I ordered something to sit on the top of that box (I gutted two of those boxes years ago to hide small appliances. My rule is only one appliance on a countertop) to hide the cord.
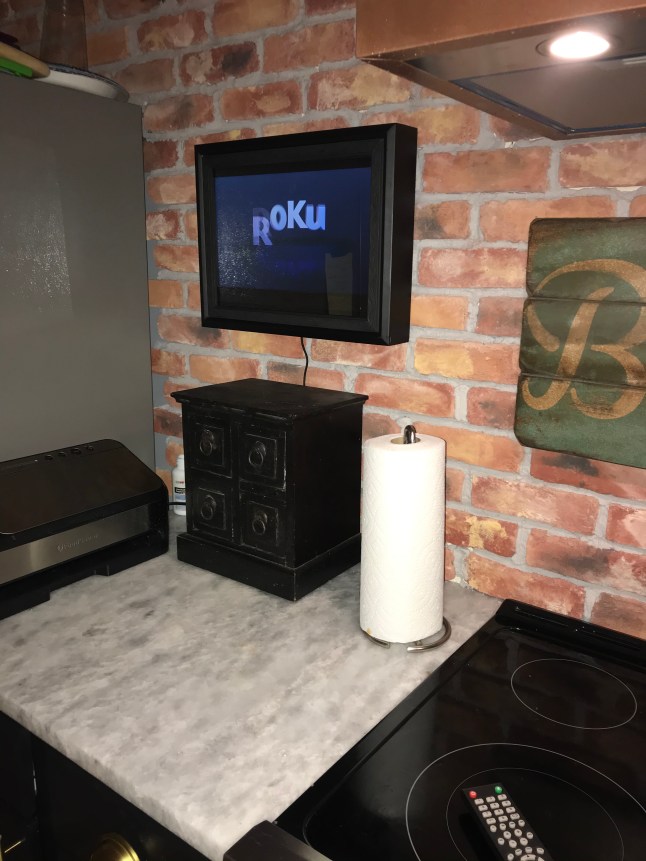
I ordered something to sit on the top of that box (I gutted two of those boxes years ago to hide small appliances. My rule is only one appliance on a countertop) to hide the cord.
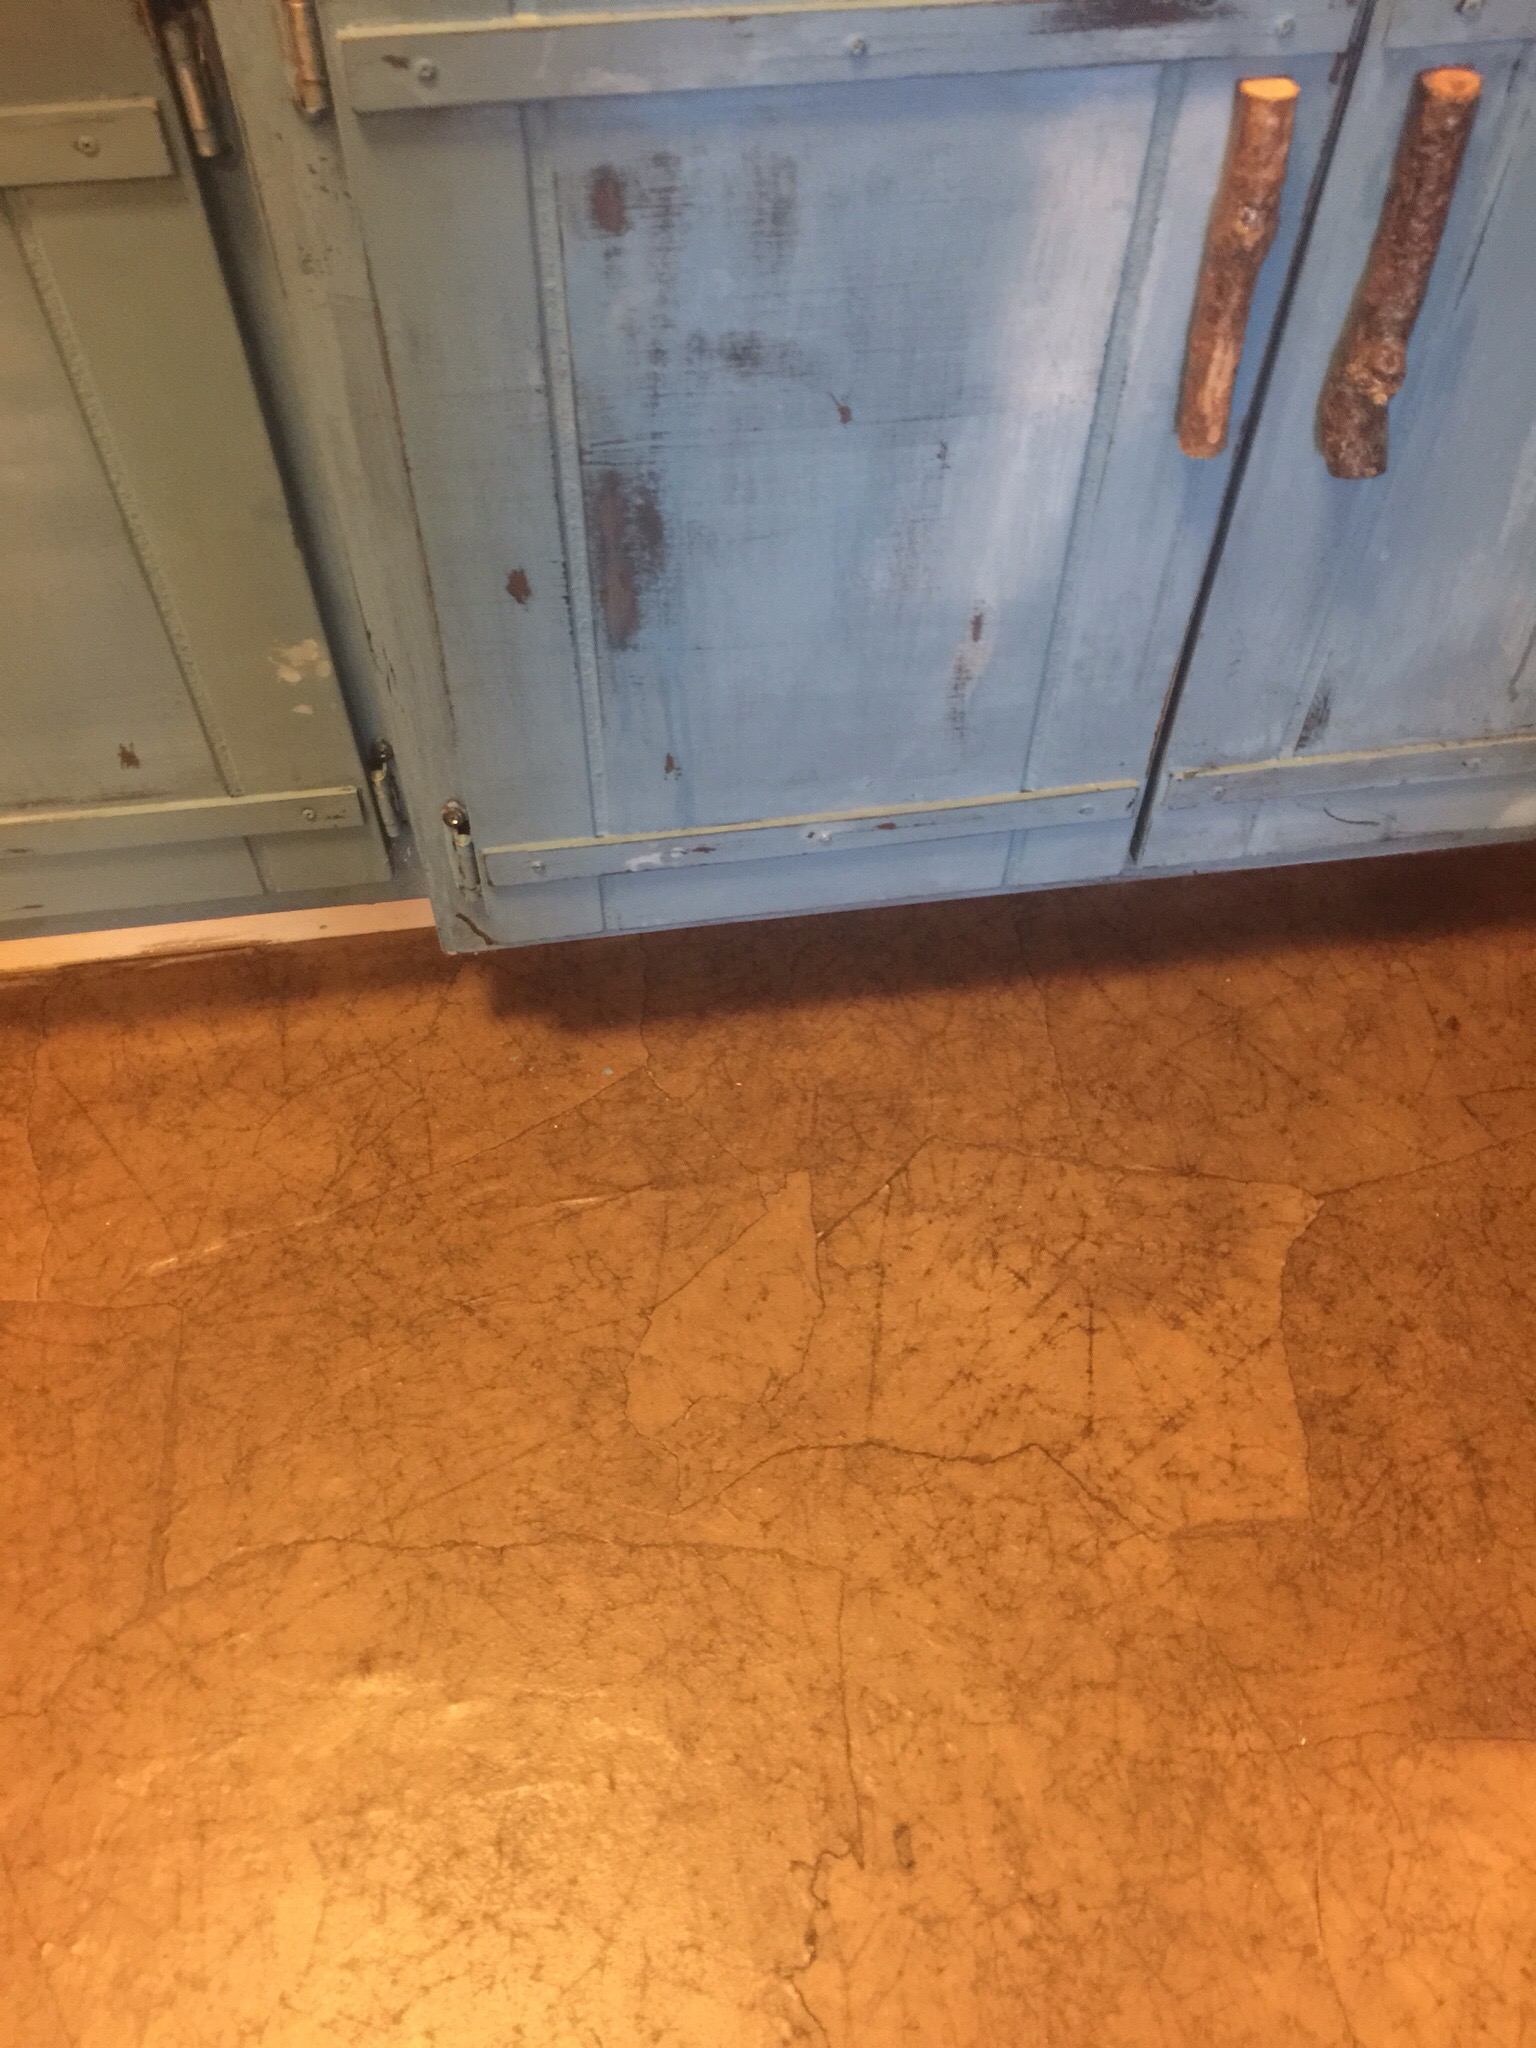
As my last post ended, we had bought a house in Lexington, KY. It’s cute and although we moved kicking and screaming in a sense, it’s a nice place. But this is what the kitchen looked like:
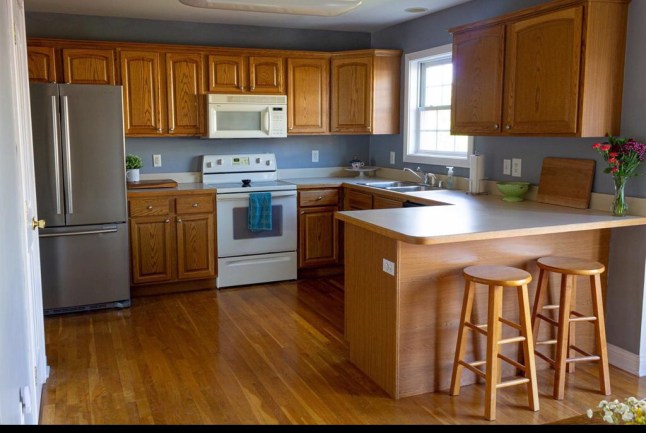
Yikes is all I can say!
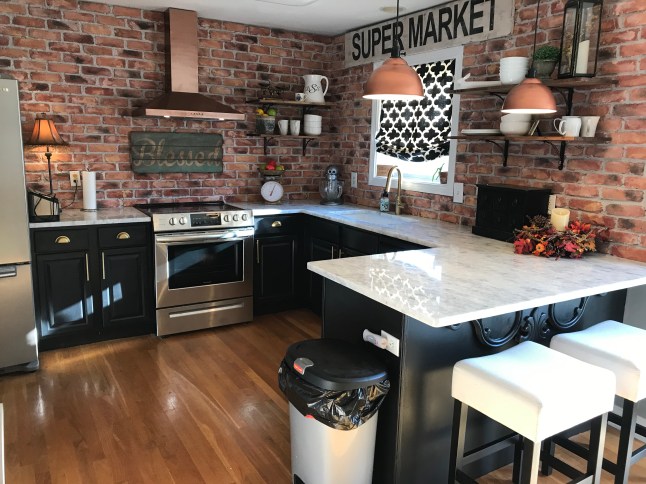
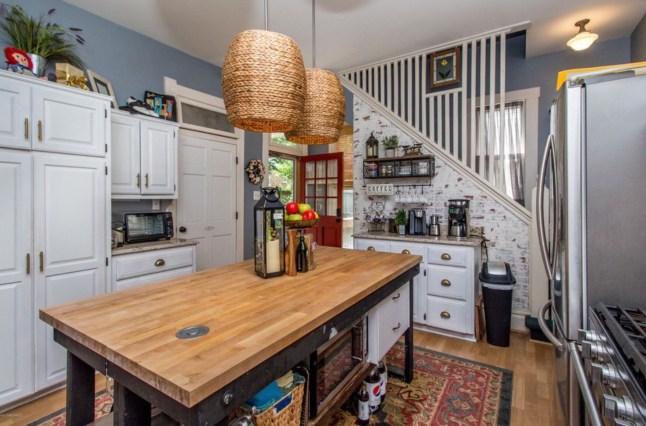
I knew I wanted something very different and something bold. This is the finished product 2 months later….
I started my plan to tear out all the upper cabinets, much to my husband’s chagrin. He was not happy! Sorry, dear, we’re doing it.
After the uppers were gone, we ripped out the countertops. I was so nervous about going to a design center to talk about nice countertops. A little intimidated, actually. Well, that was silliness because it was a breeze. The day we visited the place, I picked out my choice of material and the slab. They scheduled the measuring for a week later and 6 days after the measure, the countertops were installed! I couldn’t believe how easy and quick the entire process would be.
I chose Marble for my countertops. I went in with the intention of finding the perfect Quartz. I knew I didn’t want granite. The patterns just aren’t something I am interested in. They are too busy for me. I want all the movement in my kitchen to be on the walls.
Although I found a bunch of quartz slabs that I loved, gosh, the price was a lot more than i had hoped. That’s why I started looking at the marble slabs. The entire bill for the countertops and single basin sink came to $2,300. Not bad!
I had done some research on Marble since we have all heard the horror stories about the etching and staining that marble is subject to on a daily basis, but it was worth the risk to me. I am truly not disappointed. I love it! The only thing I wish I had thought about was to get honed instead of shiny. Otherwise, it’s been wonderful. I’m just am careful with spills, getting any kind of lemon or lime juice on it. Otherwise, it’s no different than being careful with any type of countertop.
Okay, so that’s the lowdown on my countertop. Here’s how I did the brick backsplash.
I was pretty set on wanting a brick backsplash. Just something about the warmth and coziness of brick. Something I needed in our new life here in Kentucky.
As everyone does, I searched and researched what kind of brick to use and how to adhere the stuff.
This is what I went with. Home Depot’s Old Chicago Brick. It was reasonably priced. I liked that each brick was a little different and looked old and “real”, though it really is brick, just that it’s much thinner.

I used Loctite Power Grab Heavy Duty Construction Adhesive used in a caulking gun. It worked great! I was able to push on the brick for only a few seconds and it held firm every time.

For spacing I used a 1/2” dowel rod. But let me assure you, about 5 rows into it, you end up just using your eye. After all, I wanted it to look like it had been there forever.
Cutting the bricks wasn’t too terribly difficult. If you score then, then snap them, most broke perfectly. There were a couple of tough ones and a little frustration but all in all, it worked. We used a saw to score deeper on some and that worked as well. A tile cutter didn’t work for us on these bricks.
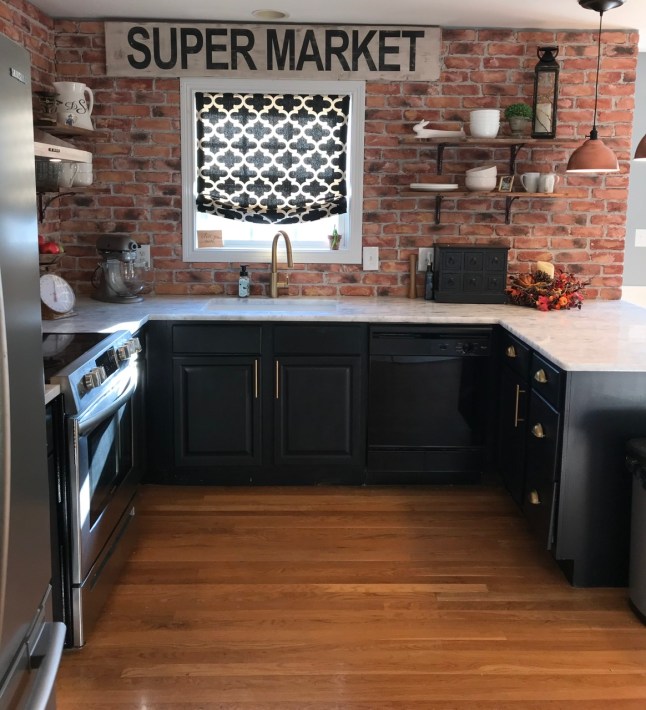
Here’s a picture of the first few rows that i completed.

My only problem with putting the bricks on the wall was completely my fault. I thought I would be so smart to wait until the countertop had been installed before putting the bricks on. Bad idea. Duh, how was I supposed to get the top bricks on??? You can’t stand on marble! The ladder, no matter which one I tried, wouldn’t get me to those upper corners. Holy cow, was it a challenge and one I wish I had a picture of. I used one of those old people (yikes, I AM an old person!_ grab tools. The ones that you can stand and pick something up, say, off the floor. How the hell I managed to get those bricks up still amazes me, but I did it. So my suggestion would be if you have laminate countertops, use those as your way to get any sort of tile beyond your reach with a ladder! I suppose laminate could give way or crack, but I’ve climbed on them many years ago and they were fine.
Next….grouting. I tried three different grouts and mortar. My problem was even using regular mortar with a grout bag, it wasn’t adhering, so the damned stuff was falling off. It was the consistency and look and feel of just wet sand. I struggled a lot. But by the time I thought to myself “gee, Susan, move on to something else”, well, I already had dried mortar. I was stuck. So I continued with the mortar. Don’t! I couldn’t trowel it on because it would have left a finish on the bricks that wasn’t what I desired. I did use something different when I put the brick over existing ugly tiles on our fireplace. But that’s a different post!
Bottom line here. I’m not young and I was able to do the entire kitchen by myself. It took me 9 days to finish it. i love the look and it does give me that cozy, warm feeing every time I walk in to the kitchen.
It’s been a really long time since I’ve posted. I’ve completed so many projects and yet haven’t shared them. Time, some laziness in the beginning and a major change in our lives.
Three years ago we moved a mere 30 minutes from where we were living, to a quaint little town. We had stumbled on this house and knew right away it needed to be ours. An 1898 Victorian home with all the character and charm I had only dreamed of. I love this house and I love the people in this little town.
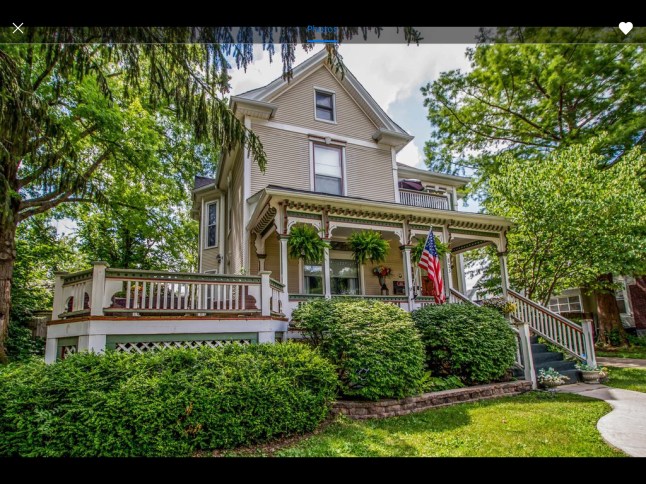
Everything was still in it’s original form. We couldn’t believe that over those 120 years, nobody had painted any of the beautiful wood. The only thing I had to work on was the kitchen. It was a challenging space, but I made it work.

Our oldest child, Todd, 39 years old, has lived with us and did so much of the work on this beautiful house. He lived on the 3rd floor. I loved him living with us. He filled our home with life. We truly were best friends.
But things changed. Last summer Todd lost his life in a car accident. 7 months later and I still can’t fathom that this has really happened to me. To us as a family. Living without my boy is a pain like no other.
I couldn’t stay in that house. Every inch of it screamed Todd to me, to us. Without Todd there, we had no other family other than our friends. So, after much thought we moved to Lexington, KY to be near our amazing daughter and boy oh boy are we blessed, son in law. They wanted us close, and we wanted to be close. It was bittersweet. I long for our grand home, but I know we did the right thing and everyone here has been so welcoming and kind and for that I thank God.
So we went from that house and that kitchen, to this….
Uh….not exactly my style I might say and those that know me and know my blog know, yikes!
This isn’t a blog about the grieving process, something I have had to, unfortunately, endure. This is a blog about decorating and home improvement.
So the next post which I promise to complete this weekend….the kitchen…..

It finally got warm enough the last couple of weeks for me to tackle our screened in patio project. The patio had really gotten out of hand the last couple of years. It was pretty and useful as you may have seen on one of my original posts to this blog and then a big dog came into our lives. He didn’t necessarily ruin the patio, but since it’s the only means of getting out in the yard, the mud on paws, then those paws laying on the furniture when I didn’t see him and, well, I gave up. I tossed the patio set and it sat for an entire year with nothing on it. It has always made me sad, I loved that patio.
This is how it was looking for way too long. We had put these garage flooring plastic things down to try and cut down on some of the mud and, well, all kinds of shit that this dog was so lovingly wanting to bring into the house with him. Well FORGET THAT. So these pictures are when I was almost finished pulling those things up. Look at that dirt and disgust!


Once I got it all swept and vacuumed, here it is again…

To make a long story short because, well, who really wants to see pictures of the “stages” of cleanup….
Here’s the final result!


We went ahead and got a wireless satellite box, so were able to put a tv out here as well. It’s turned out that we use it a lot.

Have so enjoyed being out here. I’m working now on the backyard and all the flowers and vegetables I’ve been growing. Too fun!
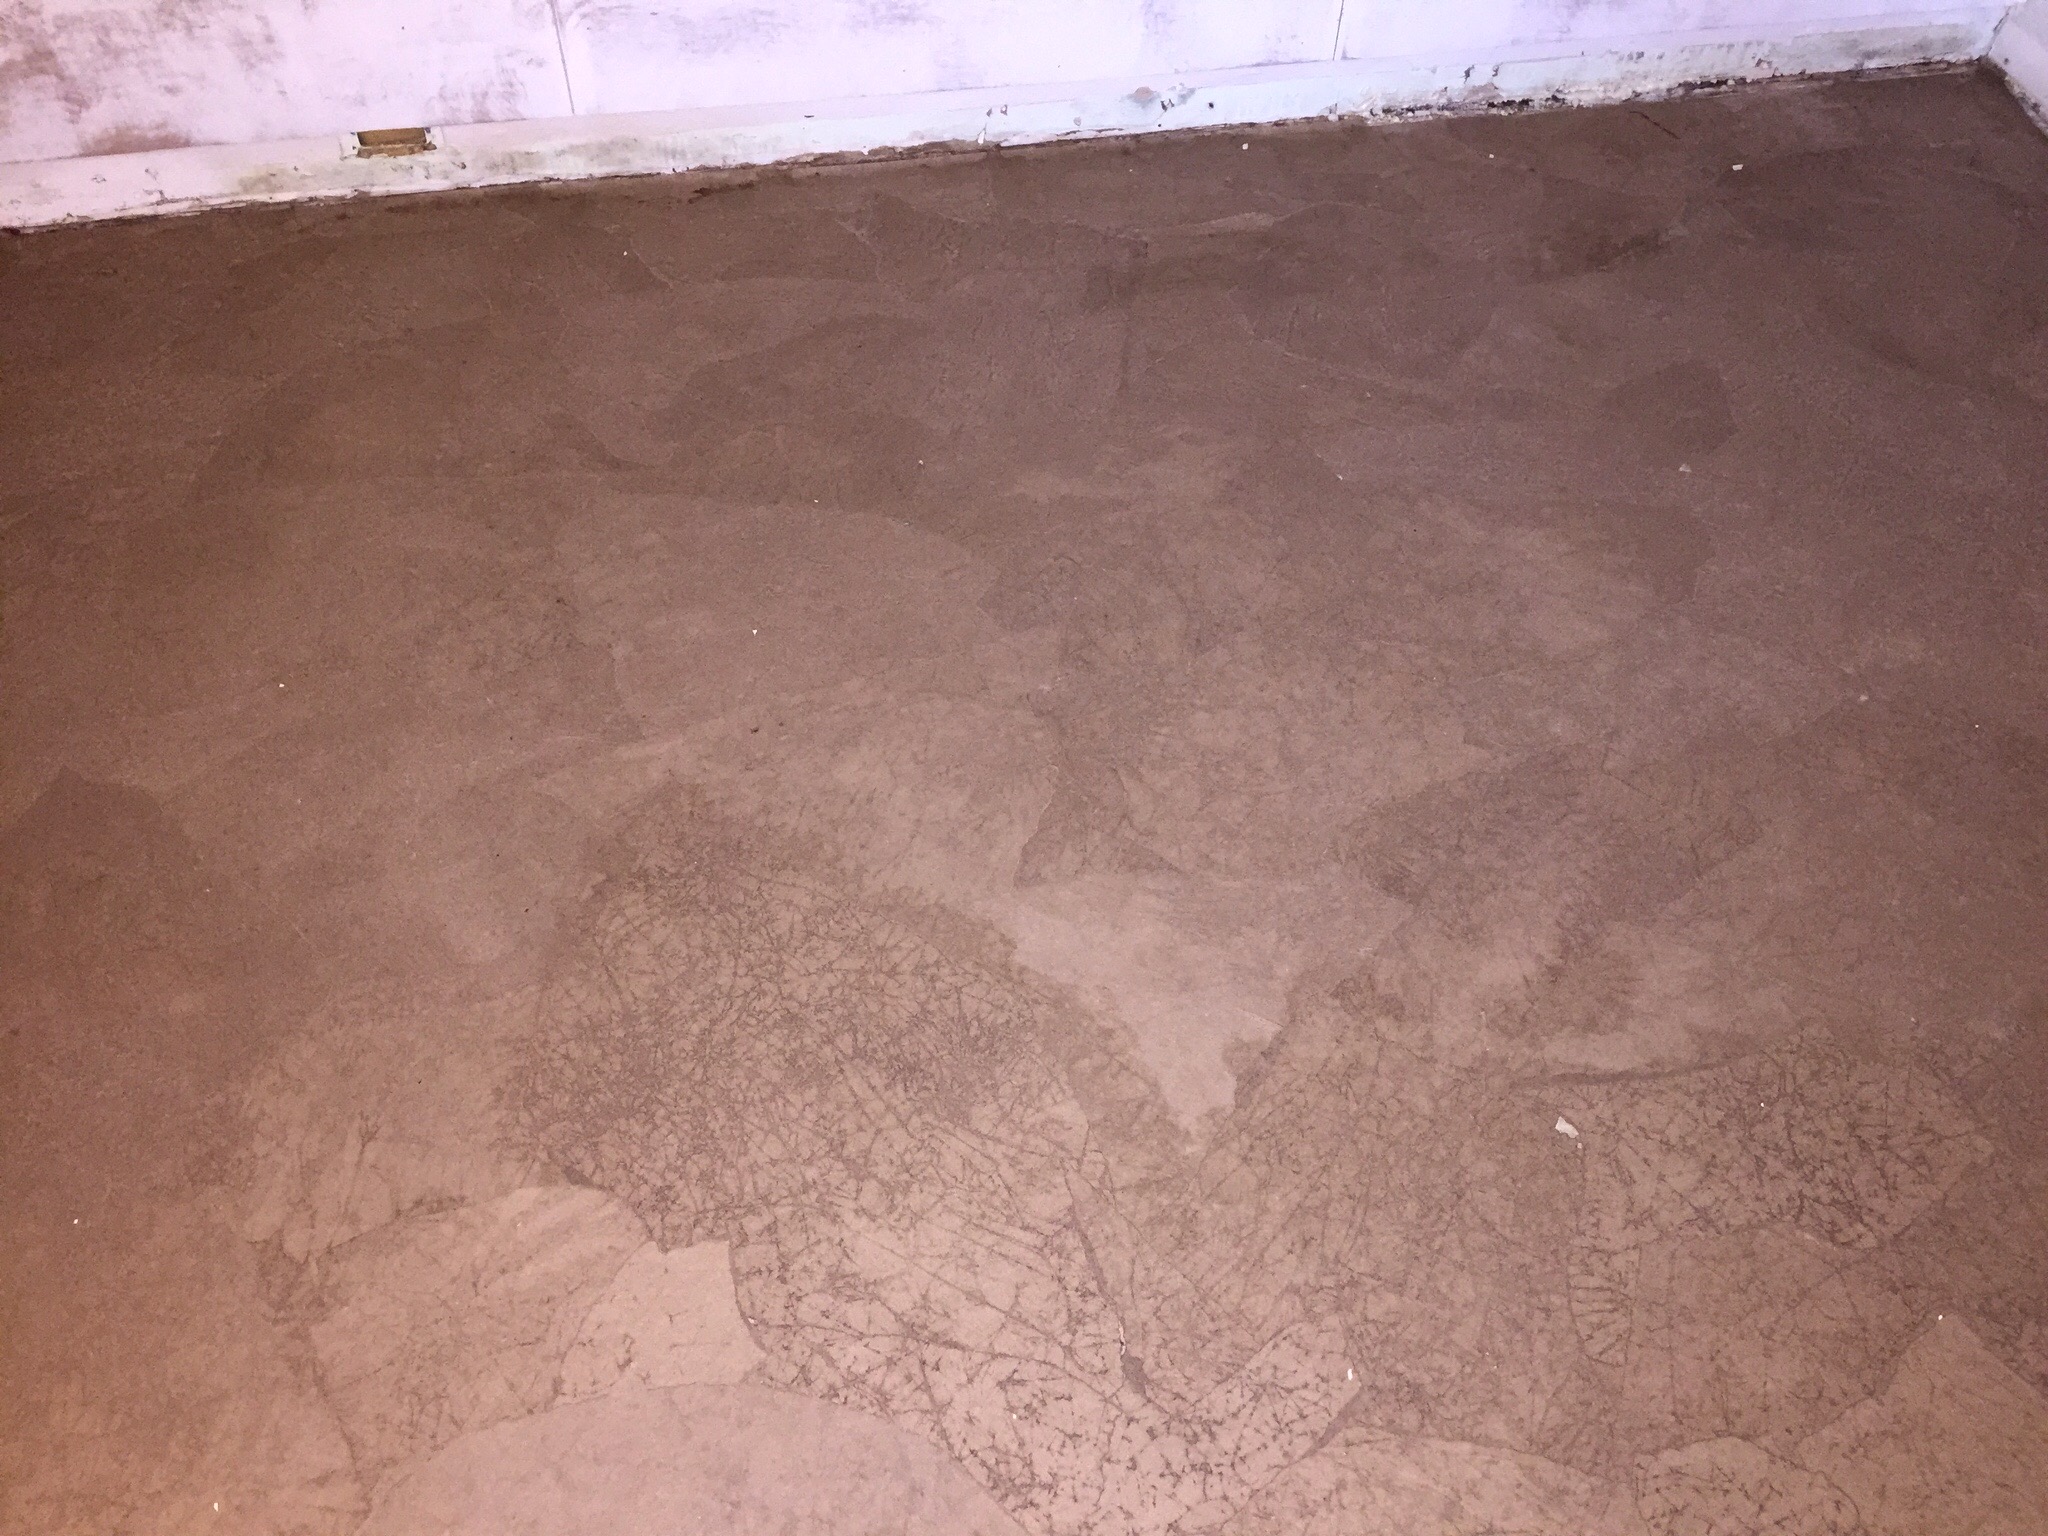
Yup, you read that right! Torn up paper bags, moistended with glue and water and voila, instant flooring that looks simply amazing.
After researching things quite a bit online and finding some great tips, I decided to give it a try on the cement floors of our lake house, aka The Guinia Pig Place, since whatever new i want to try, I try it there. So far, all of the projects have been total successes!
The paper bag flooring project was 1,000 sf. That’s quite a bit. What I did is tackle one room at a time each time we went up, so the project took me a lot longer than if I’d just stayed with it for a week or so. Regardless, it’s awesome!
As I tend to “talk too much”, let me just give the steps and then I’ll elaborate on them below:
Let dry and then come back with many coats of Polyeurathane. I used Minwax Polyacrylic water based
First, although you could use actual paper bags, it’s much easier to go buy a roll or two of brown paper at Home Depot ($11.99). I used three of those suckers in the house.
So tear the paper. And to be honest this was the part tht for me at least, was the most boring and after hours of tearing and wadding this stuff, my hands were tired! I’d start this part as we were watching tv.
Anyway, back to the point. Tear the paper any way you’d like. A lot of blogs suggested tearing them in stone like pieces, but although it was easy on some, most of the time i ended up with rectngles and squares. You don’t notice that at all! What i did was tear the sides of the paper, the straight sides, down the length of the paper so tht i could use the straight edges when applyig up against the walls. I wadded them up and put them in a separate trash bag. Then off to tearing and crinkling and tearing and wadding and…….til I thought I might lose my mind a few times. I put all those wadded up pieces in a diffferent trash bag.
I used Elmers Glue.. I wouldn’t use any other kind. I was able to find the gallon jugs of it for 14.99 at Ace. Home Depot was out of it every time I needed some, but definitely check since you’re goig to be buying your paper there. I used a 2:1 water to glue ratio, but after awhile, I stopped measuring, I just put a few “glugs” of the glue in and estimated the water I needed. I can say tht at the end, I was slpping tht damned paper down, not paying any attention to what I had done in the beginning and it looks exactly the same as the areas that I did all the right things!
I took my piece and dunked them in a bucket of the glue mixture and then rung them out by hand. You want it saturated, but not too dripping with glue. Overlap your pieces about an inch or so. Again, be random, it’s not going to show.
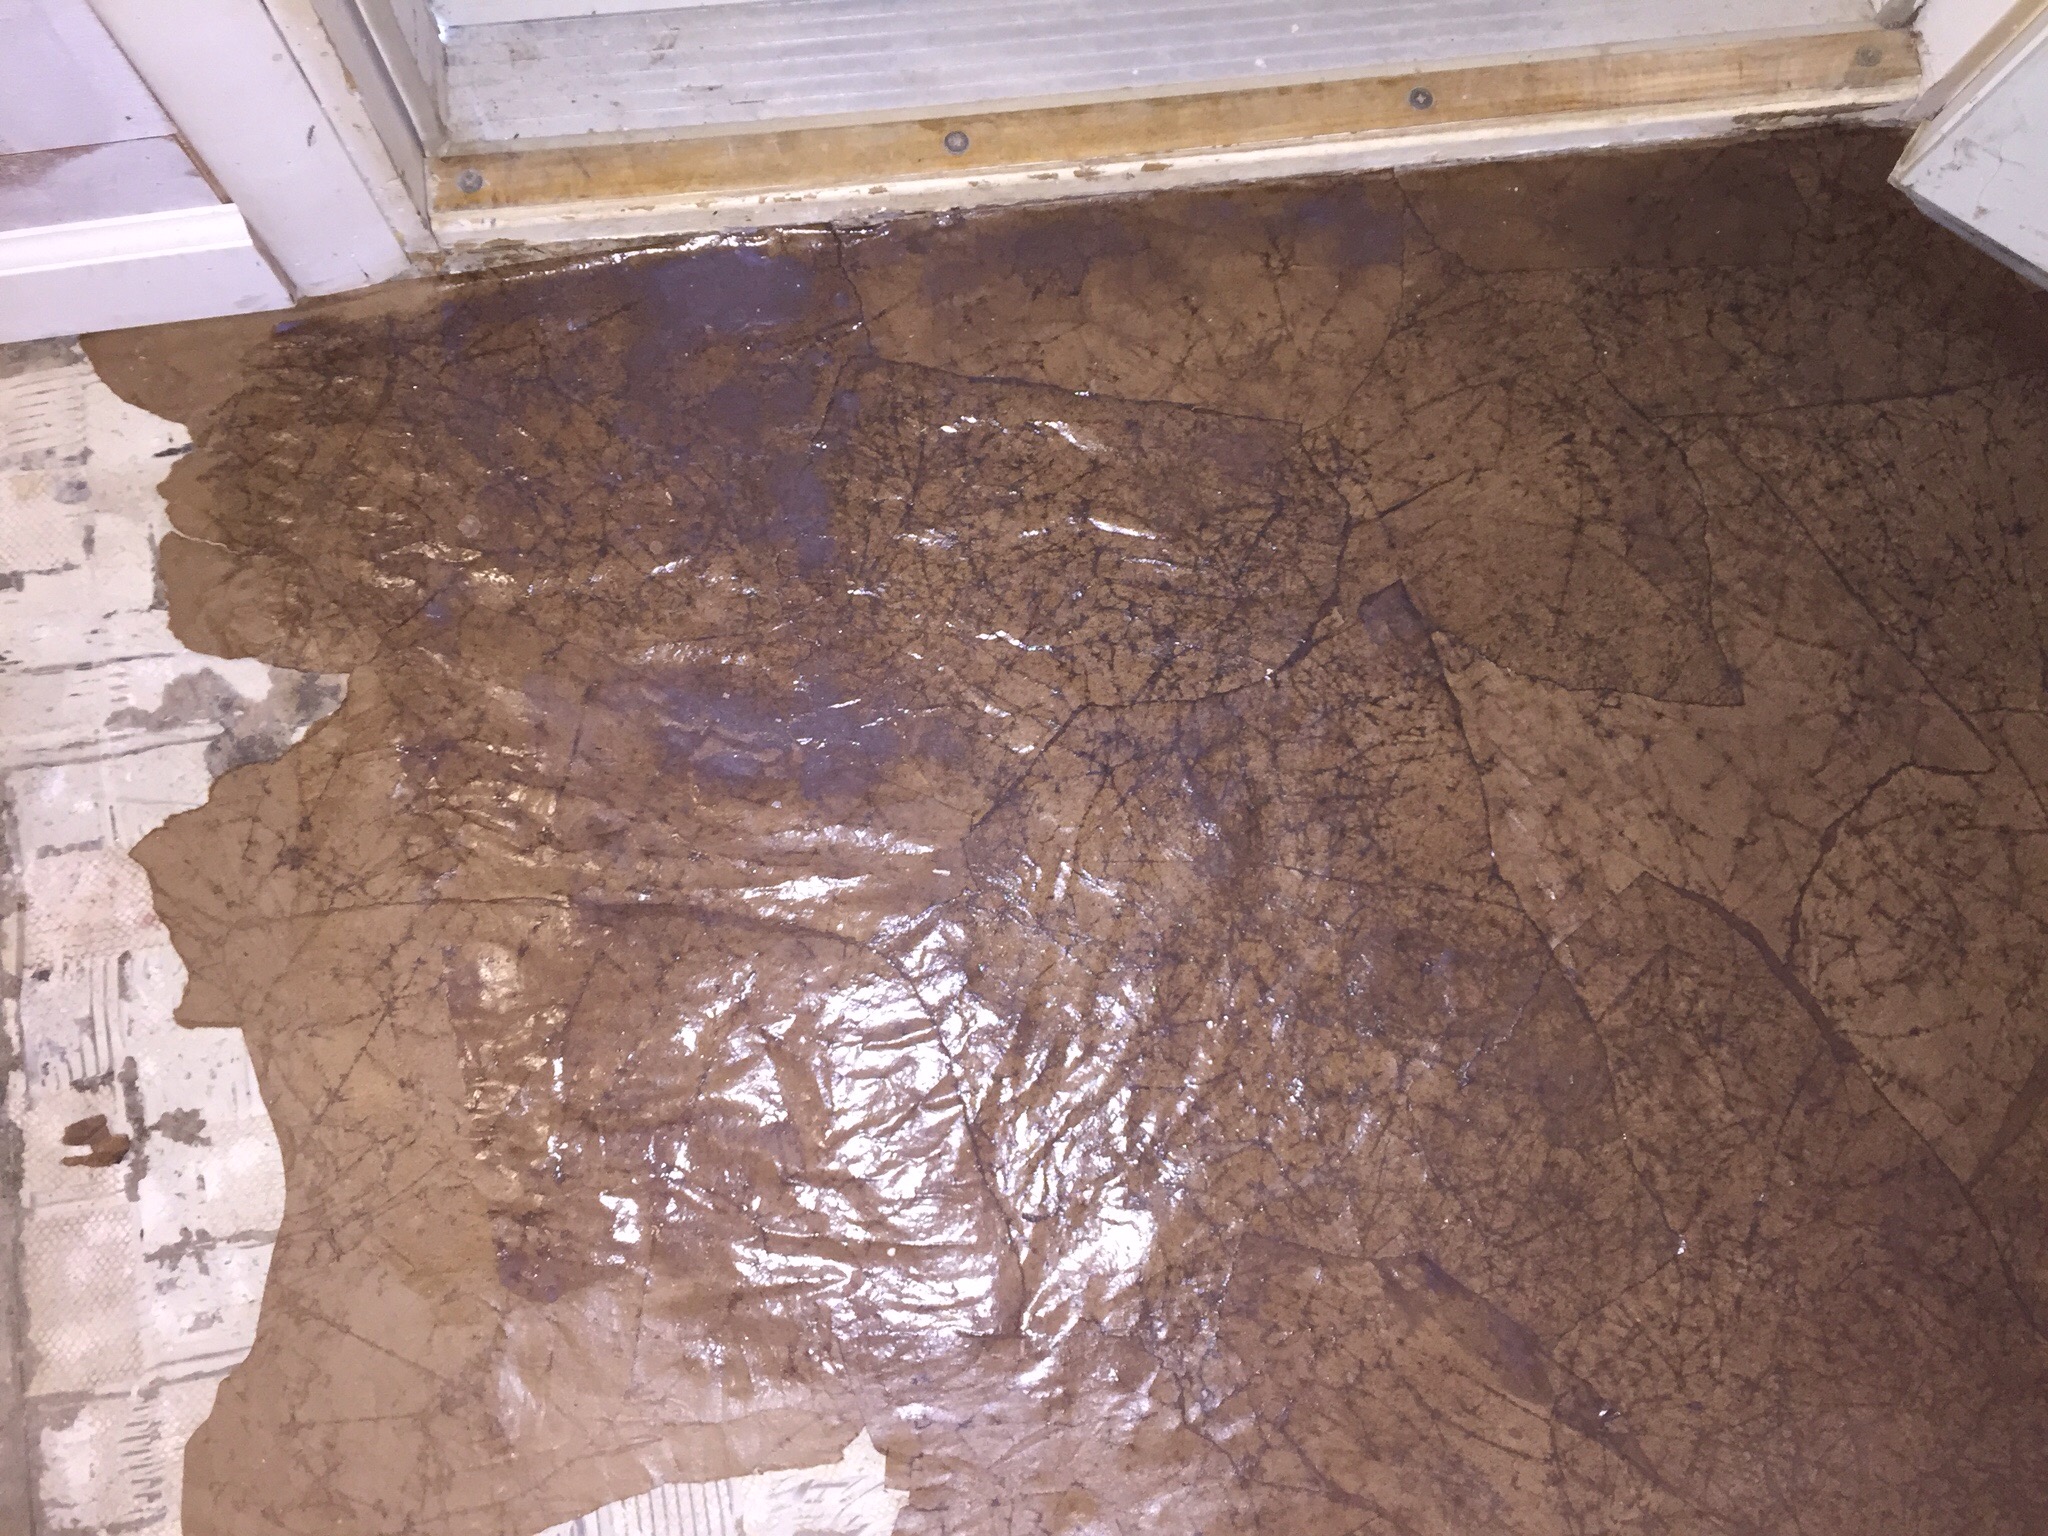
Let this dry overnight. Or as long as need be. You can tell when it’s dry. Many blogs only had instructions for putting this over a wood subfloor, so this was new territory. I did not seal our floors first, nothing. I vacuumed and mopped…..a little… This stuff went and stayed down PERFECTLY. No doubt, you will see that leather look and it is simply amazing.
Here it is after the paper dried, before the staining.
Next what I did was stain the paper flooring. You can leave it natural, but I wanted something a little darker. Not to mention that when you put the stain on, it really brings out the wrinkles, which is what makes it look like leather. What I’d do, in order to give myself a walking path throughout the house, is glue one section, say a 10’x10′ section, let it dry, and then stain it and begin a new section. You can’t tell where I stopped and then started again at all. This proect is very, very forgiving. Ahh…my kinda project!
After the stained paper was dry, which took about 8 hours, longer than I had initially thought it would take, you can apply your polyurethane. Now, I used an oil based stain and a water based poly. No problem at all and was suggested by others as well. I put 5-10 coats on. It dries so quickly tht it doesn’t take long. The less amount of coats was only due to needing to move on in the project. You can always go back and reapply more.
I got a little concerned when, after applying the poly, it started to wrinkel. Rest assured, it’ll dry smooth again.
So when it’s all said and done, this is what you are going to get.
I was sitting here wondering what I could post today and thought, DUH, my screened in patio. I keep posting current projects and forget those that I did a few years back.
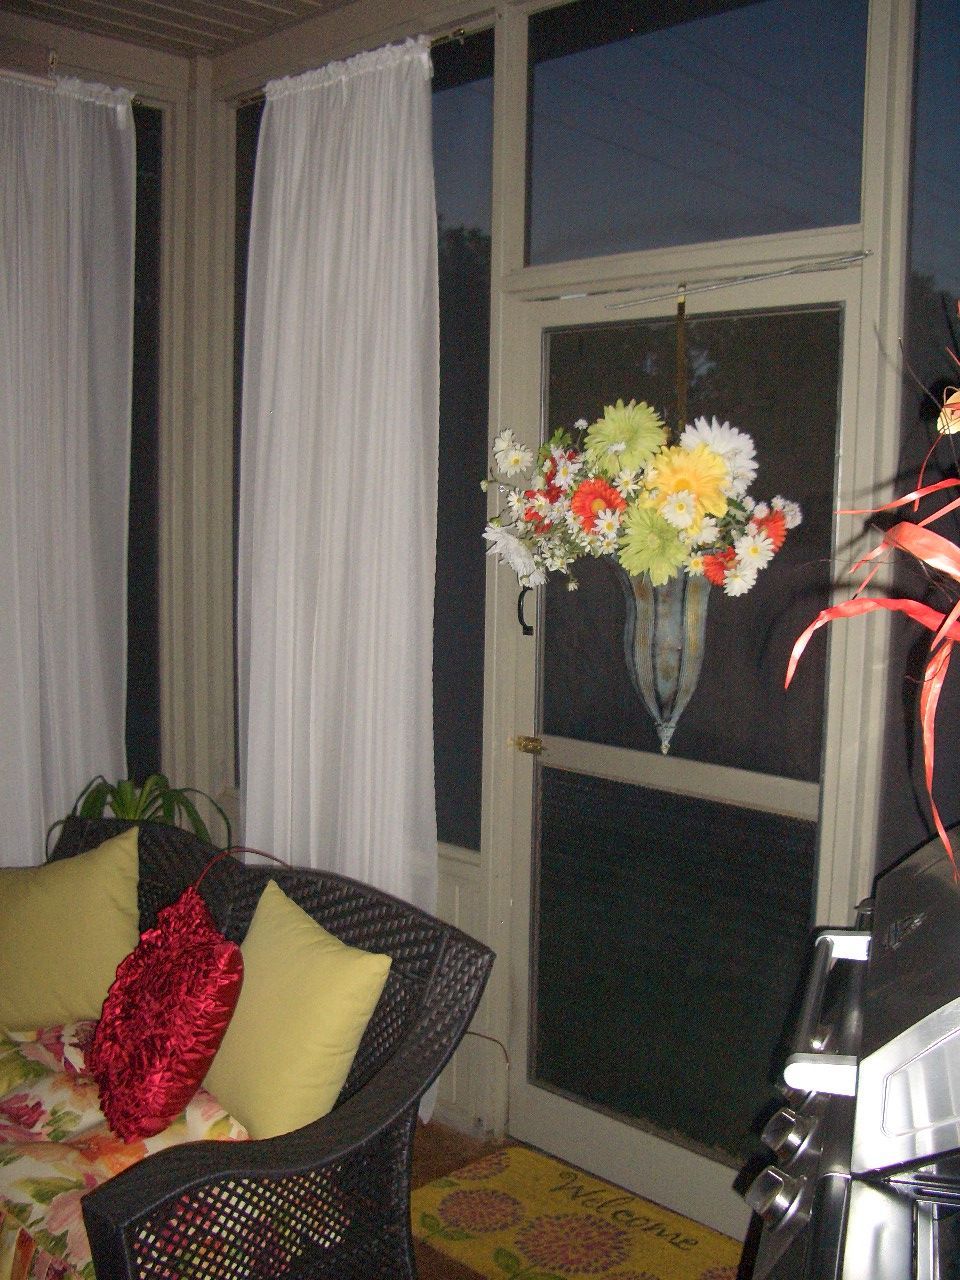
Our screened in porch isn’t very big, 10′ x 12′, but I wanted it to be an extension of our home. Living here in Columbia, MO, there are so many days and evenings that are perfect for spending outdoors.
This is what I started with. I wish I had backed up a bit to get a more broad picture, but I think you get the idea:
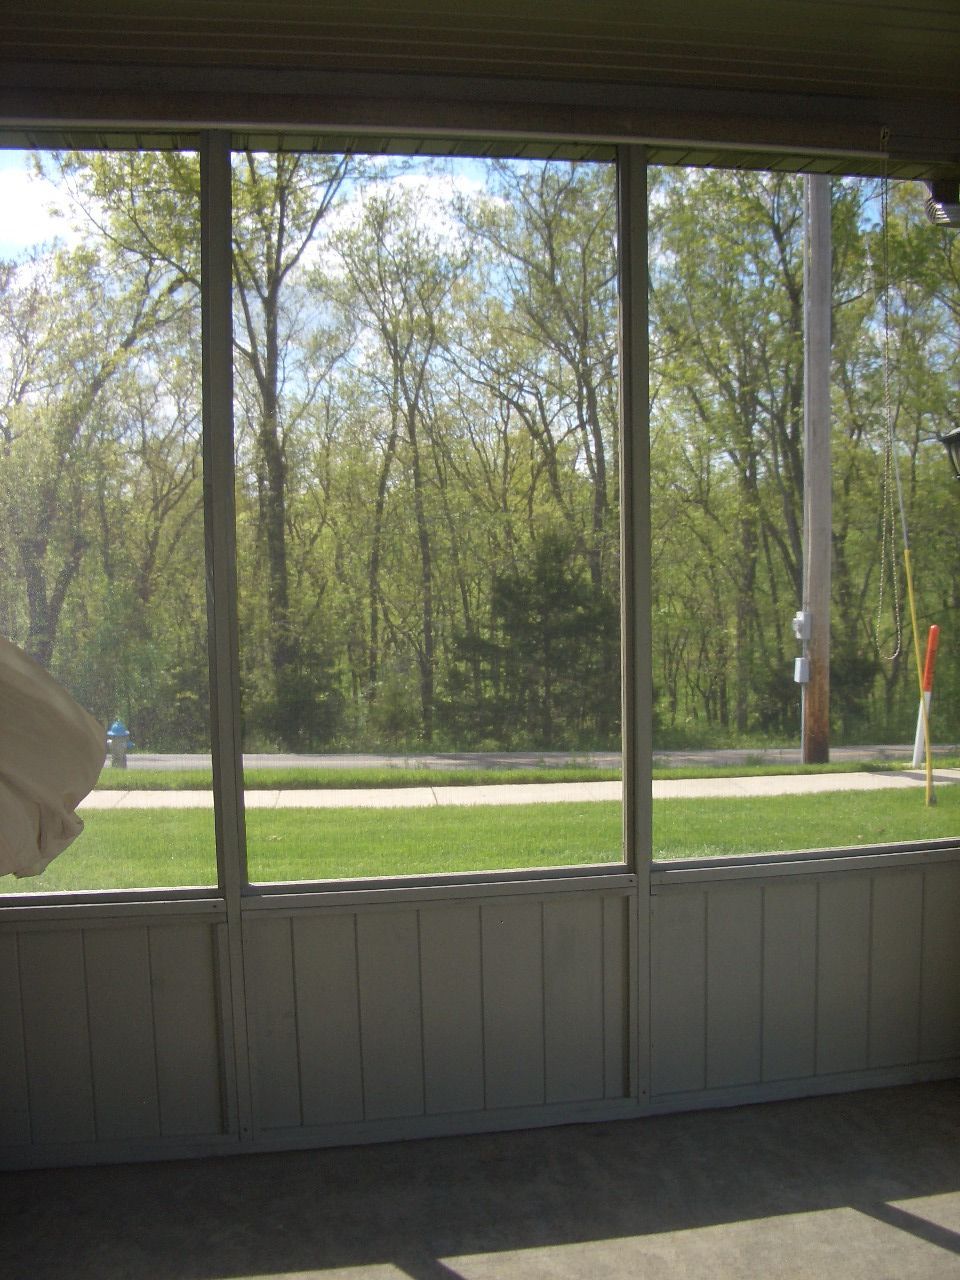
We actually had the patio enclosed. It already had a roof so it was very inexpensive to have someone come out and enclose it for us. Took the guy less than a day and was only $700.00.
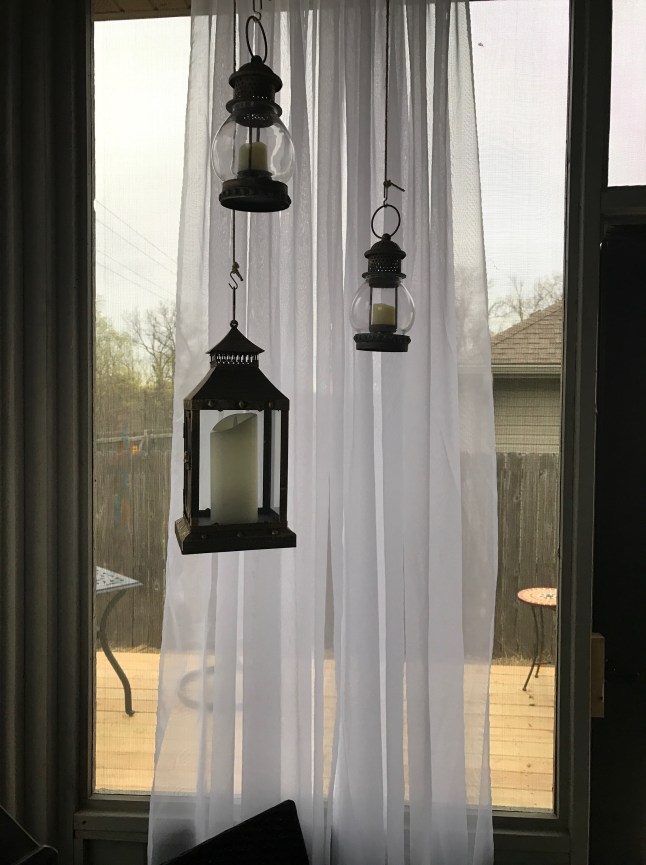
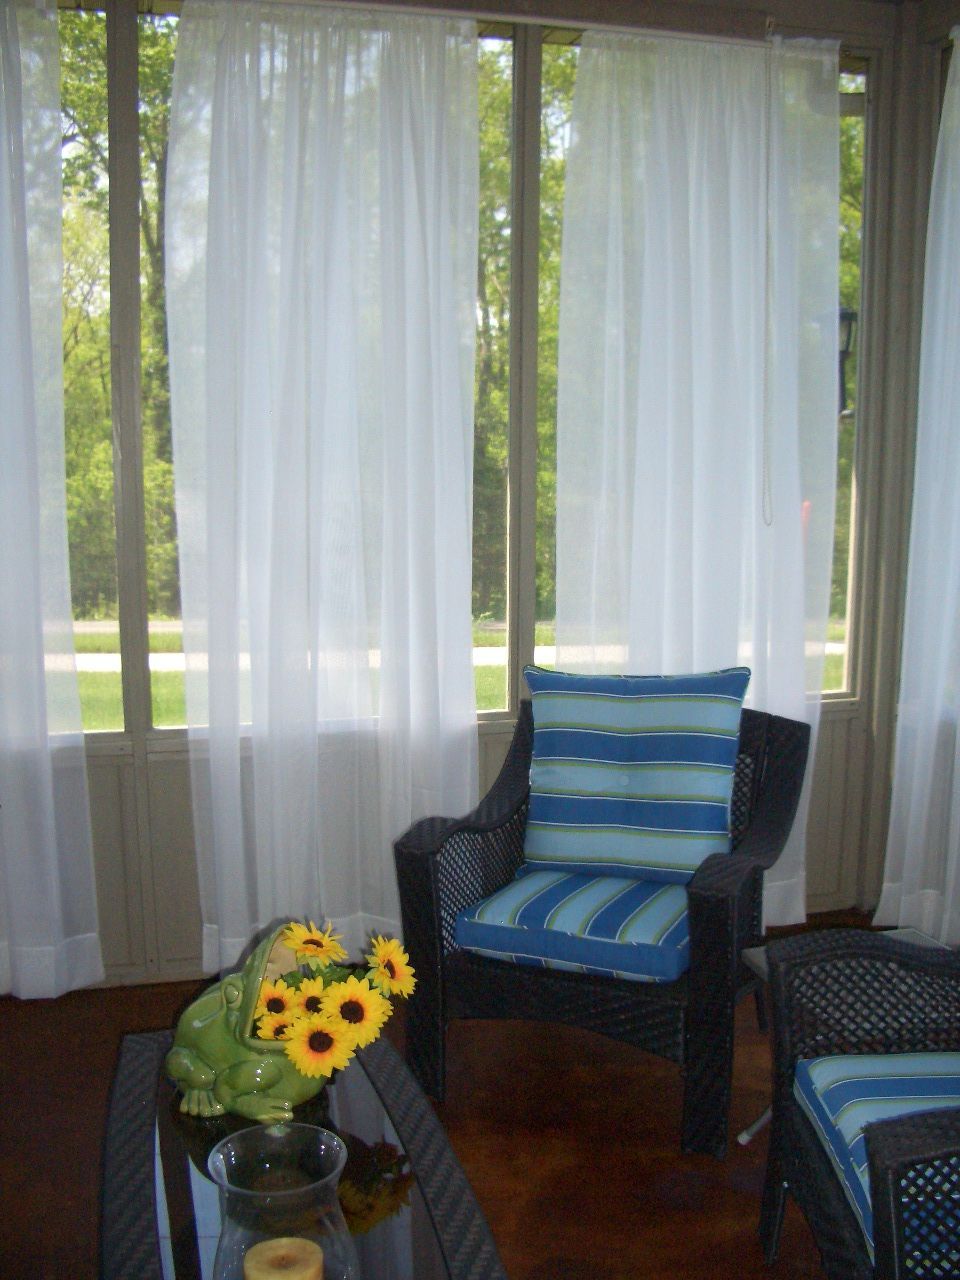
I wanted to have sheers hanging. Shoot, this was way before it was a popular idea, so it was challenging to find some that would be long enough. Now? You can find them everywhere! I found these in Penney’s, online. Not expensive at all and boy have they held up. In the four years that I’ve had them, I’ve washed them twice. If I had any inclination to sew, these would have been a breeze to make but me? Sew? Uh, nope! All we did was hang them on a cheapie rod.
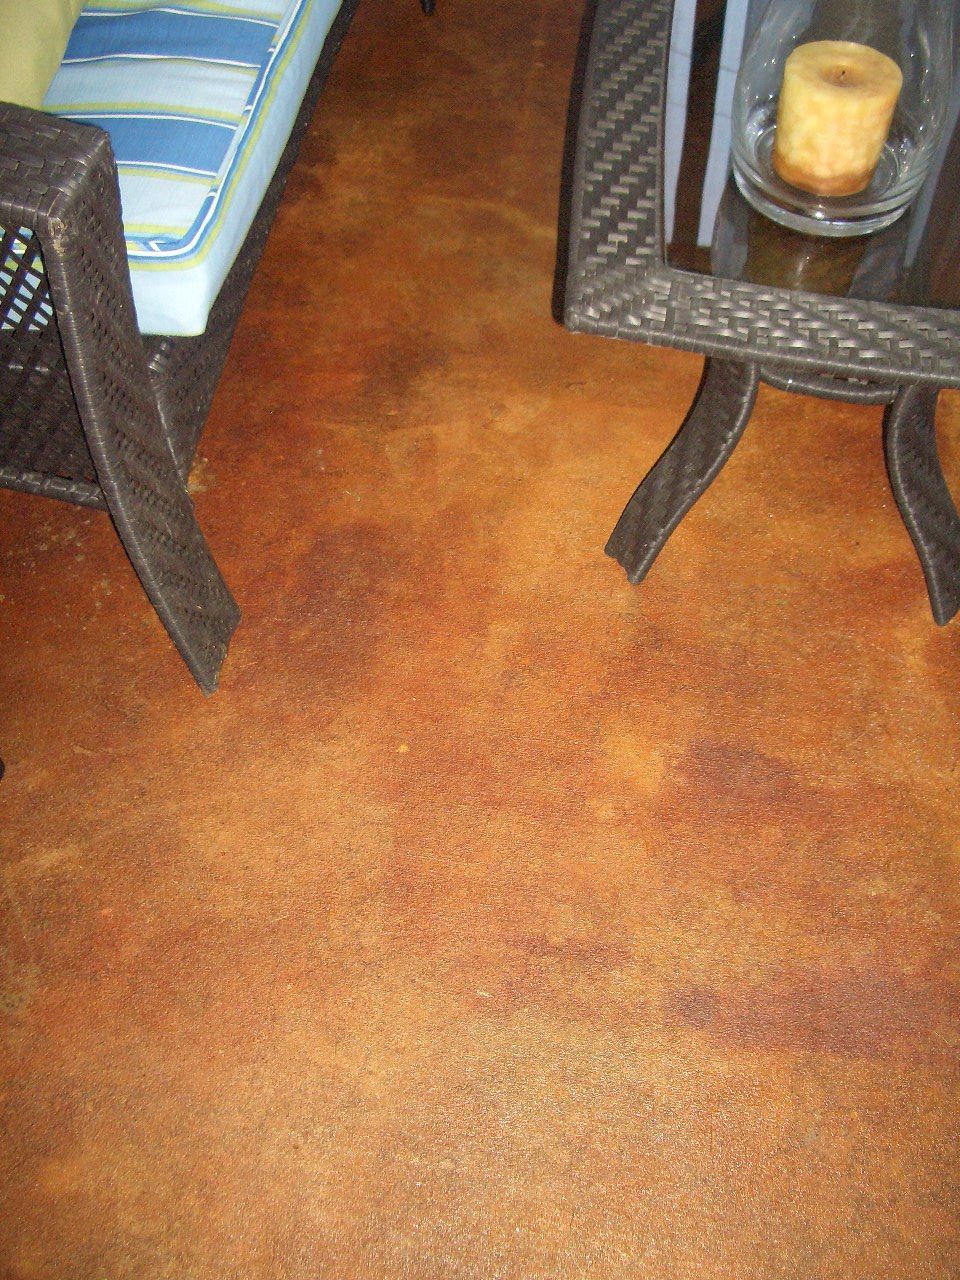
I’m a bit out of order here because once I hung the curtains, I decided to stain the concrete! I just tied them in knots so they wouldn’t get in the way. Here’s how I stained them.
I picked out a concrete stain that I thought would be pretty neutral. It’s funny how it looked afterward, because the differences in color weren’t intended, but I was so happy with the results. I washed the concrete floor of the patio, but to be honest, I didn’t go nutso crazy doing it. The most important thing I feel is that you vacuum it. Afterward, I merely rolled the stain on, after watching some YouTube videos. Of course you need to seal it. I was a bit concerned about it being slippery, but since we don’t have a pool in this house, it wasn’t that big of a deal. I got some garage floor sealer, and again rolled it on. I put three coats of that on.
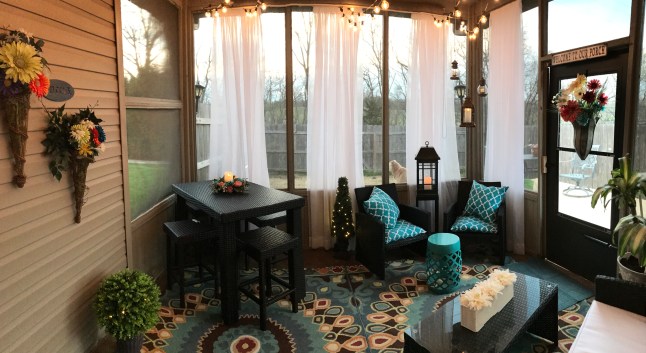
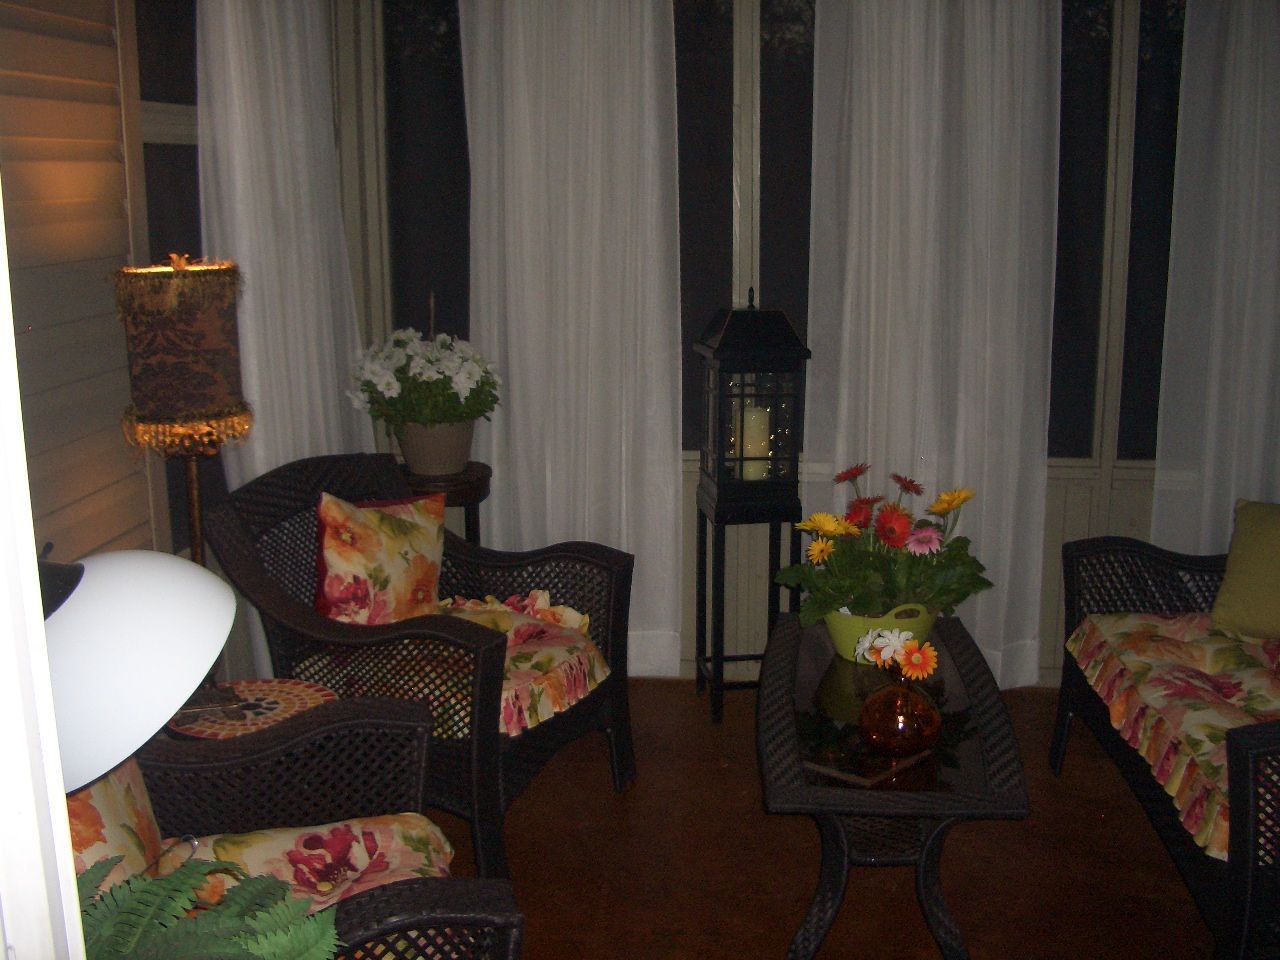
I’ve since changed out the cushions on the furniture and moved the furniture around, so here it is now!


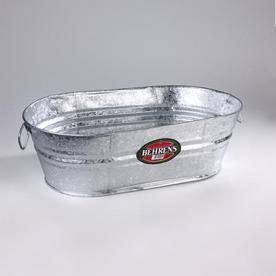
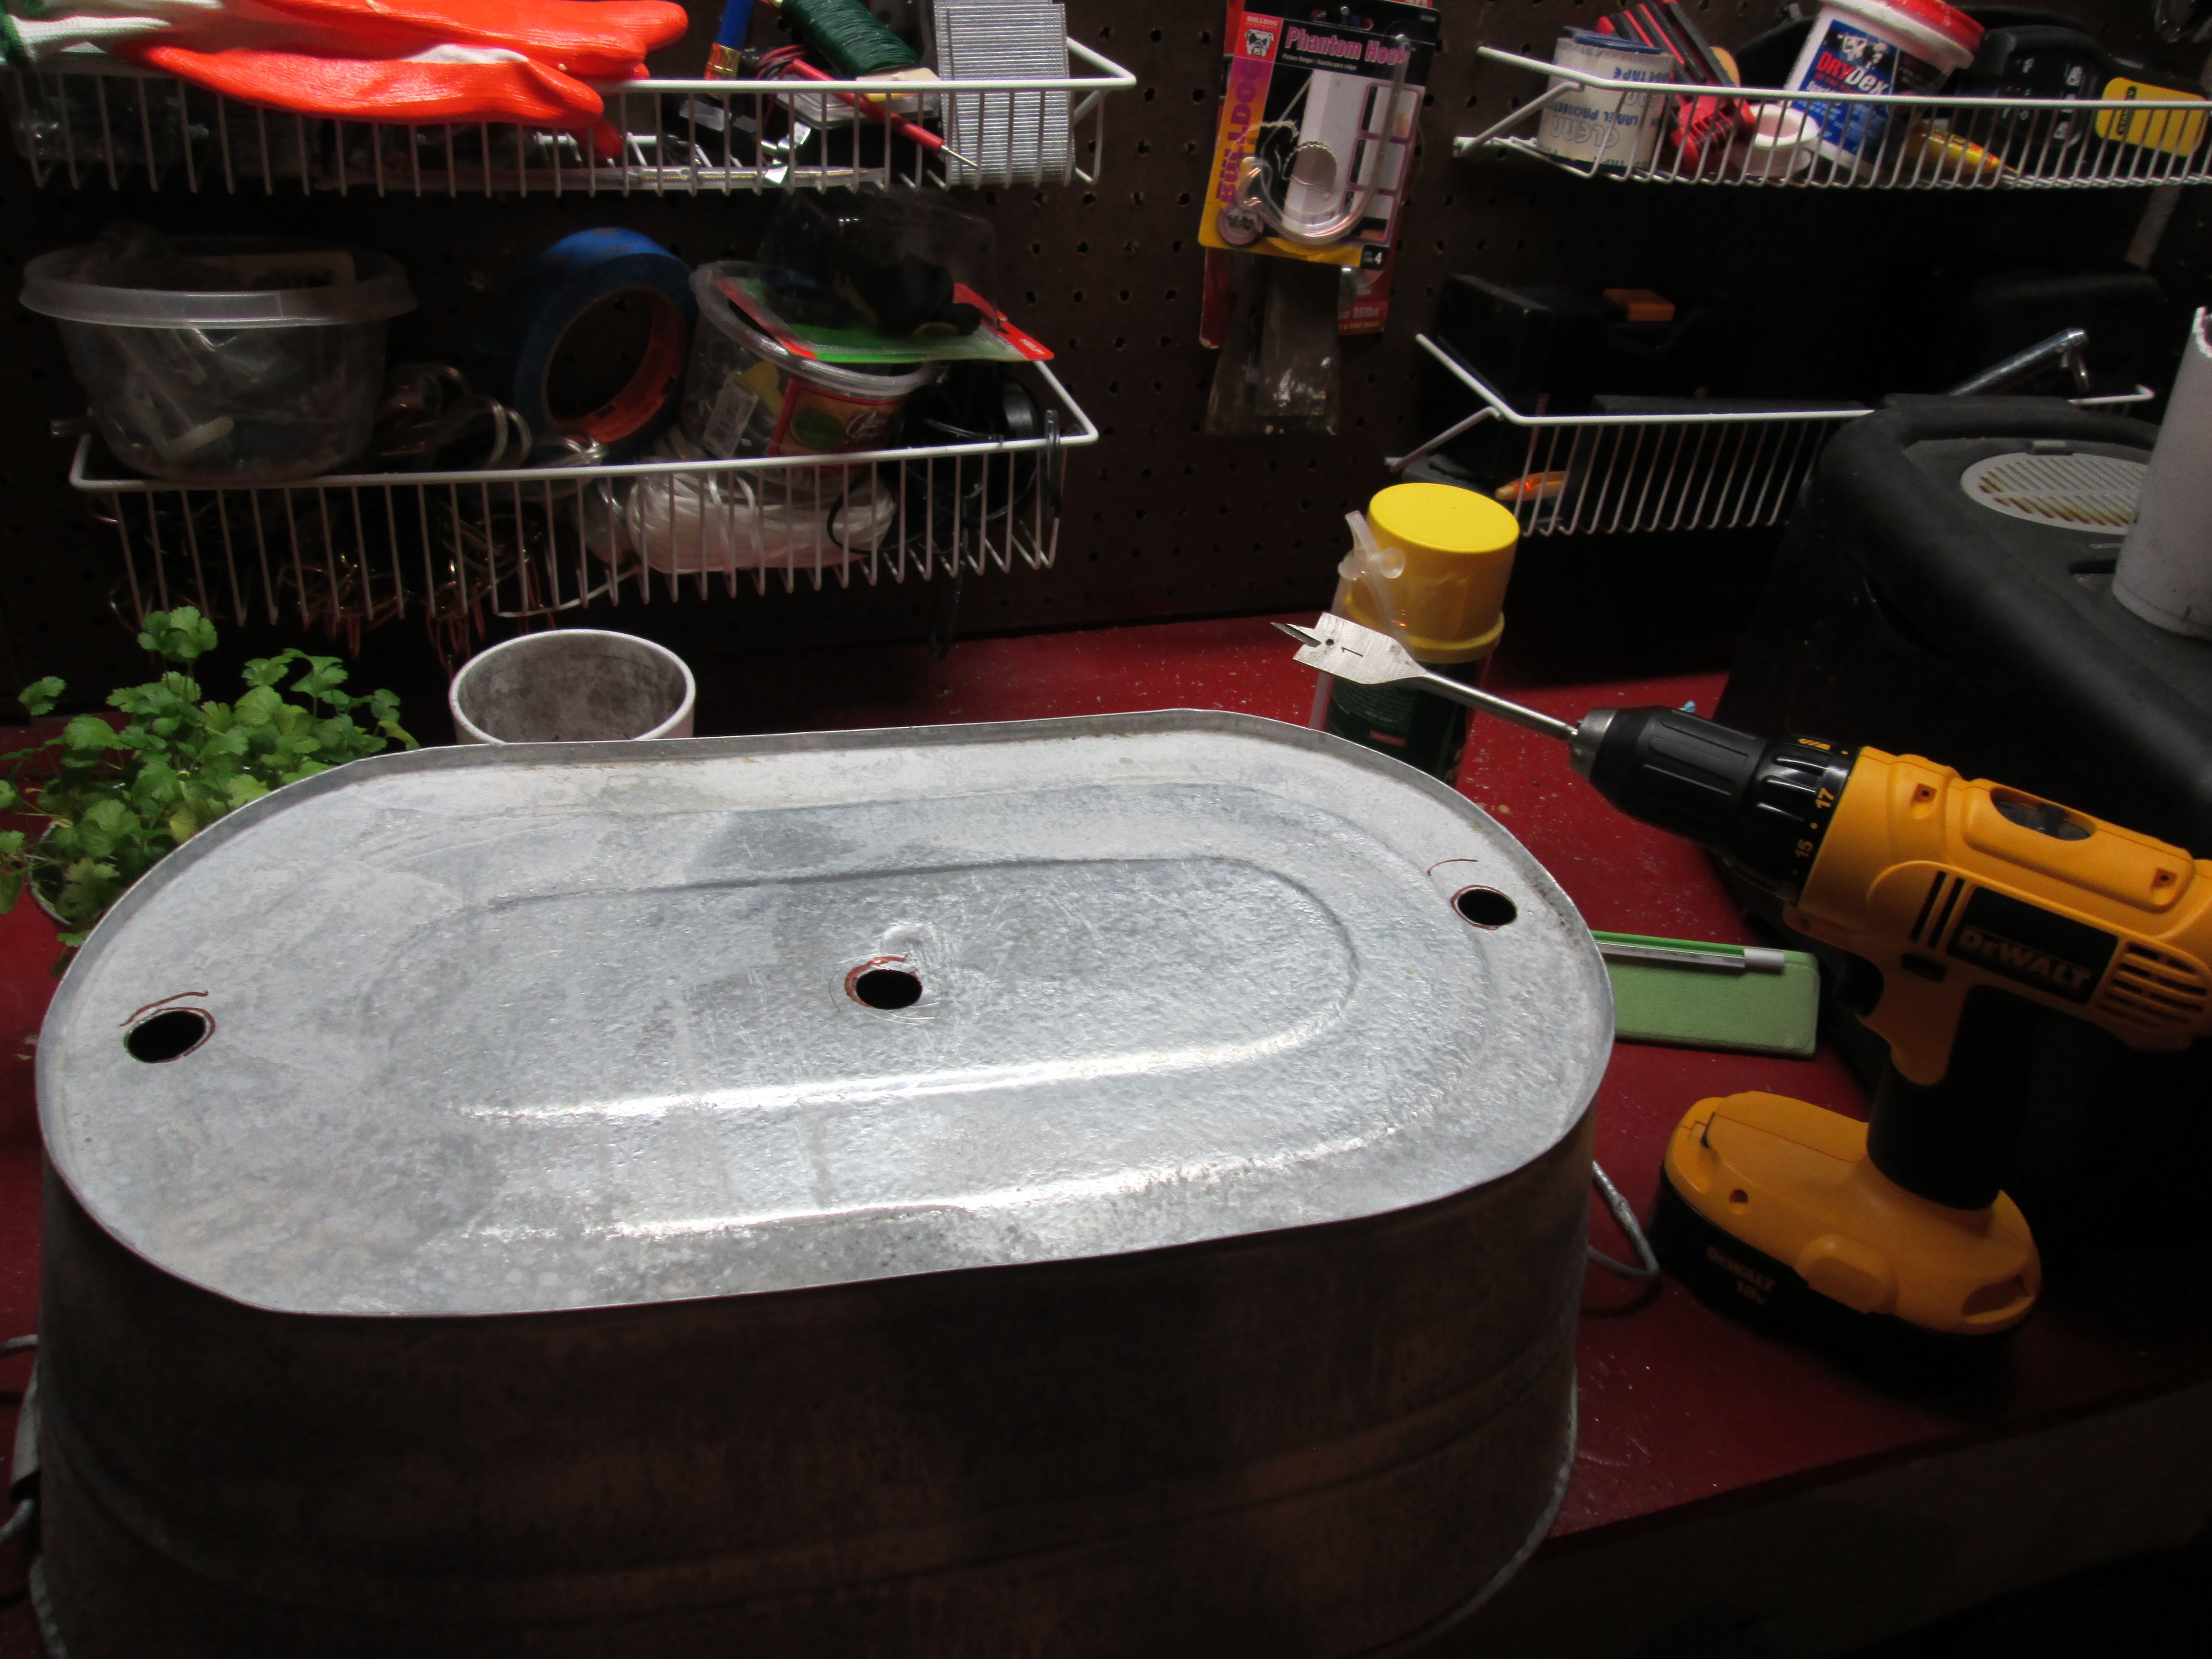
Changing the pendant shades is something I like to do. The quirkier the better! It all started with me seeing an old rectangular bucket (for lack of a better word) in a flea market. I didn’t think much about it at the time, but when I got home I realized “hey, I could make a shade for the pendant lights with that”! Well damn, the thing was gone when I got back to purchase it. I searched high and low but couldn’t find anything similar.
I started hunting for new ones. The largest I could find, other than one that would have been way too big, was the Behrens 5.5 Galvanized Tub in Lowe’s. $14.99. Bingo!
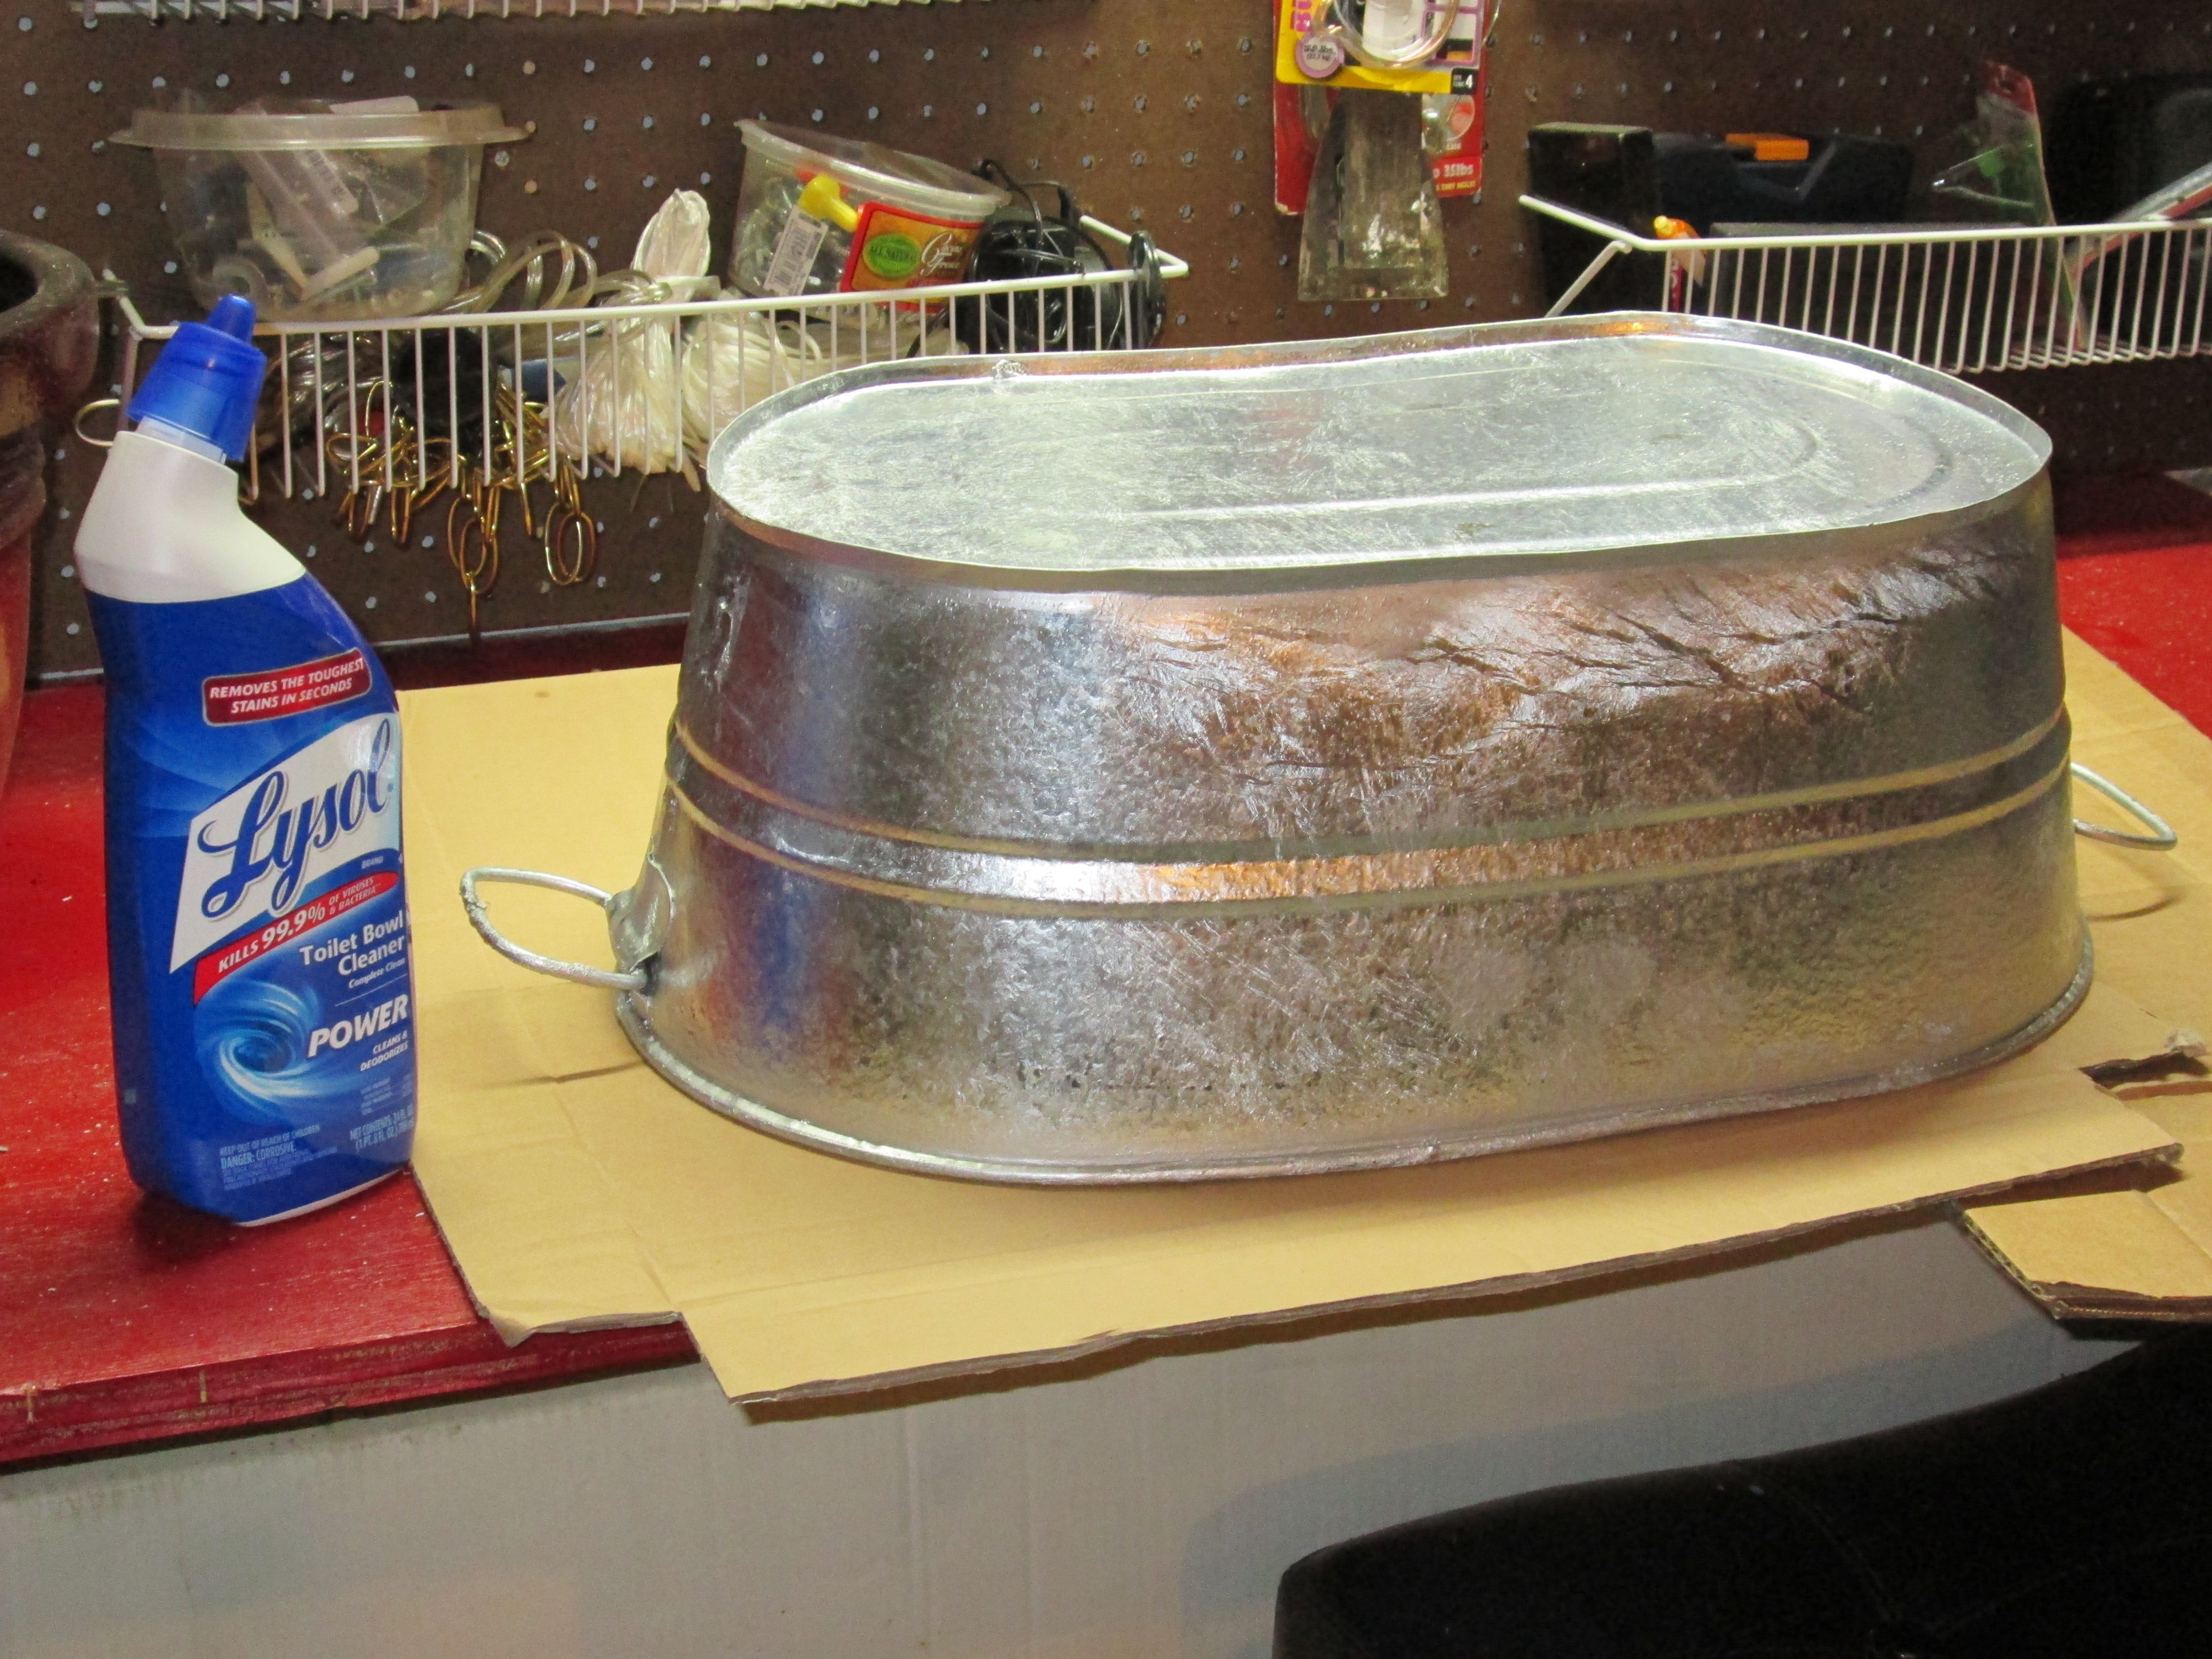
I didn’t want it to look new, but aged. After doing a little research, the best way to give it the aged look was none other than toilet bowl cleaner! Yup, you read that right. You douse it with the cleaner, let it sit, rinse it off and voila’! I actually left mine outside in the sun for a couple days. I would have liked a little more patina, but this still looks aged. No doubt, knowing me, I’ll take it down and try to age it a little more!
To mount the tub into the existing lights wasn’t difficult at all. Ideally, instead of three hanging lights, two probably would have been better, but I didn’t want to buy anything.
I took the existing “shades” off the lights and held the tub up and made marks where the holes needed to be. I knew I needed 1″ holes by measuring the opening of the end of the light:

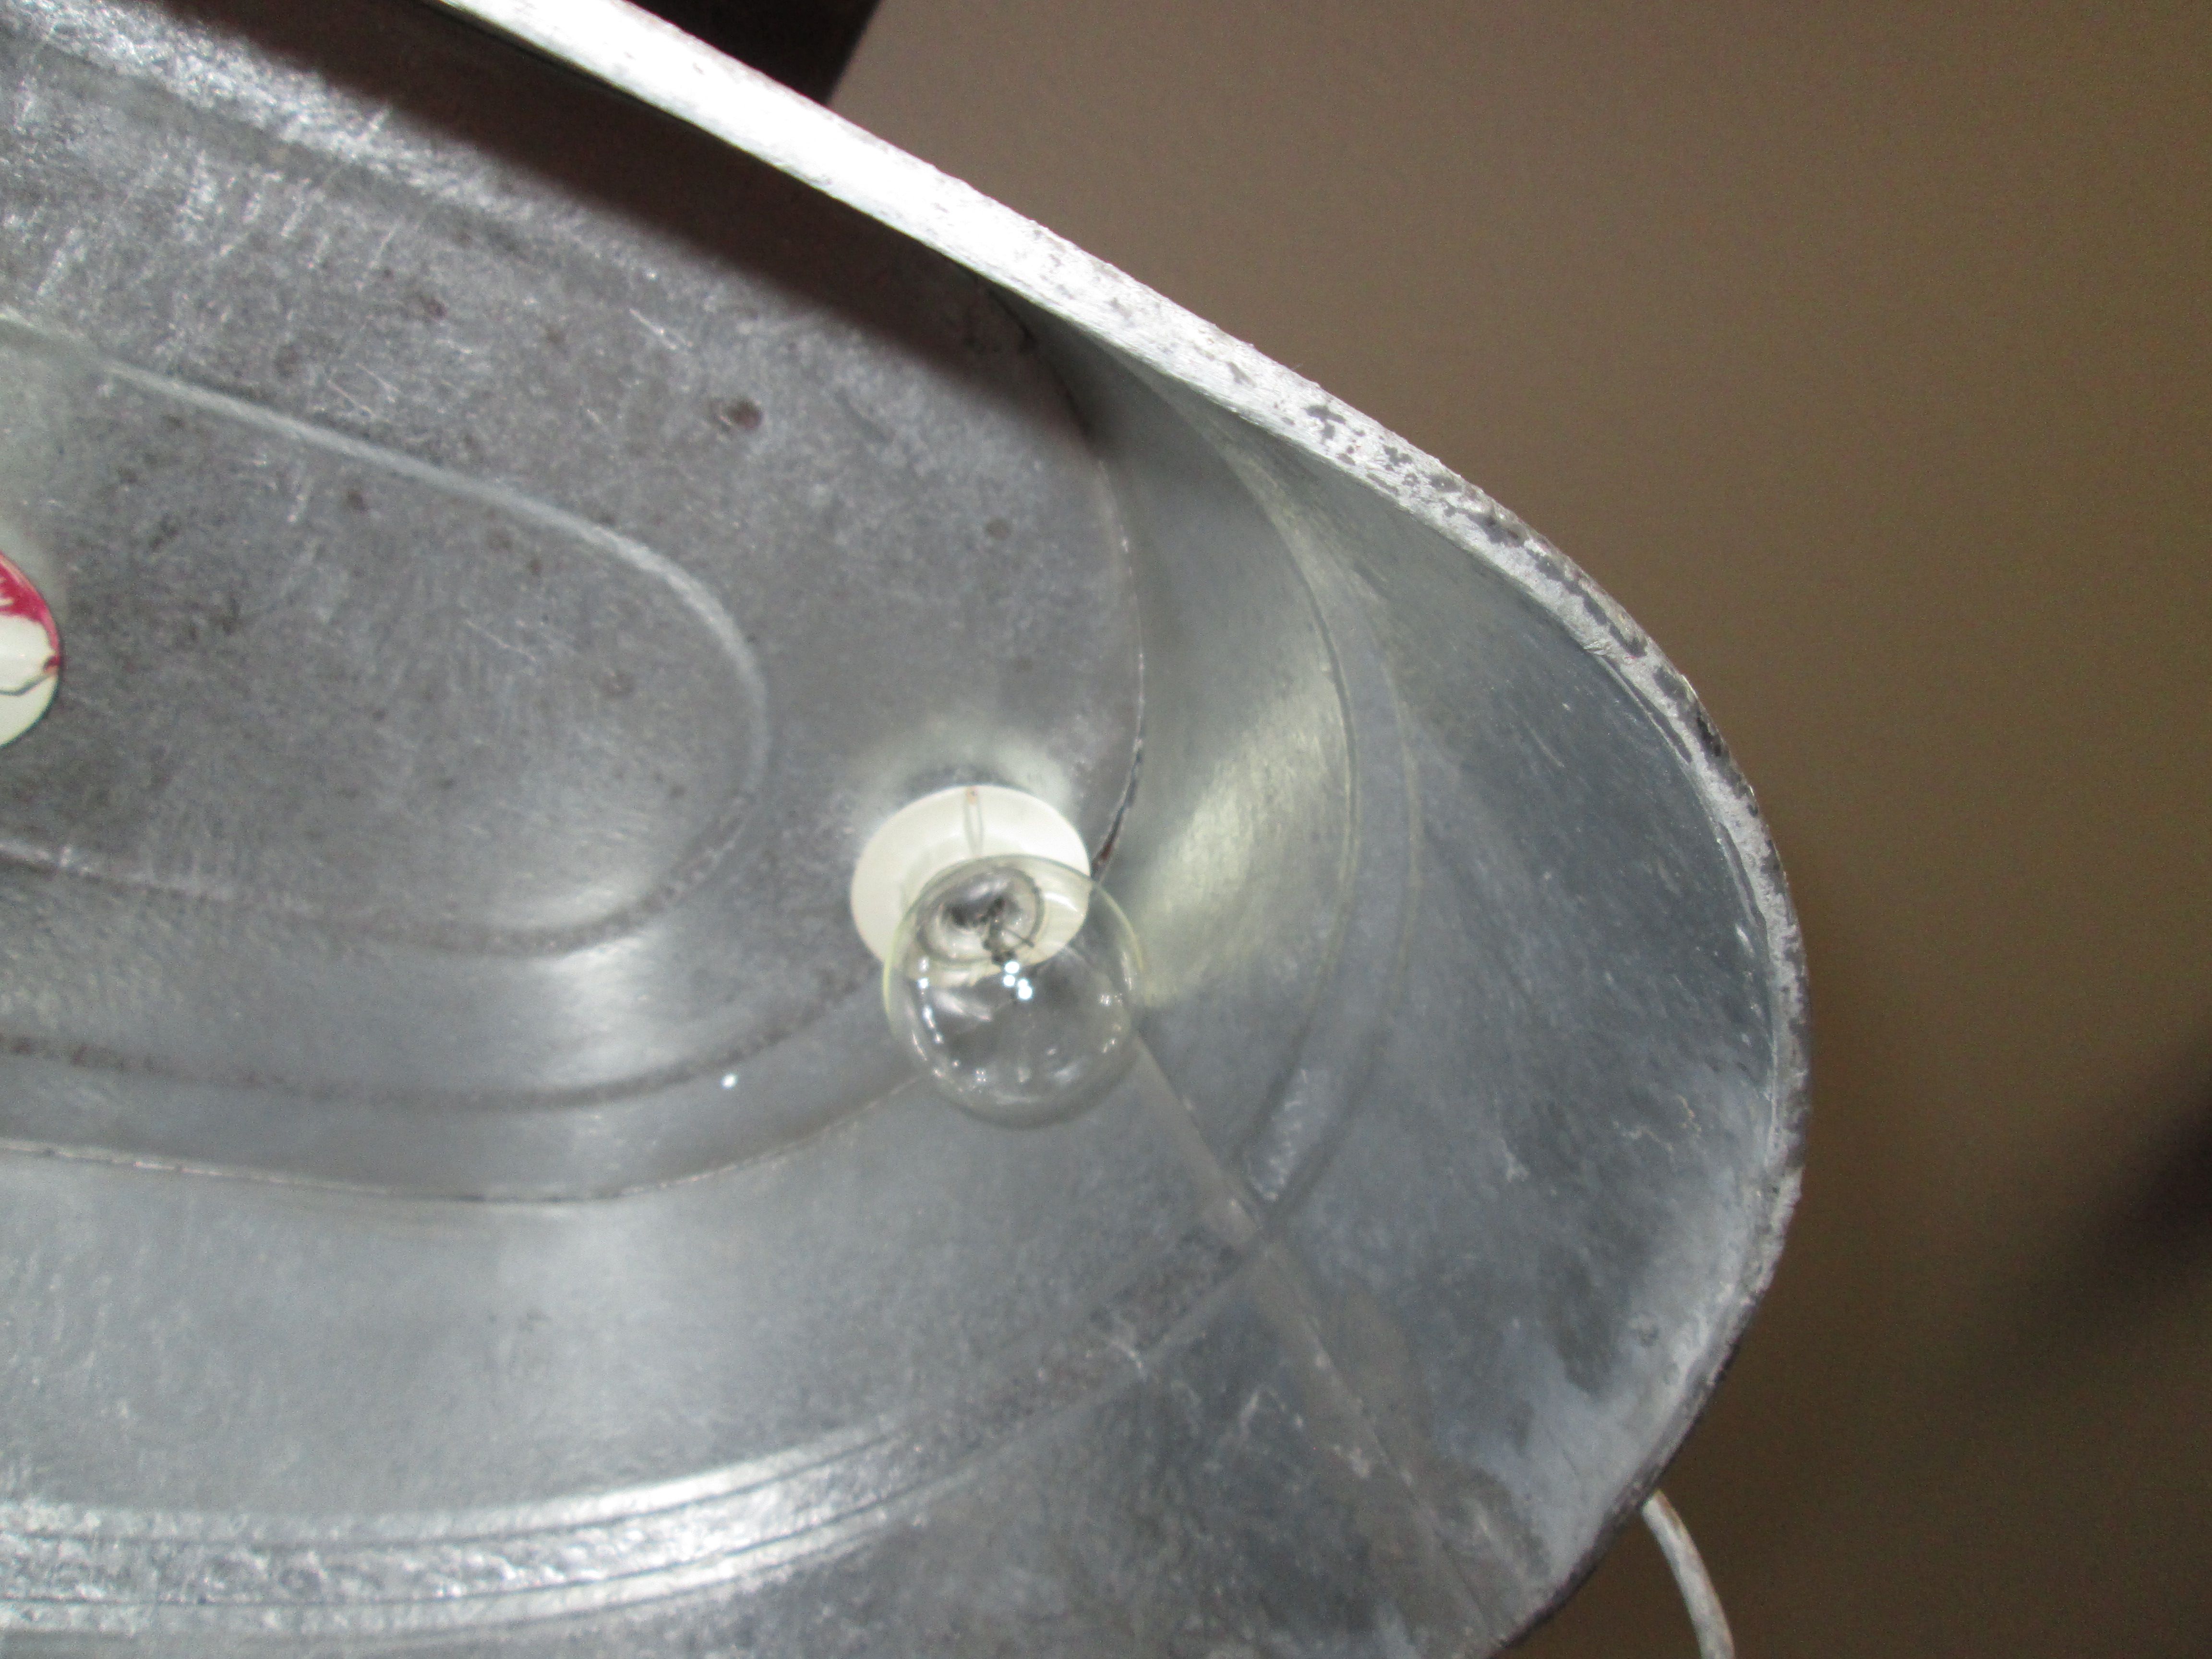
The right hole that I drilled doesn’t look even in this picture, but I promise, it is.
We then put the ends of the lights through the holes and screwed the ends on that hold the shades on. (goodness, did THAT make sense at all???) Here’s a picture of it after I screwed the bulbs back in:
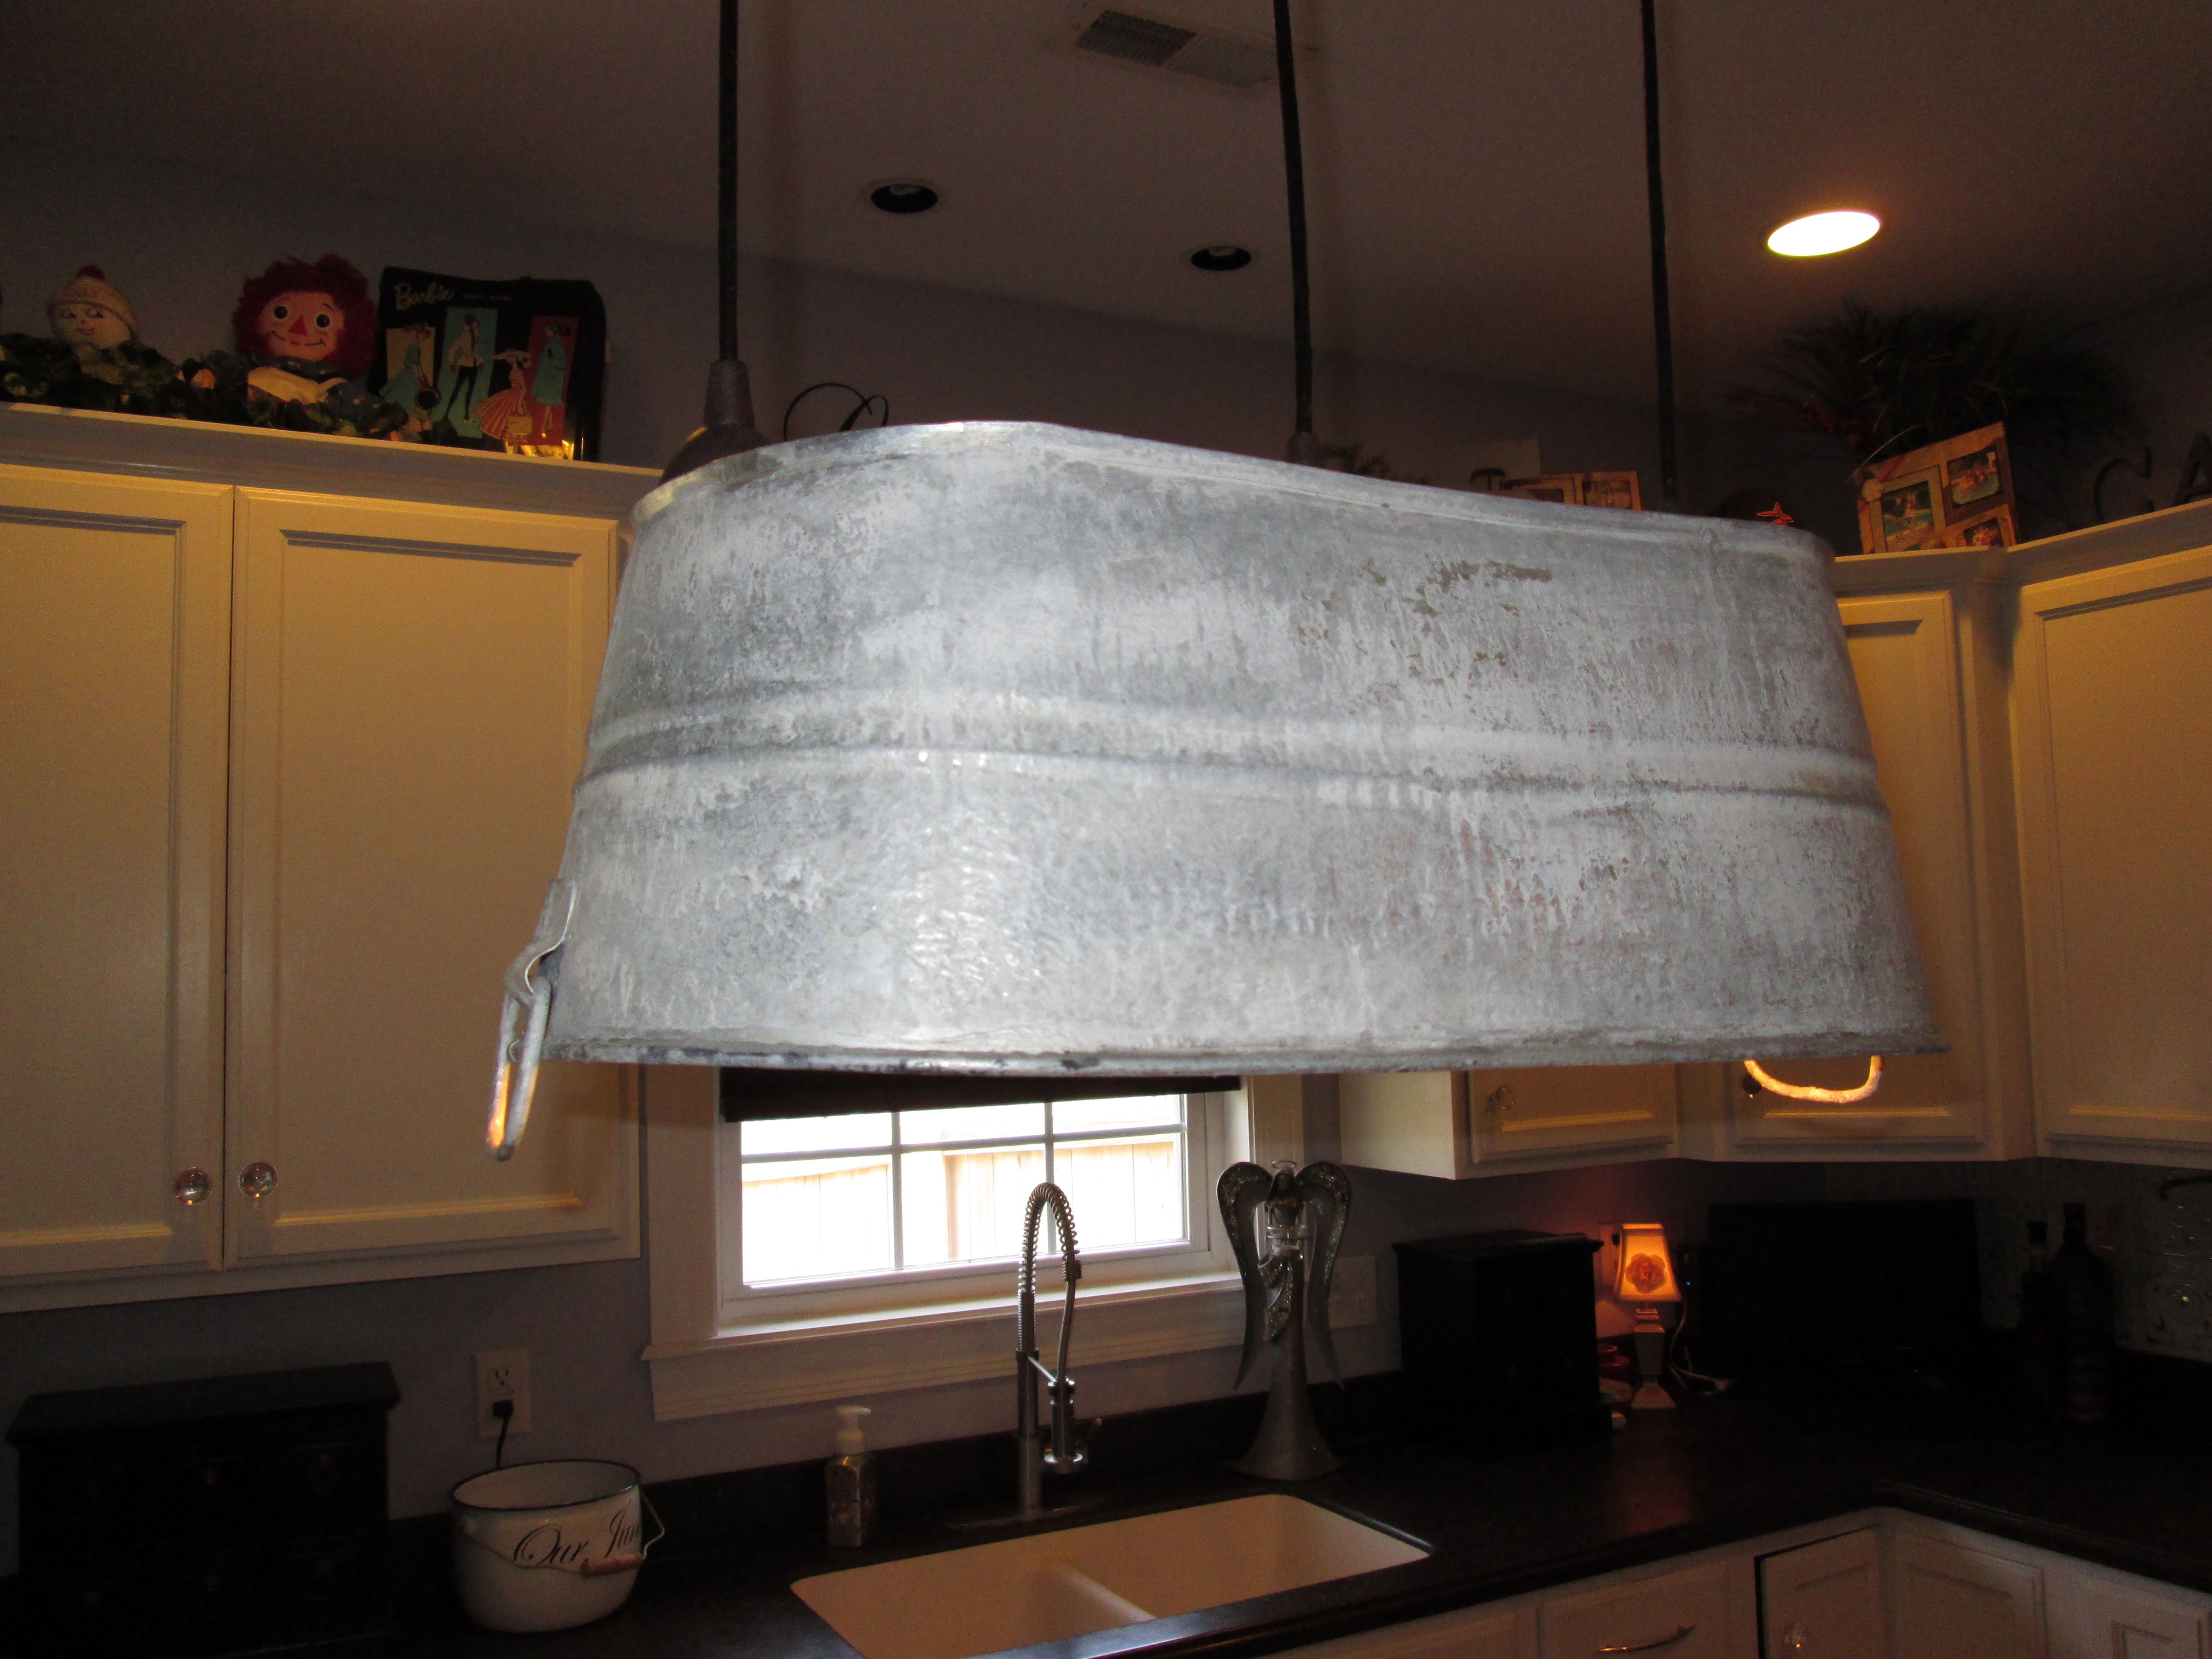
Here’s a closer look at the new “shade”

Fake stone you ask? Well, I’m gunna give it one helluva try, that’s for sure! Here’s my sad, pitiful story, as usual…..
The back of our lake house is, in my opinion, hideous! Well, instead of having to describe it, I’ll just show you a picture which shows where these fake stone panels will go!
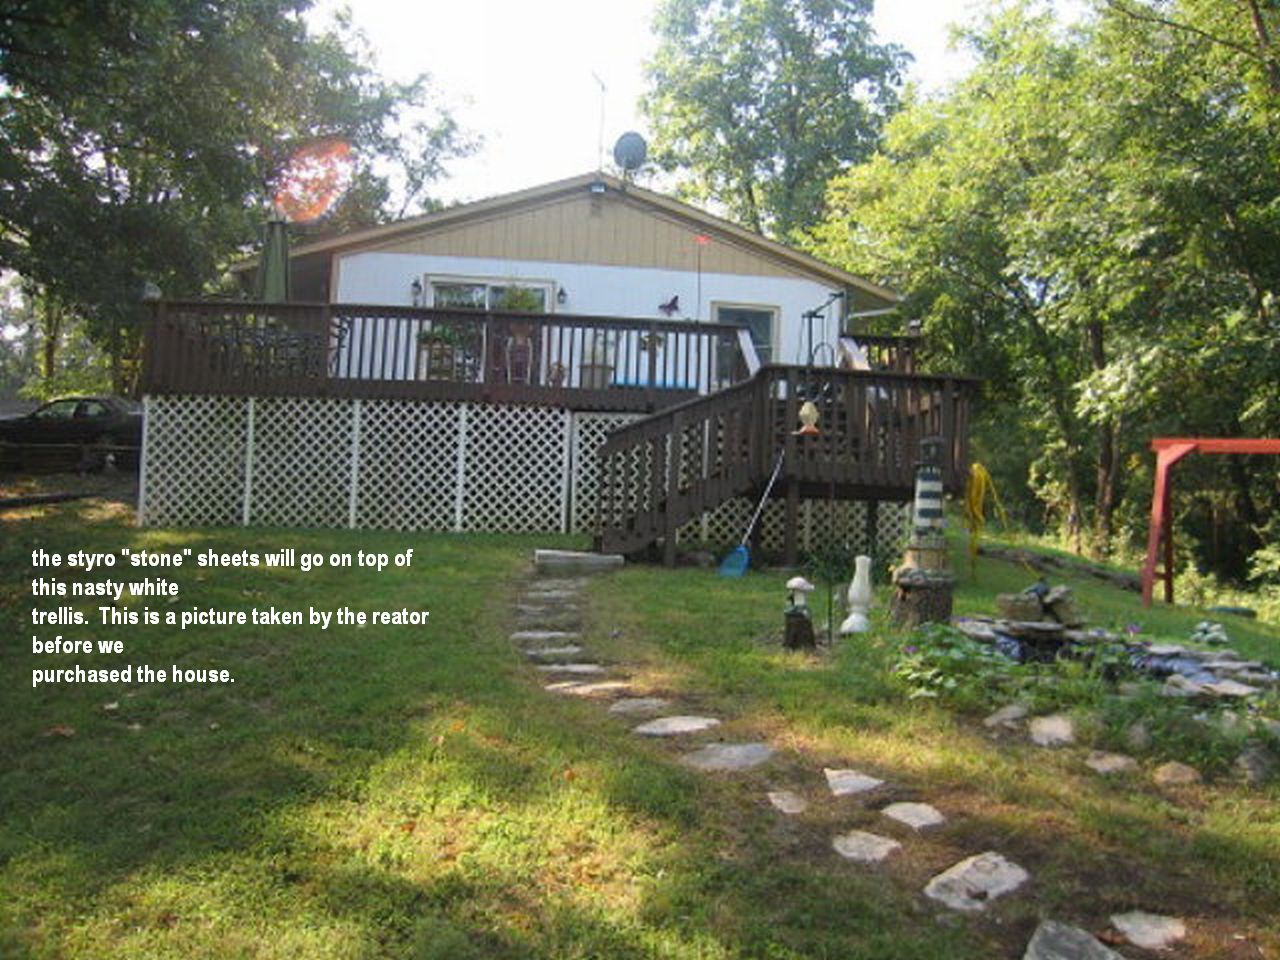 In the last year we’ve removed all the stepping stones (they were NOT helpful at all when walking down to the dock) and of course all the “stuff”, to put it nicely, cluttered about. We did power wash that nasty white trellis, but it didn’t get as clean as I had hoped, hence this post!
I’ve been a little bored lately (I think I’m the ONLY person I know that gets so damned bored when I don’t have a project to work on) so shoot, what have I got to lose trying to make fake stones!
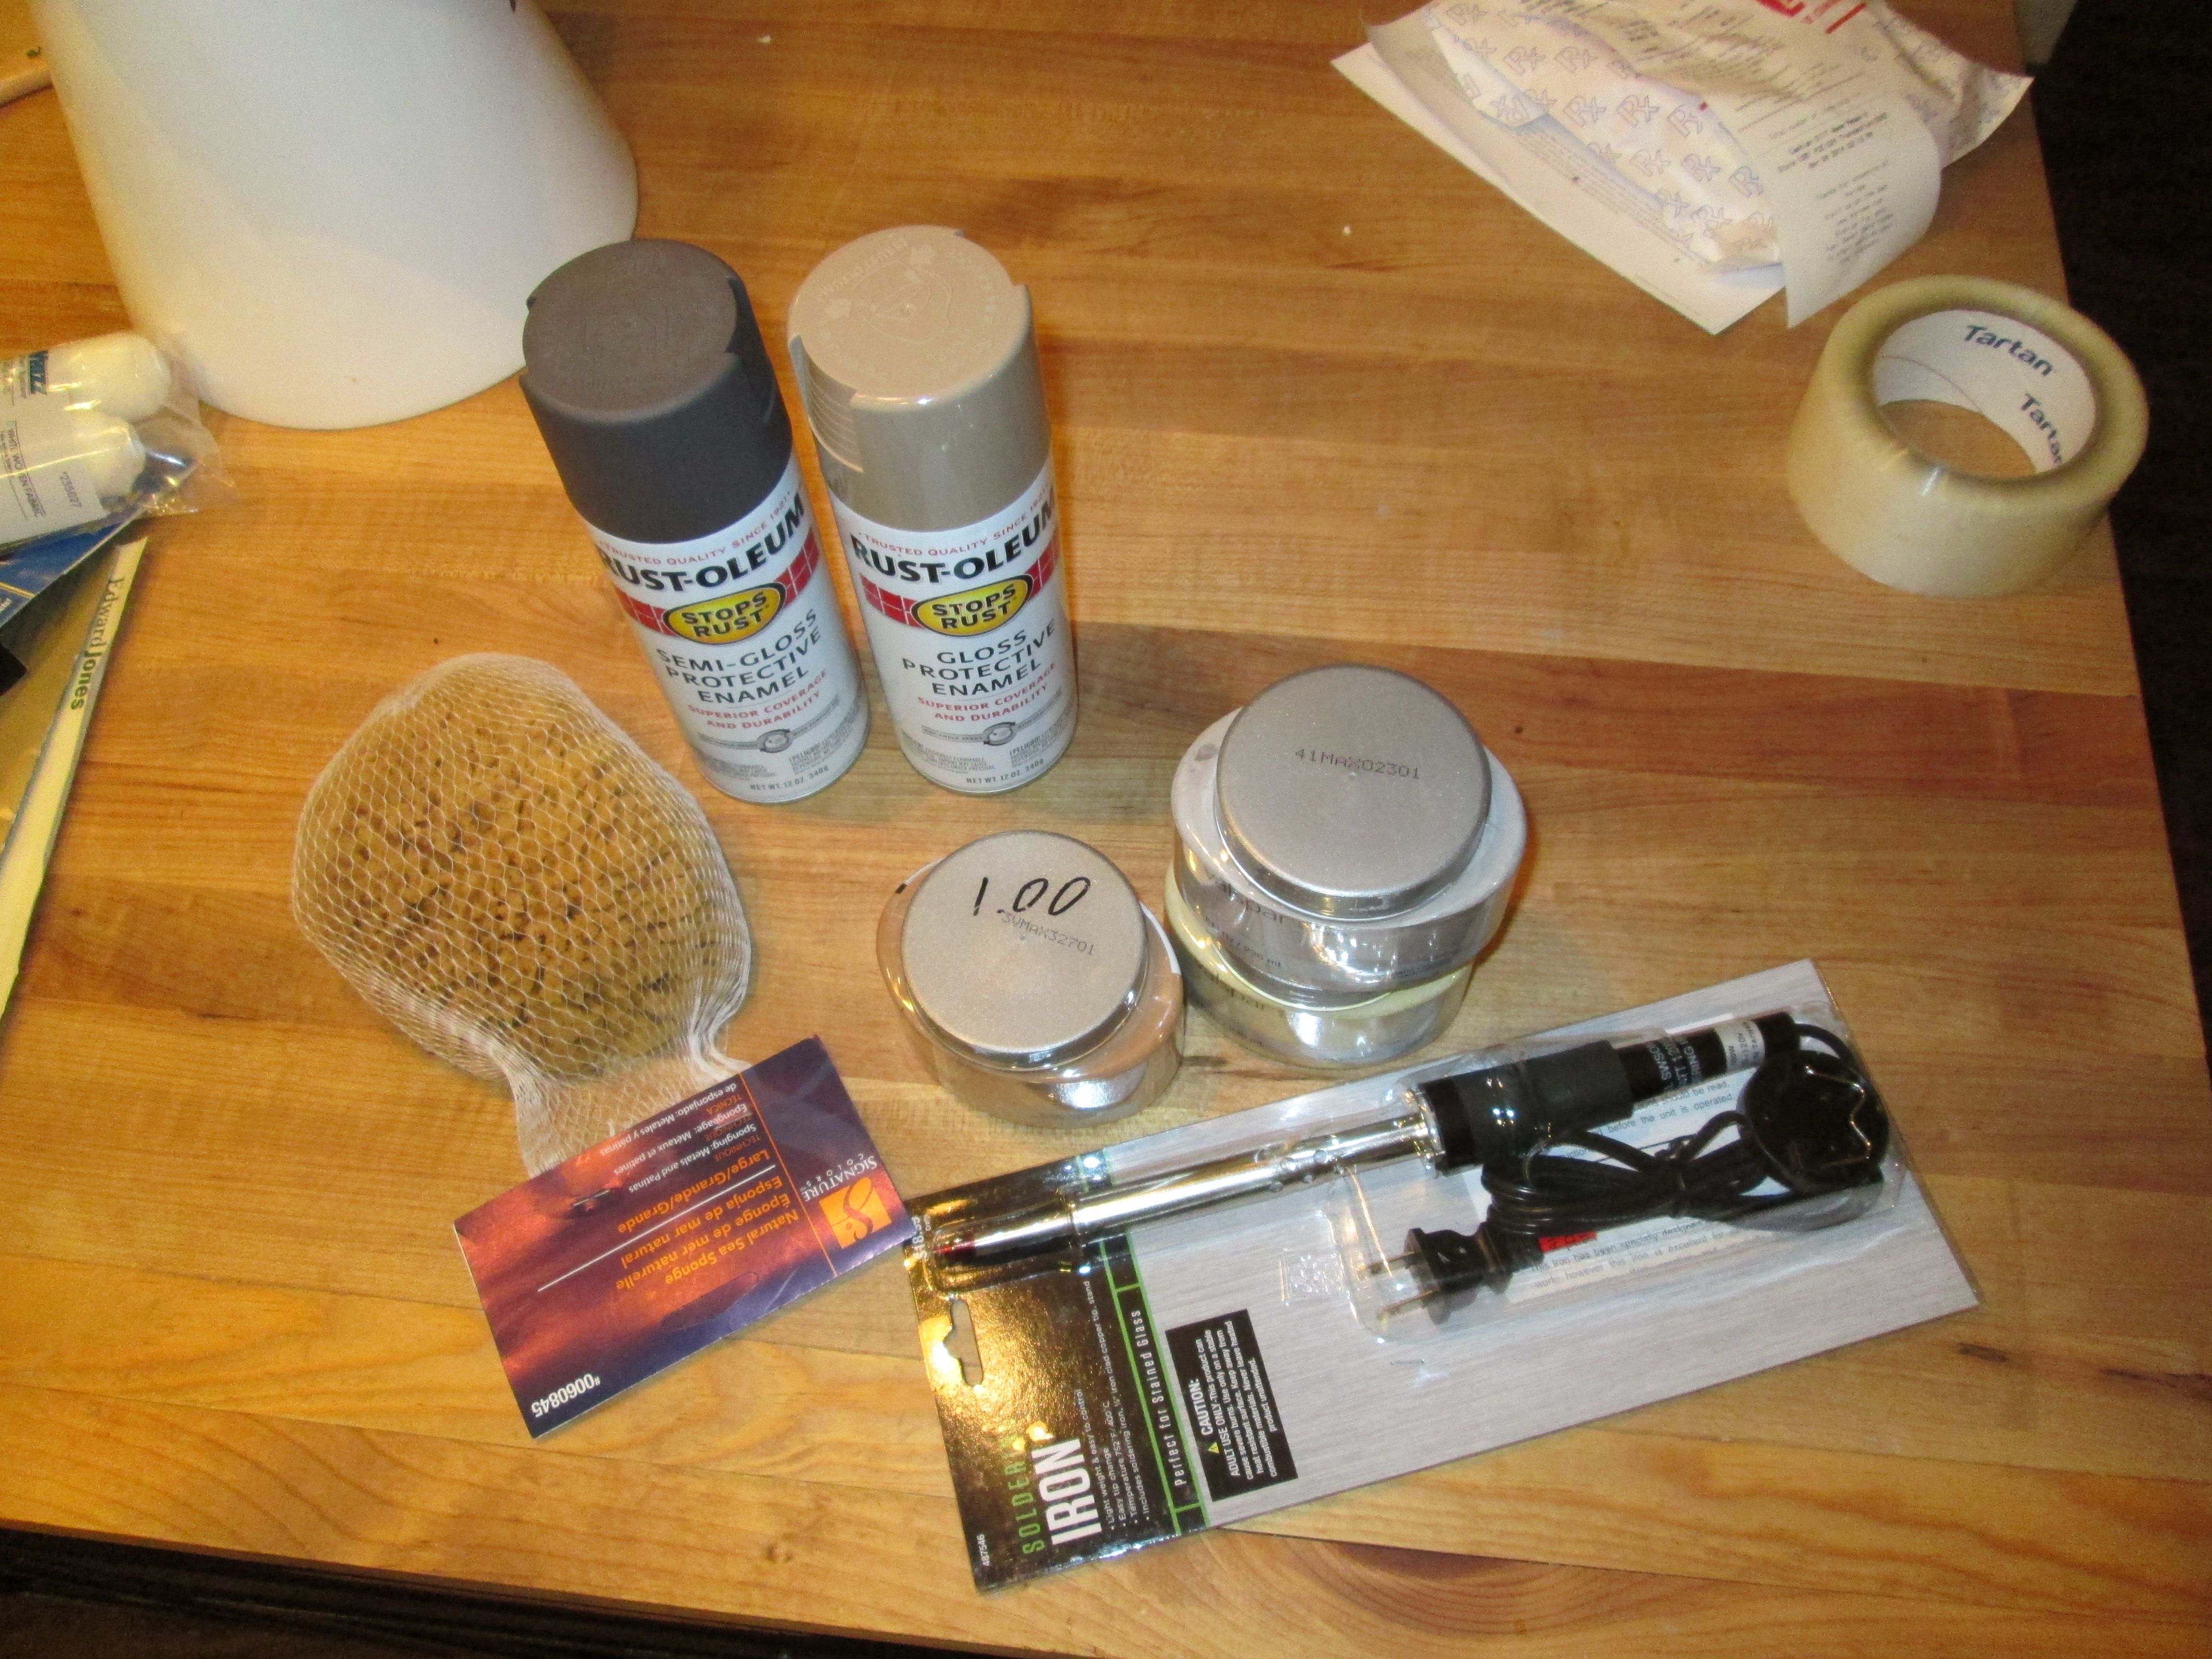
I started with a sheet of 3/4″ Polystyrene. I bought it in Lowe’s for $12.99 for a 4′ x 8′ sheet. I then got the supplies I thought I would need.
Spray paint the color I wanted my grout and stones to be, with additional colors that I could use to give it depth, a soudering iron, a heat gun (purchased at Home Depot for $10), a spray bottle and a sea sponge, although to be honest, I ended up not really using it. Anytime I needed to blend, I found it easier to use a wet cloth. No doubt, I had to add a bunch and actually not use some as the project progressed.

This really is a simple project. Bear with me (grab a cup of coffee or a glass of wine and try not to conk out!), I’ll walk you through it.
Like I said, I bought polystyrene, which is sheet insulation. Here’s a picture of the first sheet I bought and cut in half to try out different techniques. Afterward, I worked on them whole because I need a height of 5′ to 7′, depending on the slope of the yard.

Either side of it will work. Don’t forget to pull off that clear sheet that covers it. I had a heck of a time a few times trying to find it, even using the corner, but once you do, it’ll tear right off.
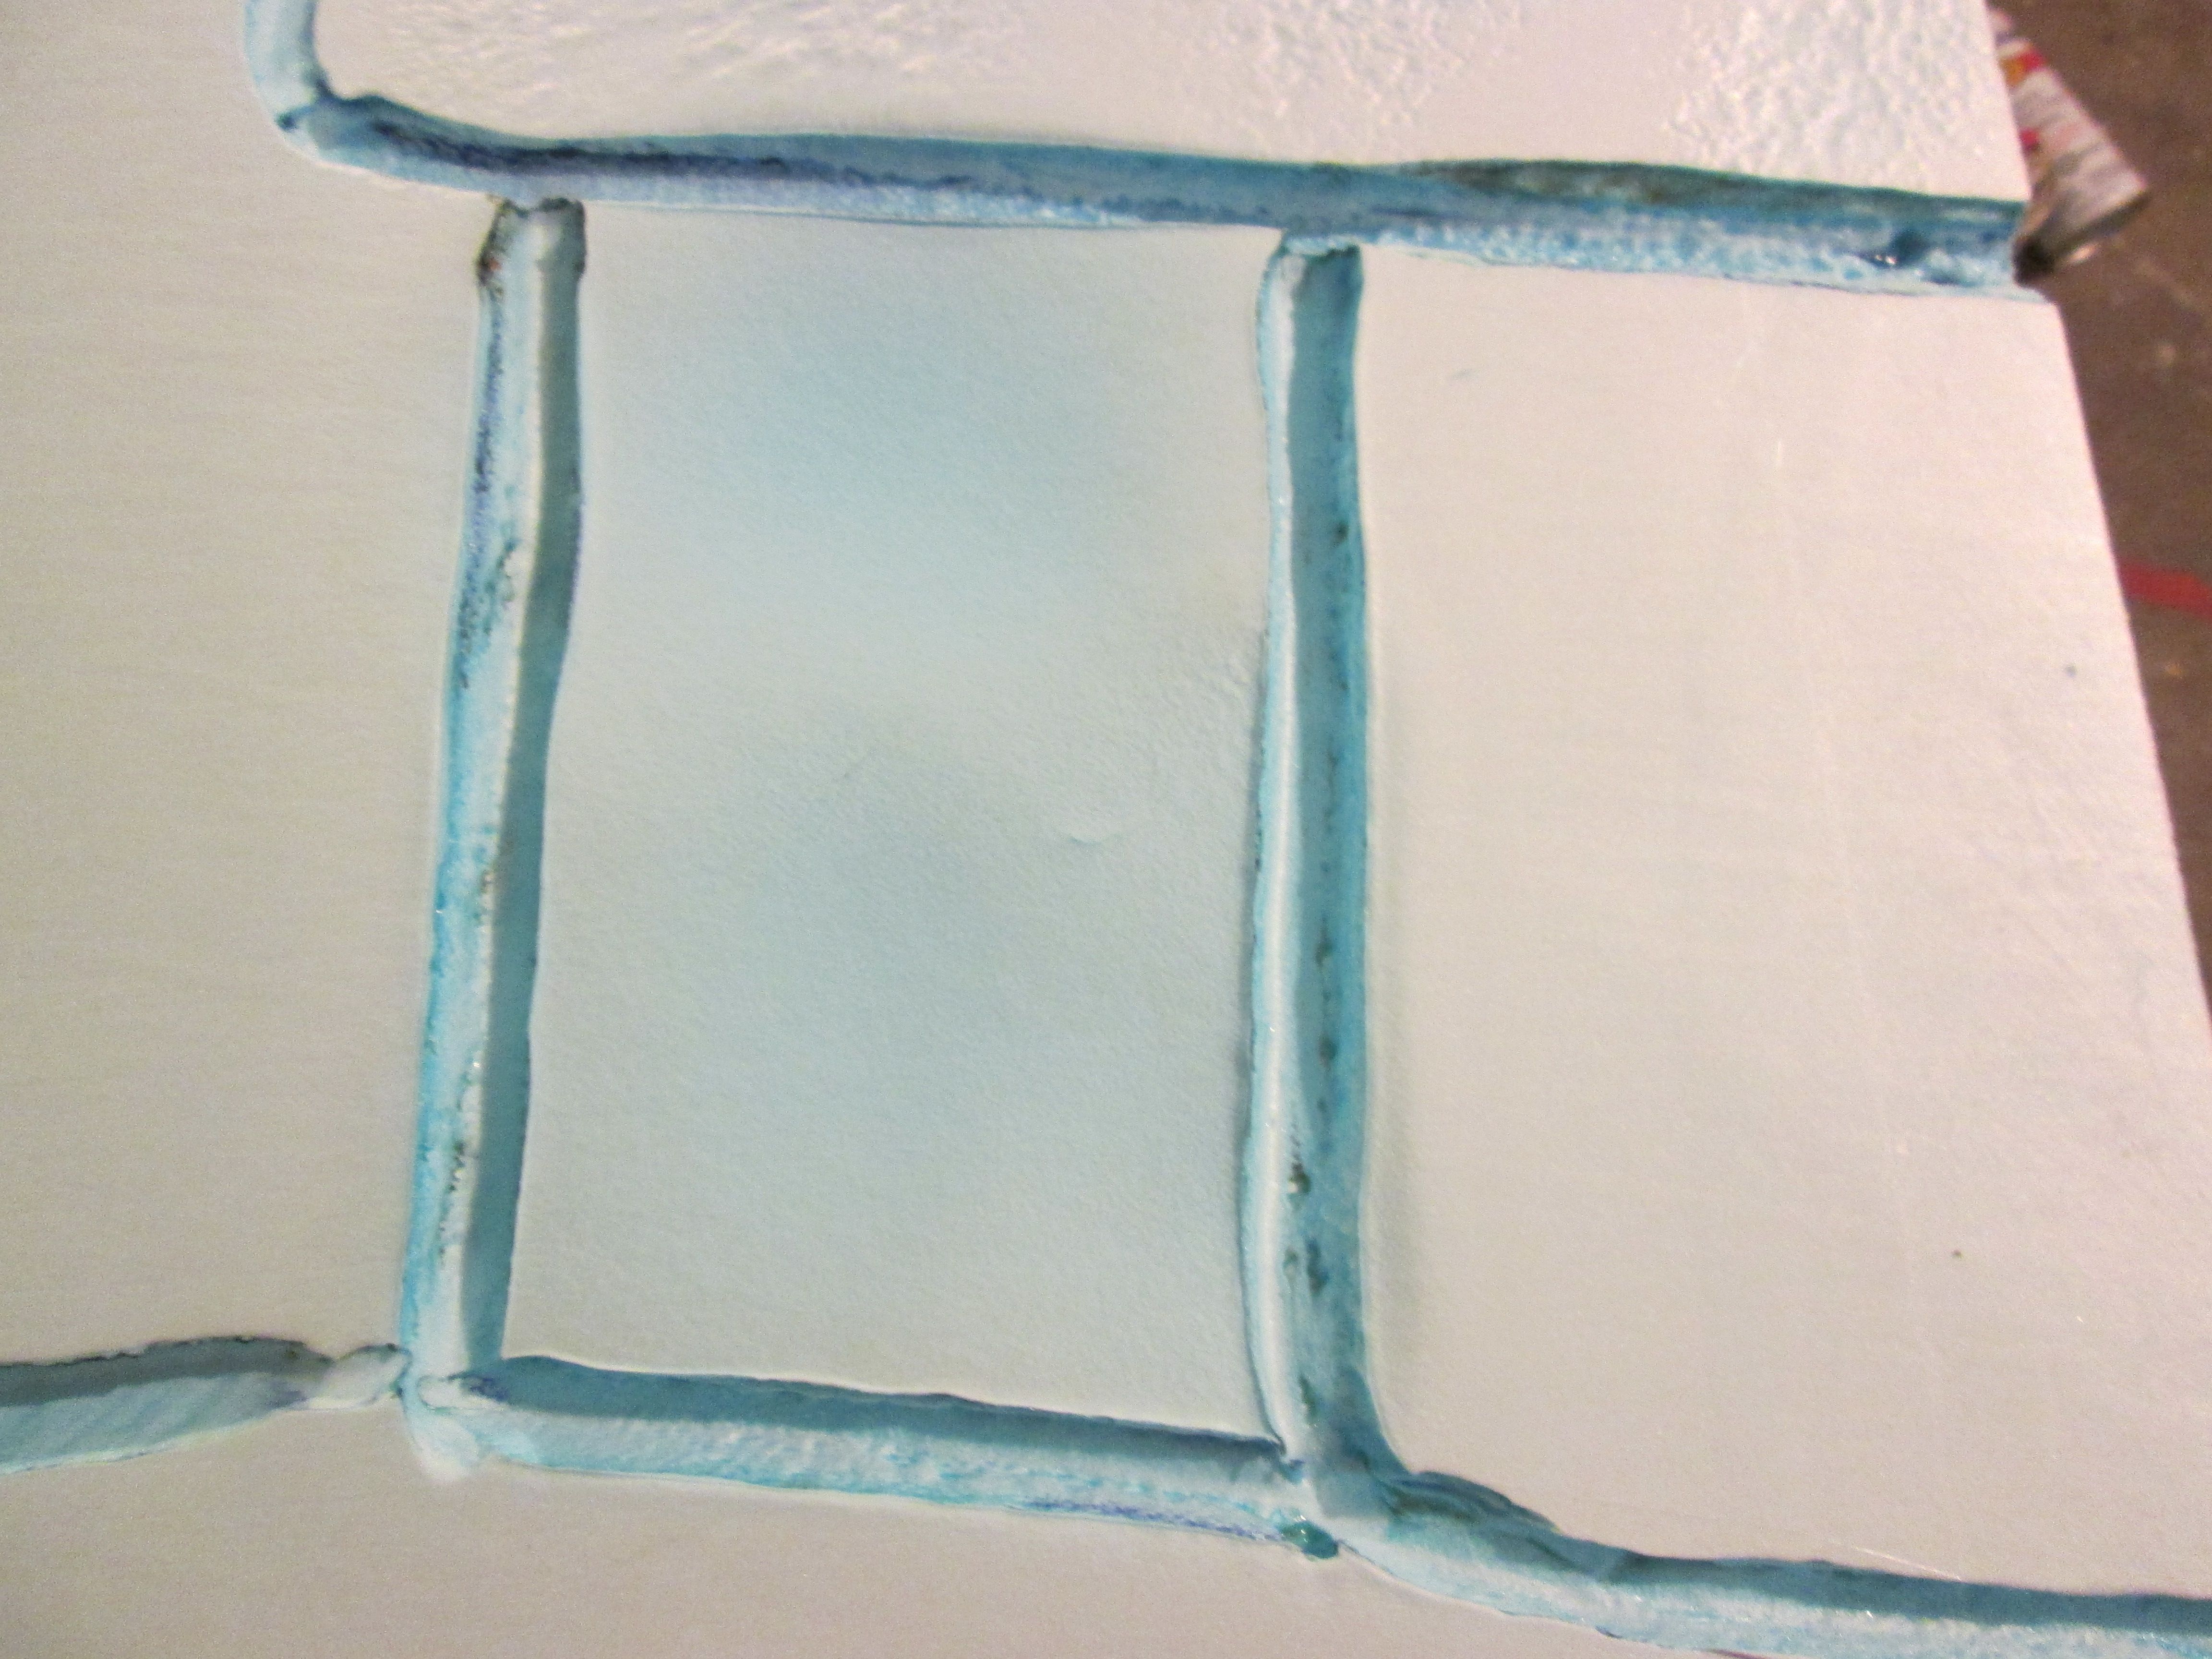
I then drew out my pattern. I just freehanded it. I wasn’t going for a brick look, so I just drew weird shaped stones!

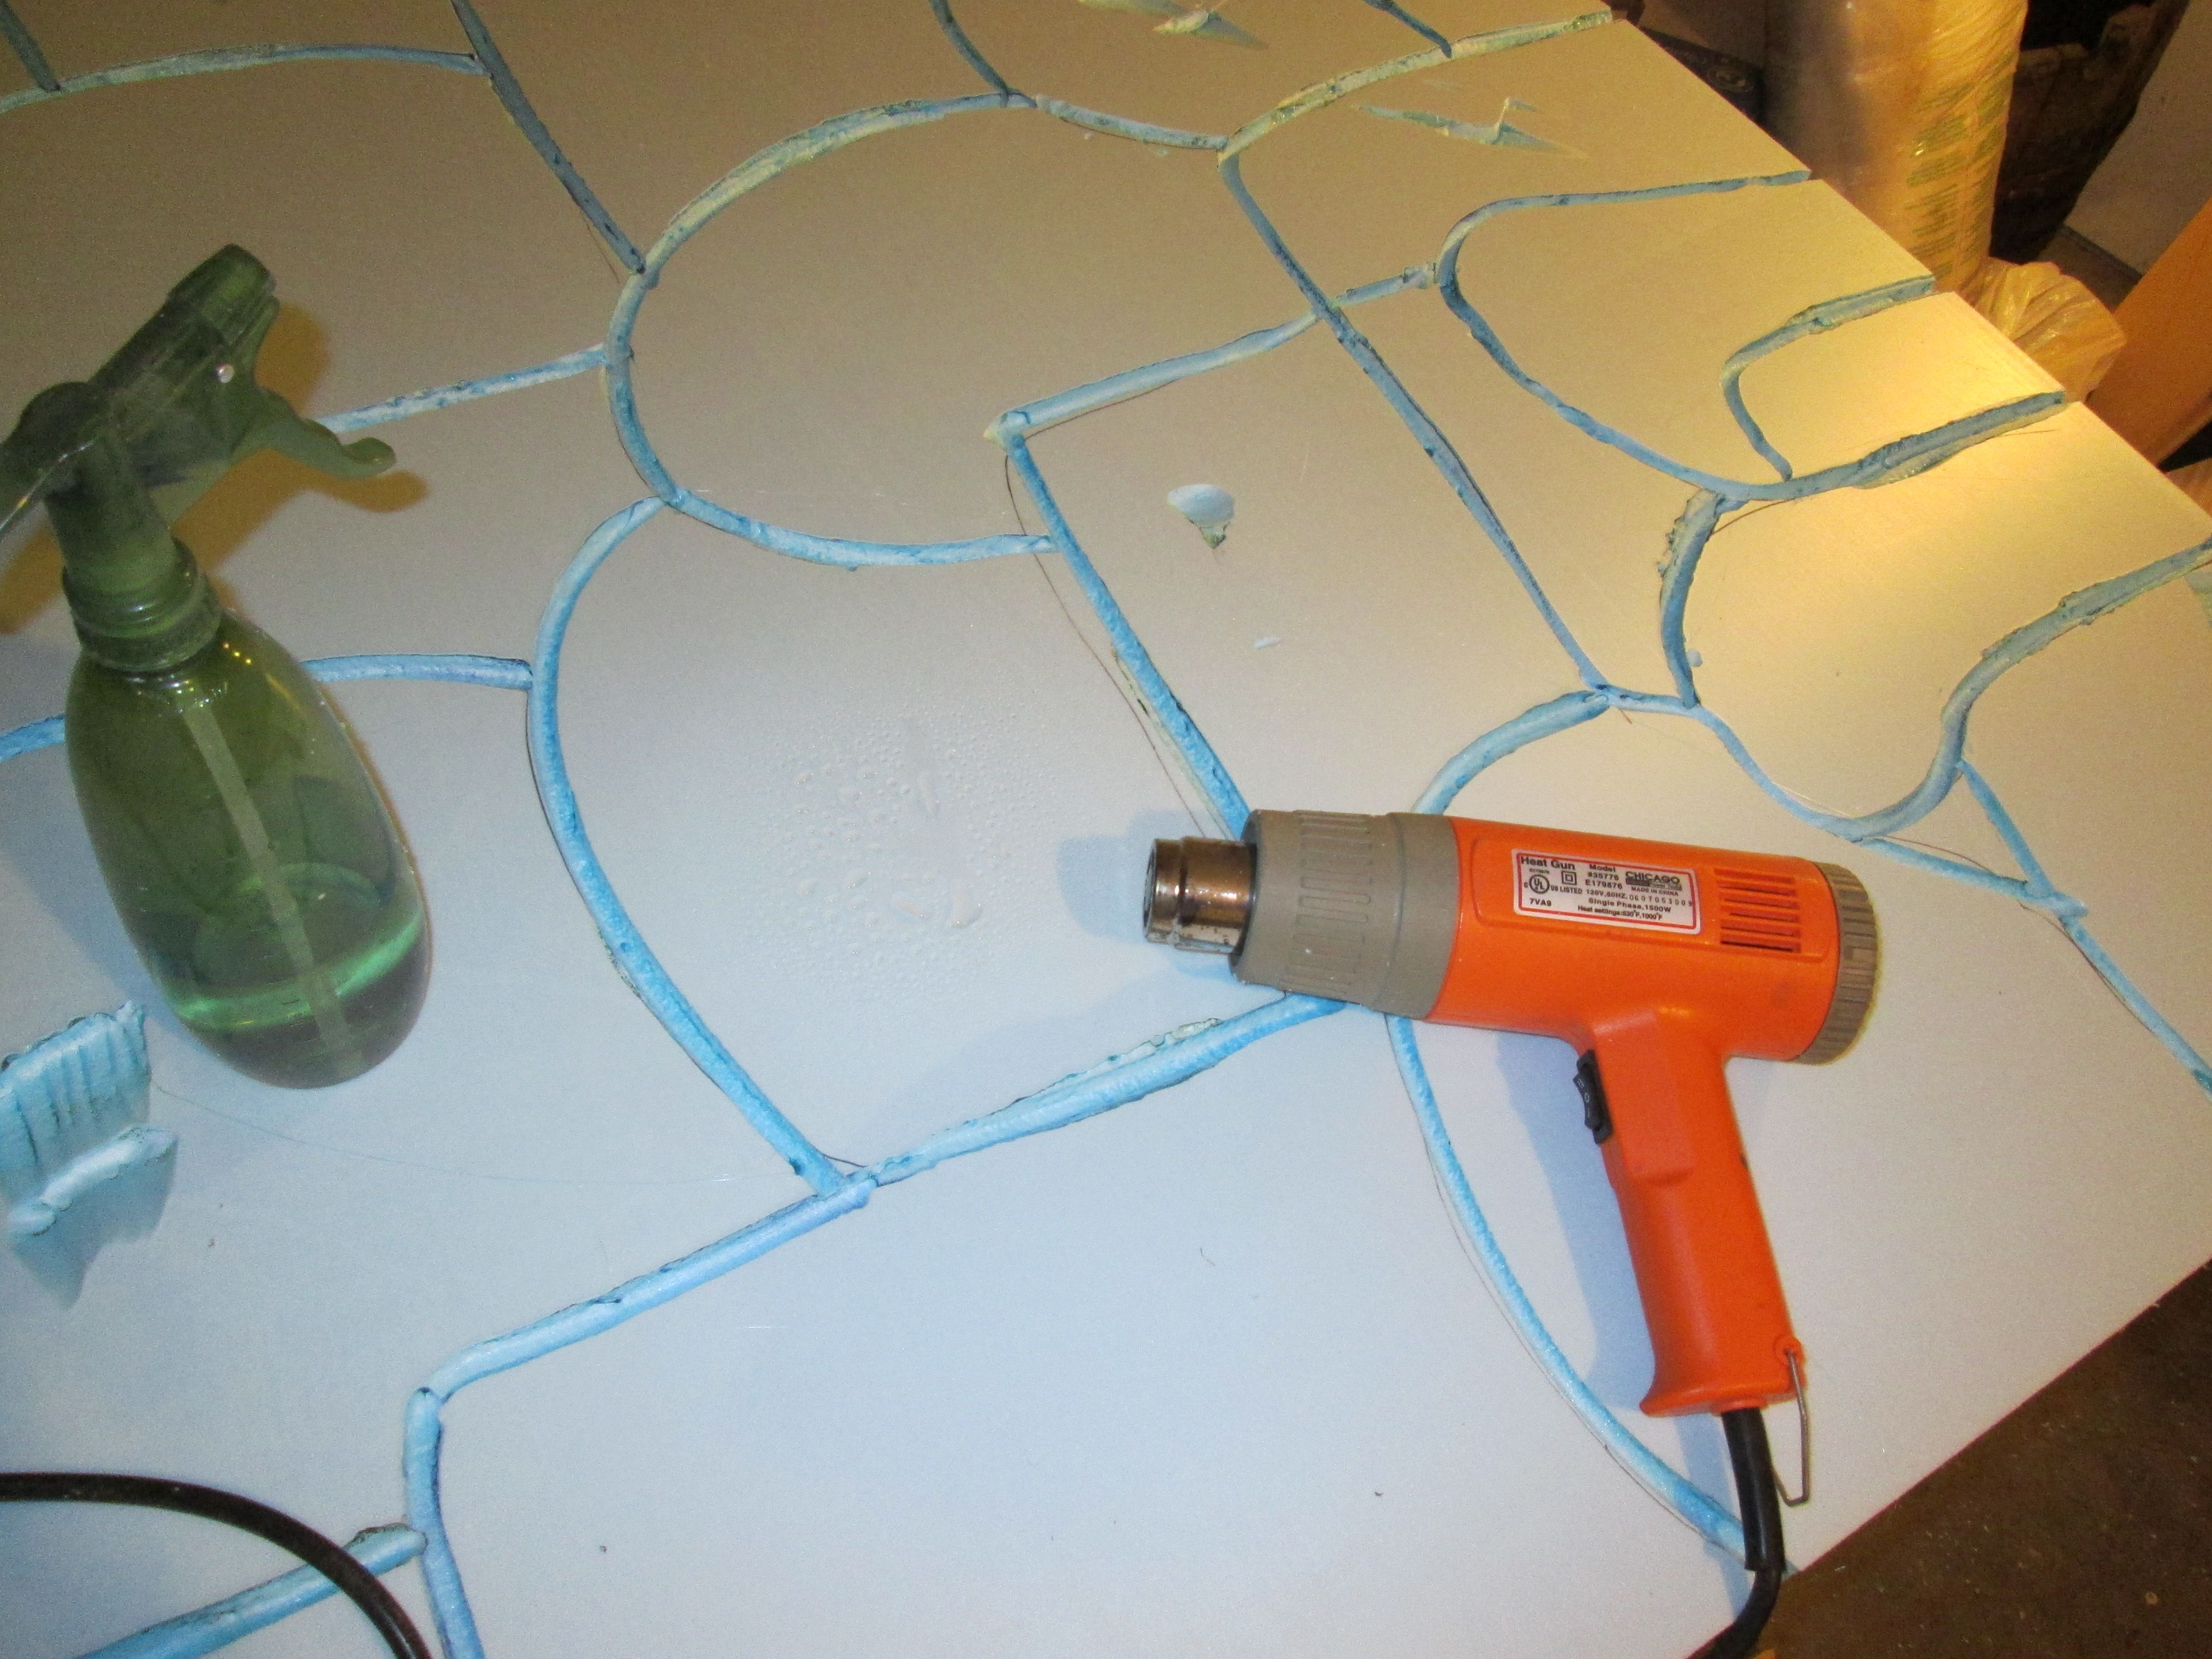
Since the soudering tool was going to melt the foam not only in depth, but about 1/4″ to 1/2″ wide, that’s what I used for my “grout”.
Be certain you don’t push down too hard with the soudering iron so you don’t go all the way through the foam. Just let it glide as you move your hand along your lines. You can also see that I tapped and rolled the tool to distress it.

Next, you might want to rough up your foam so it’ll look more realistic. I ended up getting very carried away with this part! Too damned fun. On some of my stones I used a wire brush, and on all of them, I used a spray bottle and my heat gun.
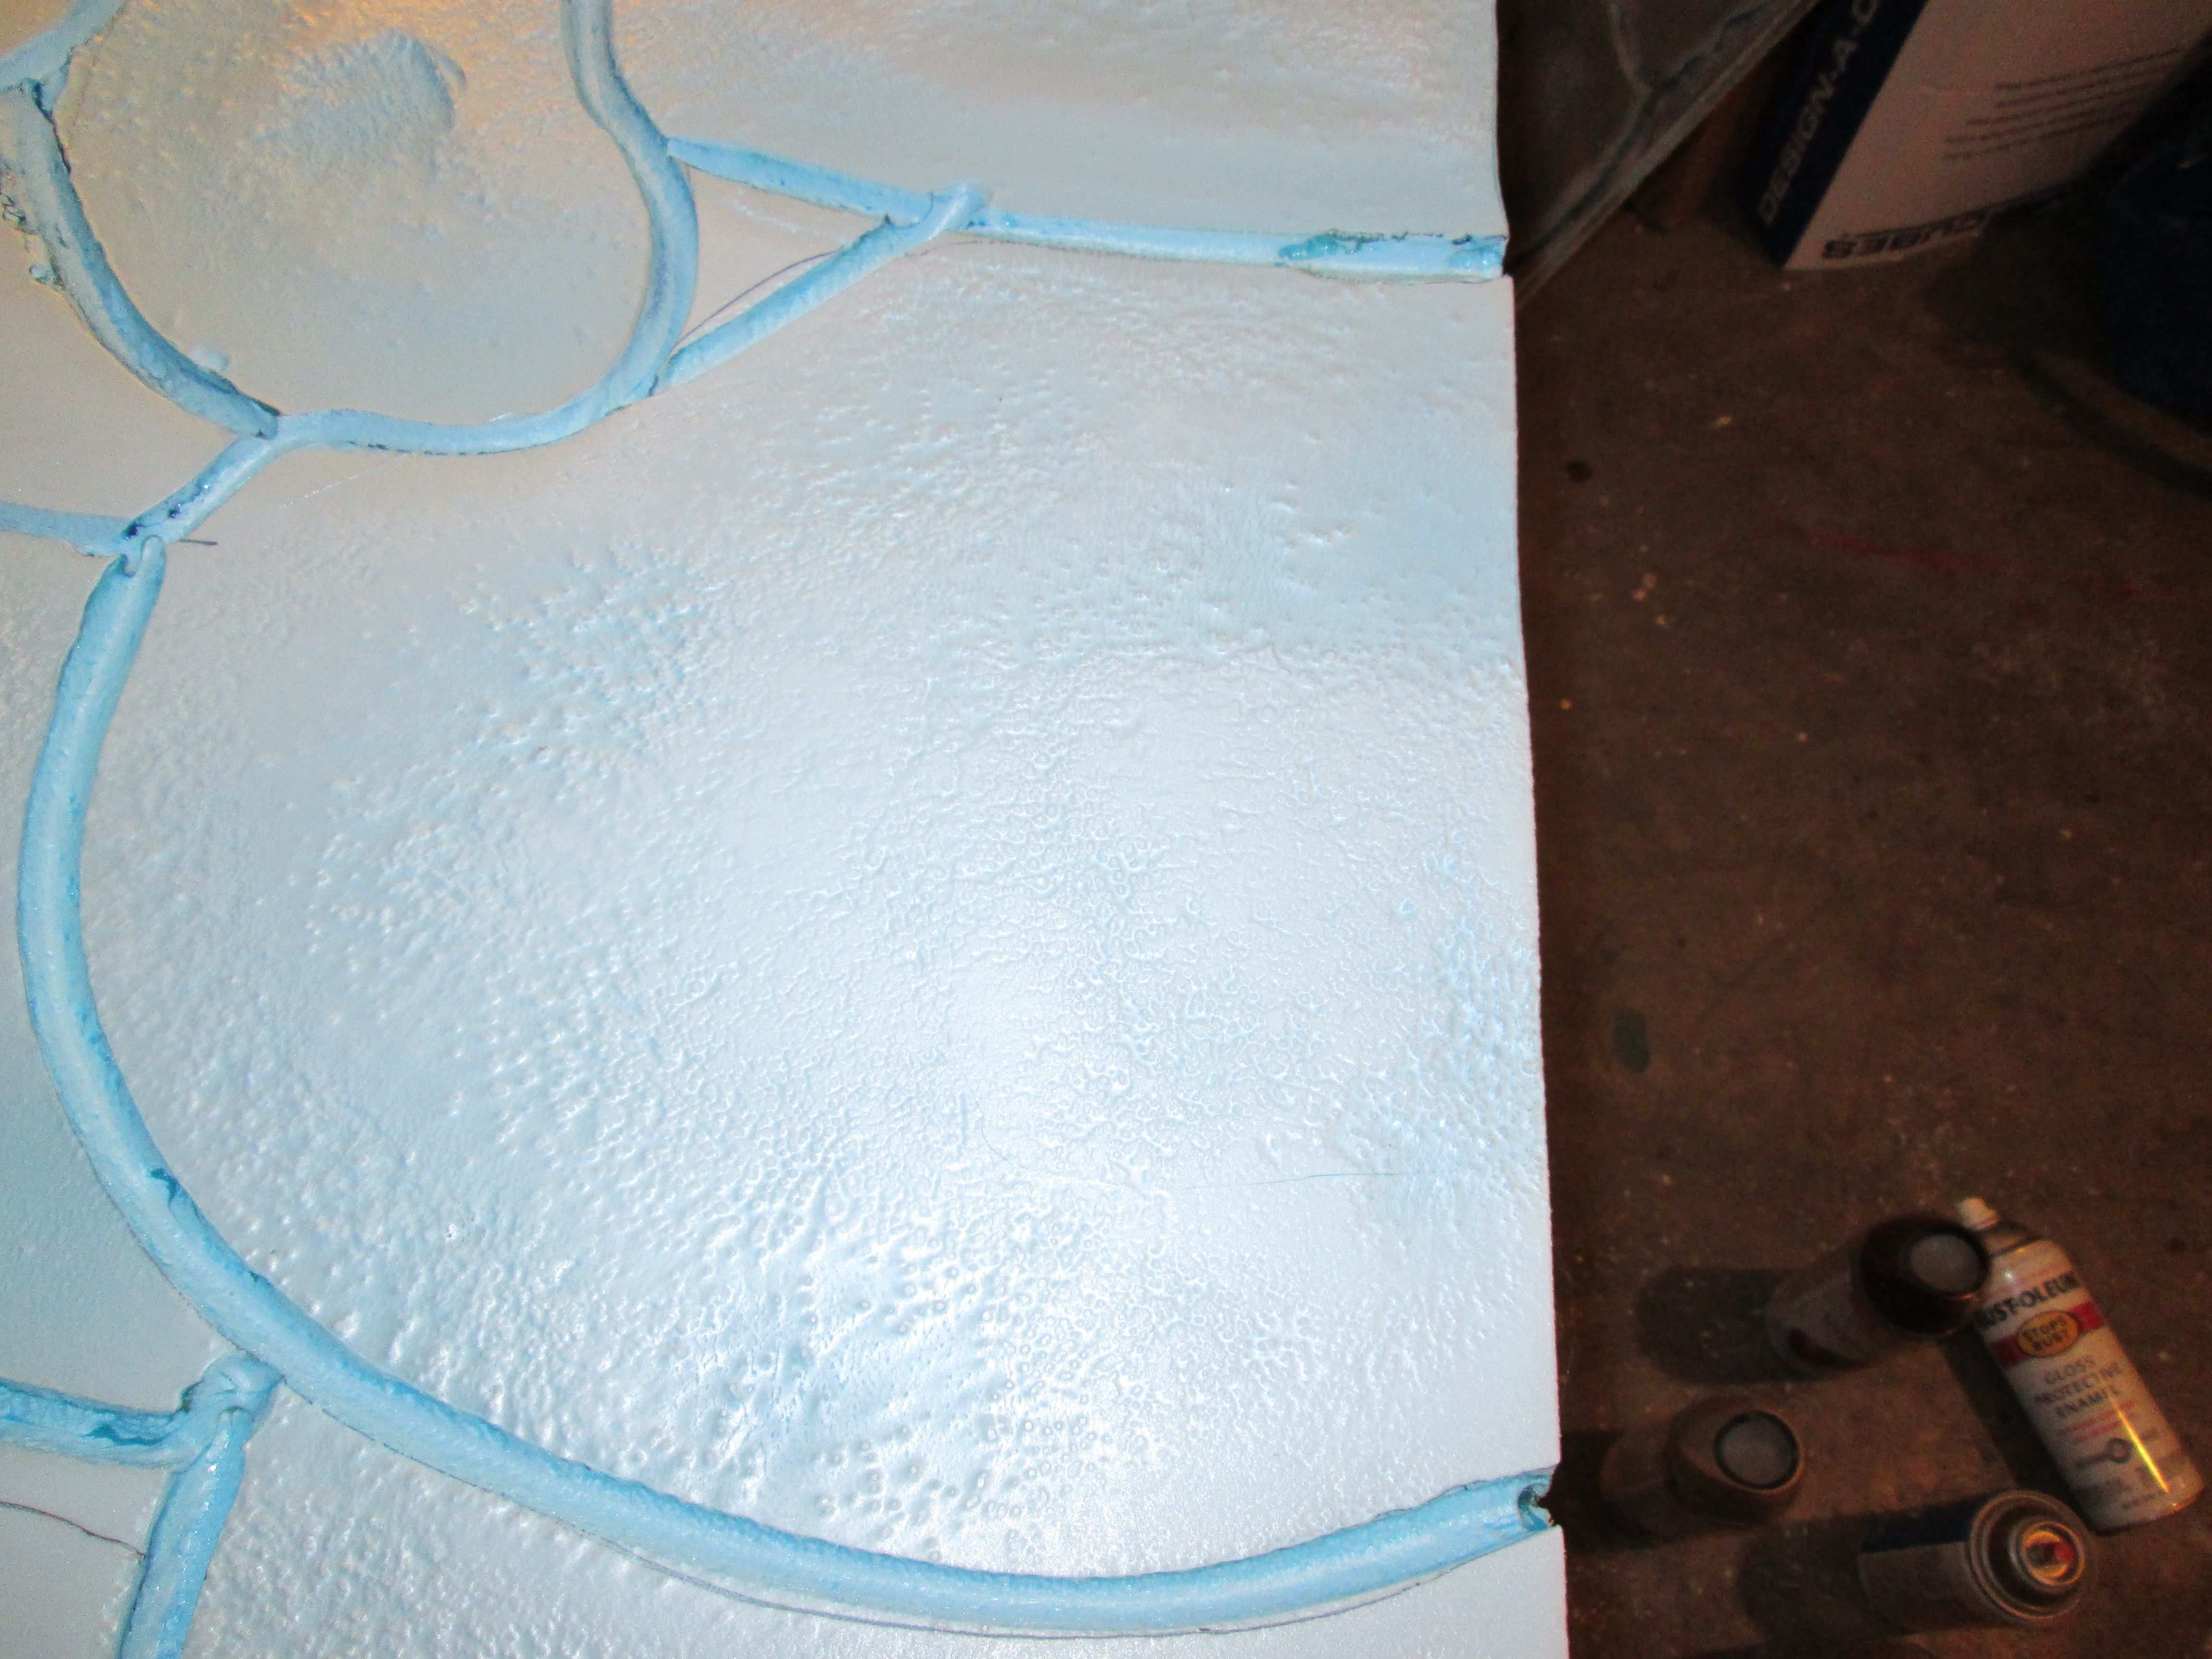
If you mist your different stones, and use the heat gun, you’ll get this look:
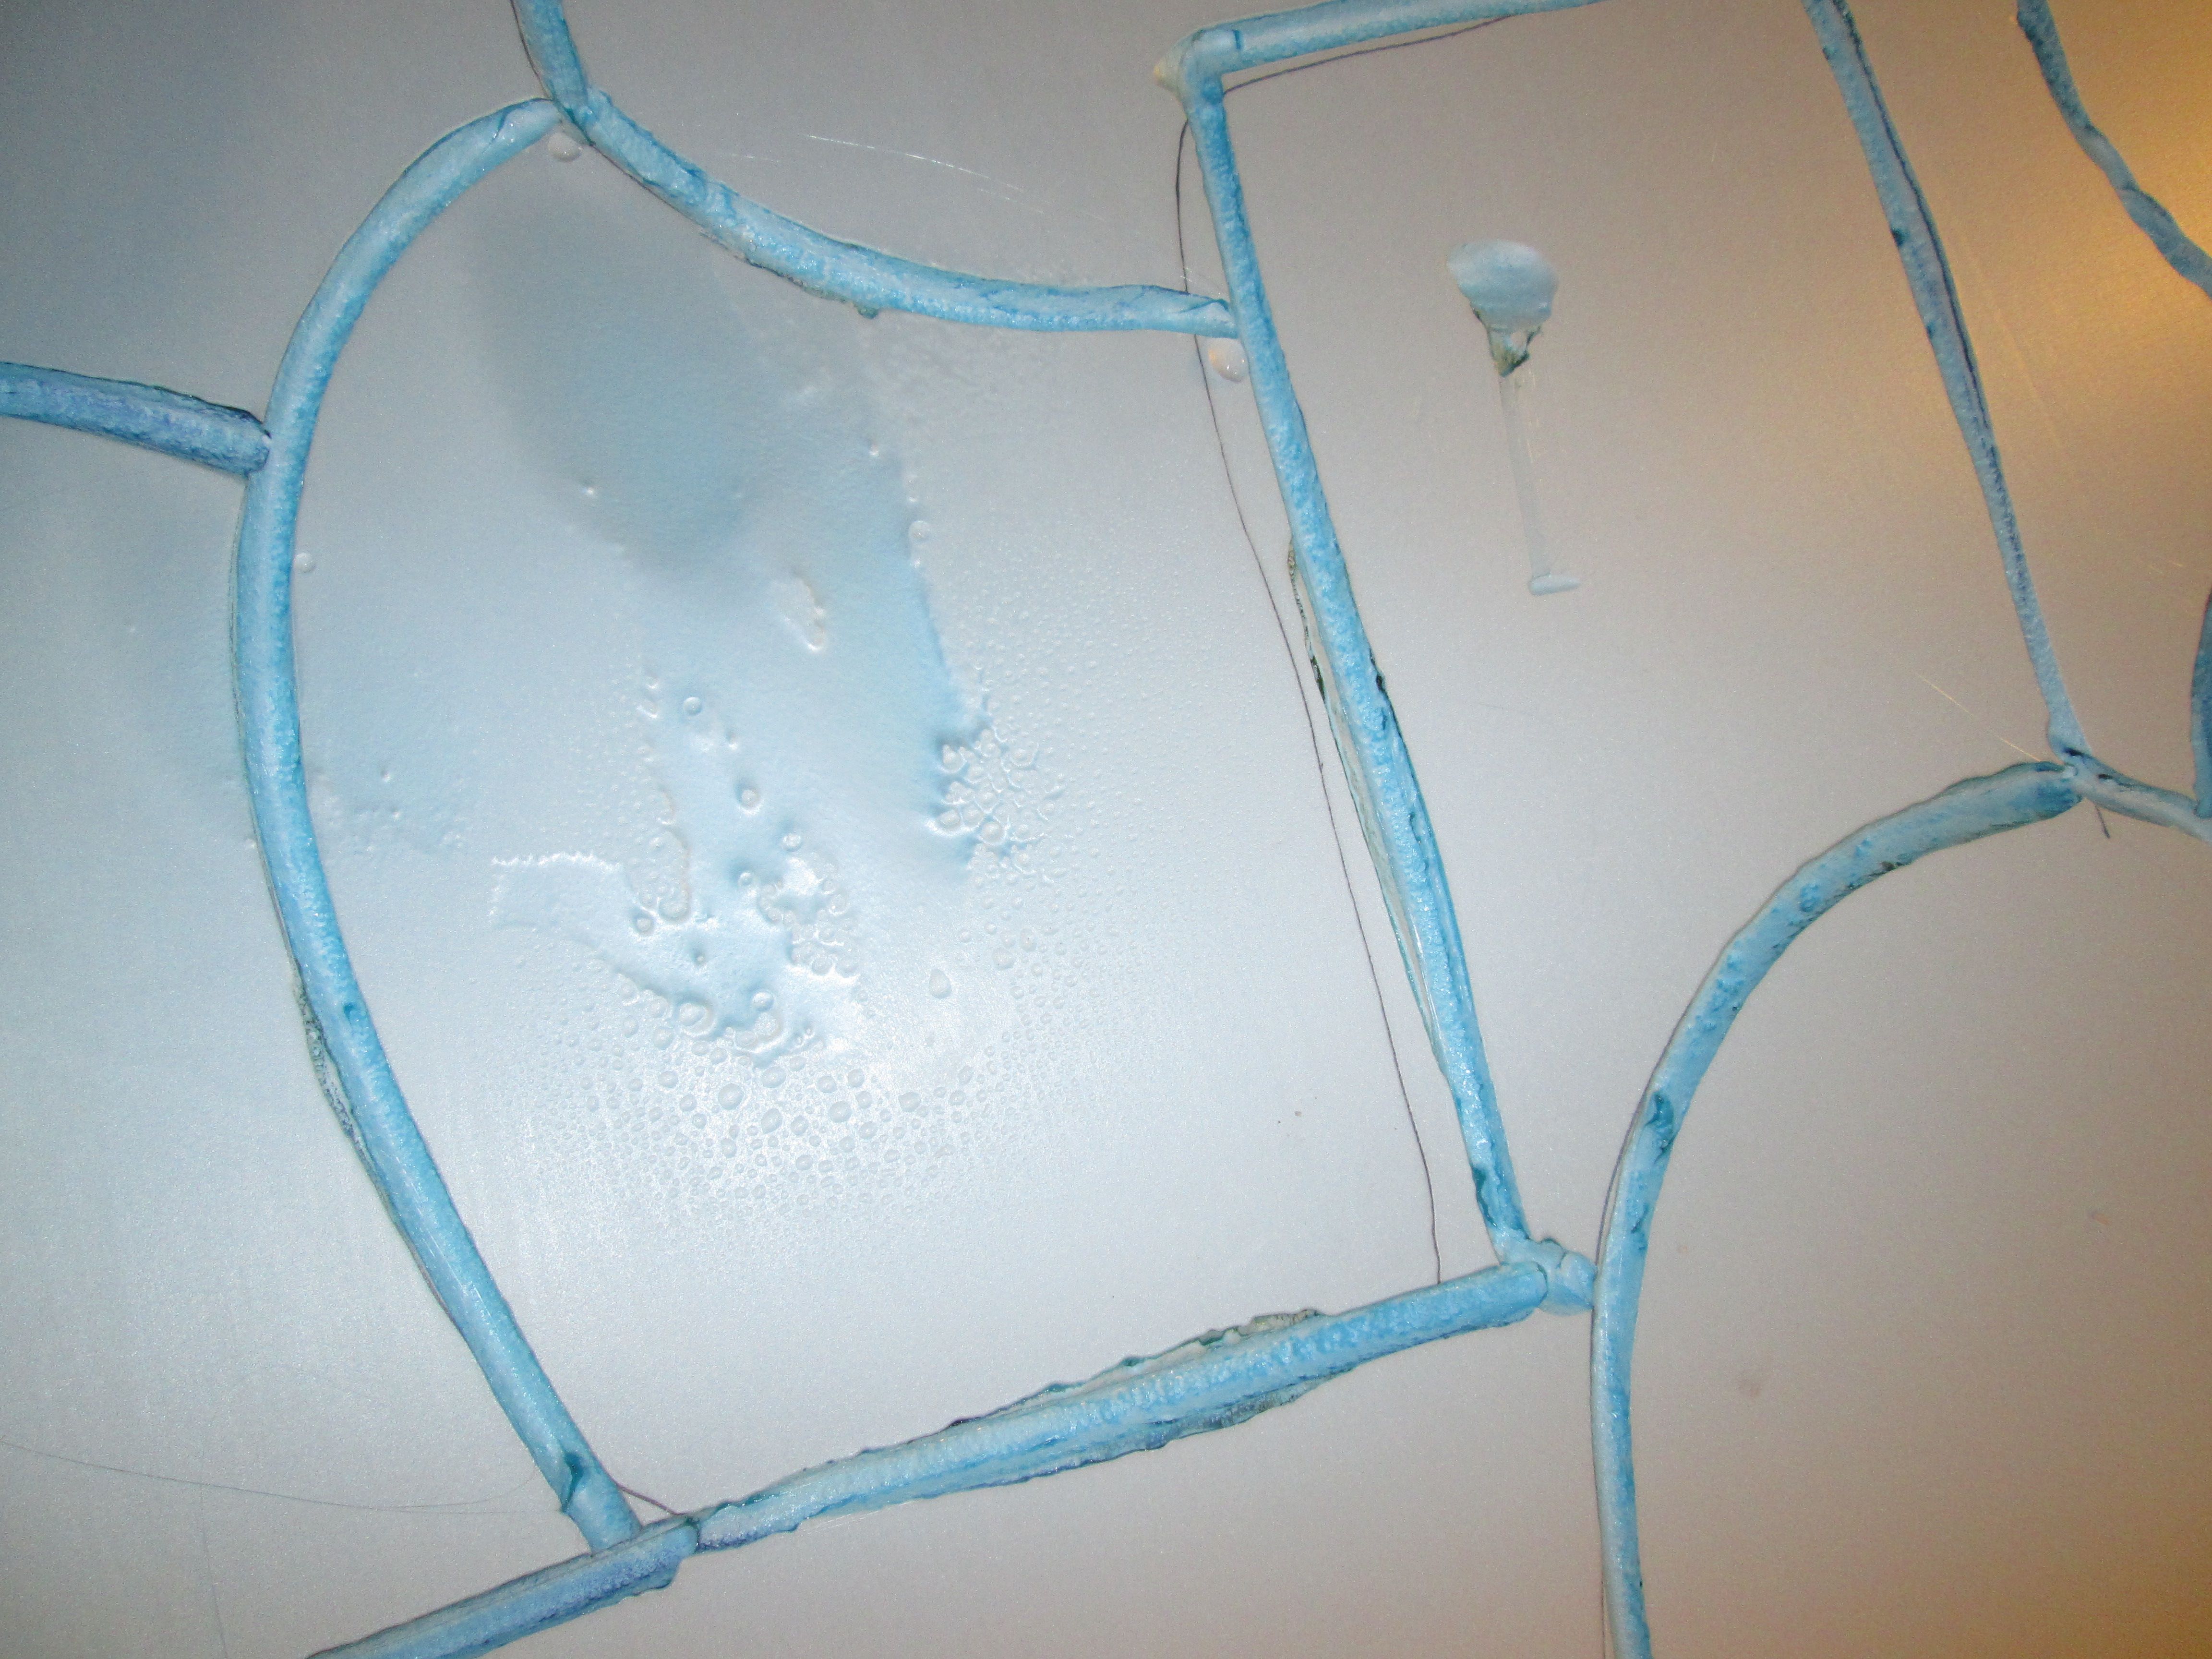
If you spray the water heavier, producing larger water drops and then almost “chase” them with your heat gun, you’ll get this look:
If you don’t use water at all, you’ll still melt the foam, but it’ll be smooth, like this:
Now, after you have your “stones” looking the way you want them to, it’s now time to paint the grout. I used a dark gray, but ran out, so on the last sheet, I used black and then brown. Each of these, at the very end, I sprayed white on them, so as to give them an old look. Plus, spraying the grout lines produces an overspray so it highlighted the stones the way I wanted.
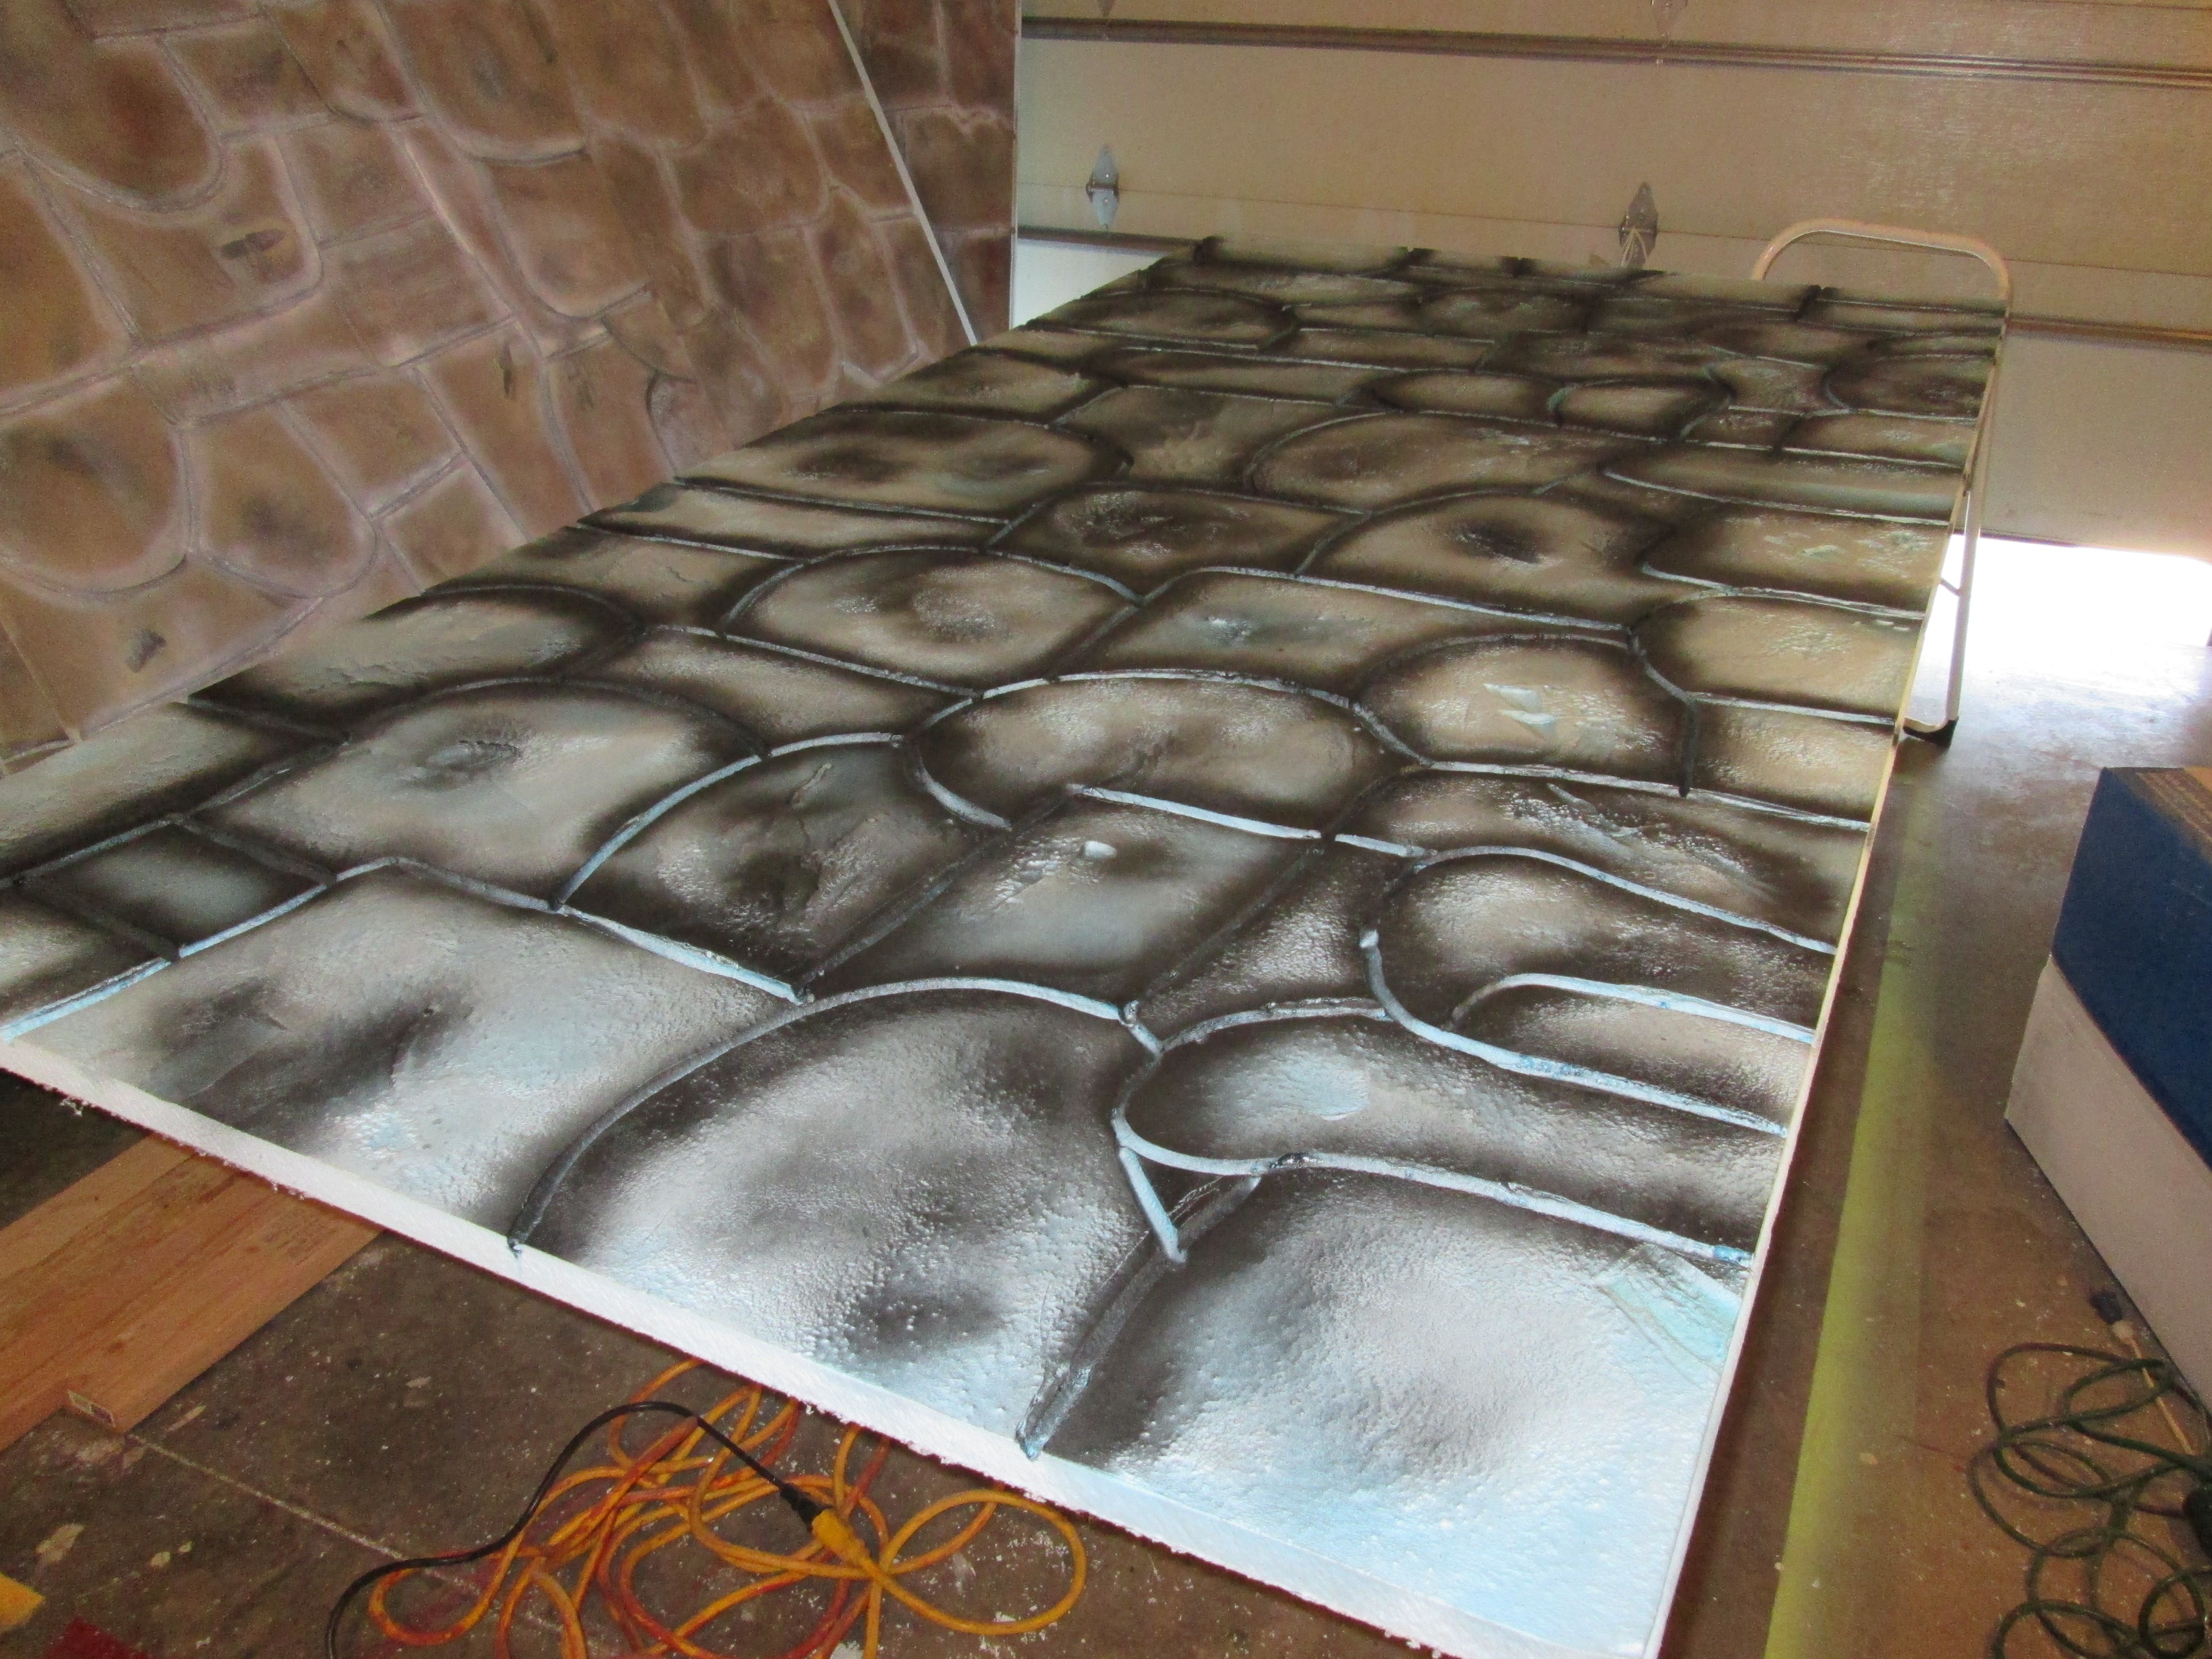
Now it’s time to play around with your colors. I wanted sand/brownish, so I used gray, brown, tan and almond to get the effect I wanted. The spray kindof does what the sponge would do. Spraying it about two feet away makes it mist and gave it highlights, giving the illusion of depth. Just start spraying your paint in layers. I also sprayed black in the deeper areas that I had distressed, and then highlighted the edges of those areas.
I also used some dark yellow and highlighted certain areas. That’s where I used a wet rag and dipped it in the yellow and then blotted it off.
Again, I ended the painting by spraying over my grout lines with white. I like the look it gave me.
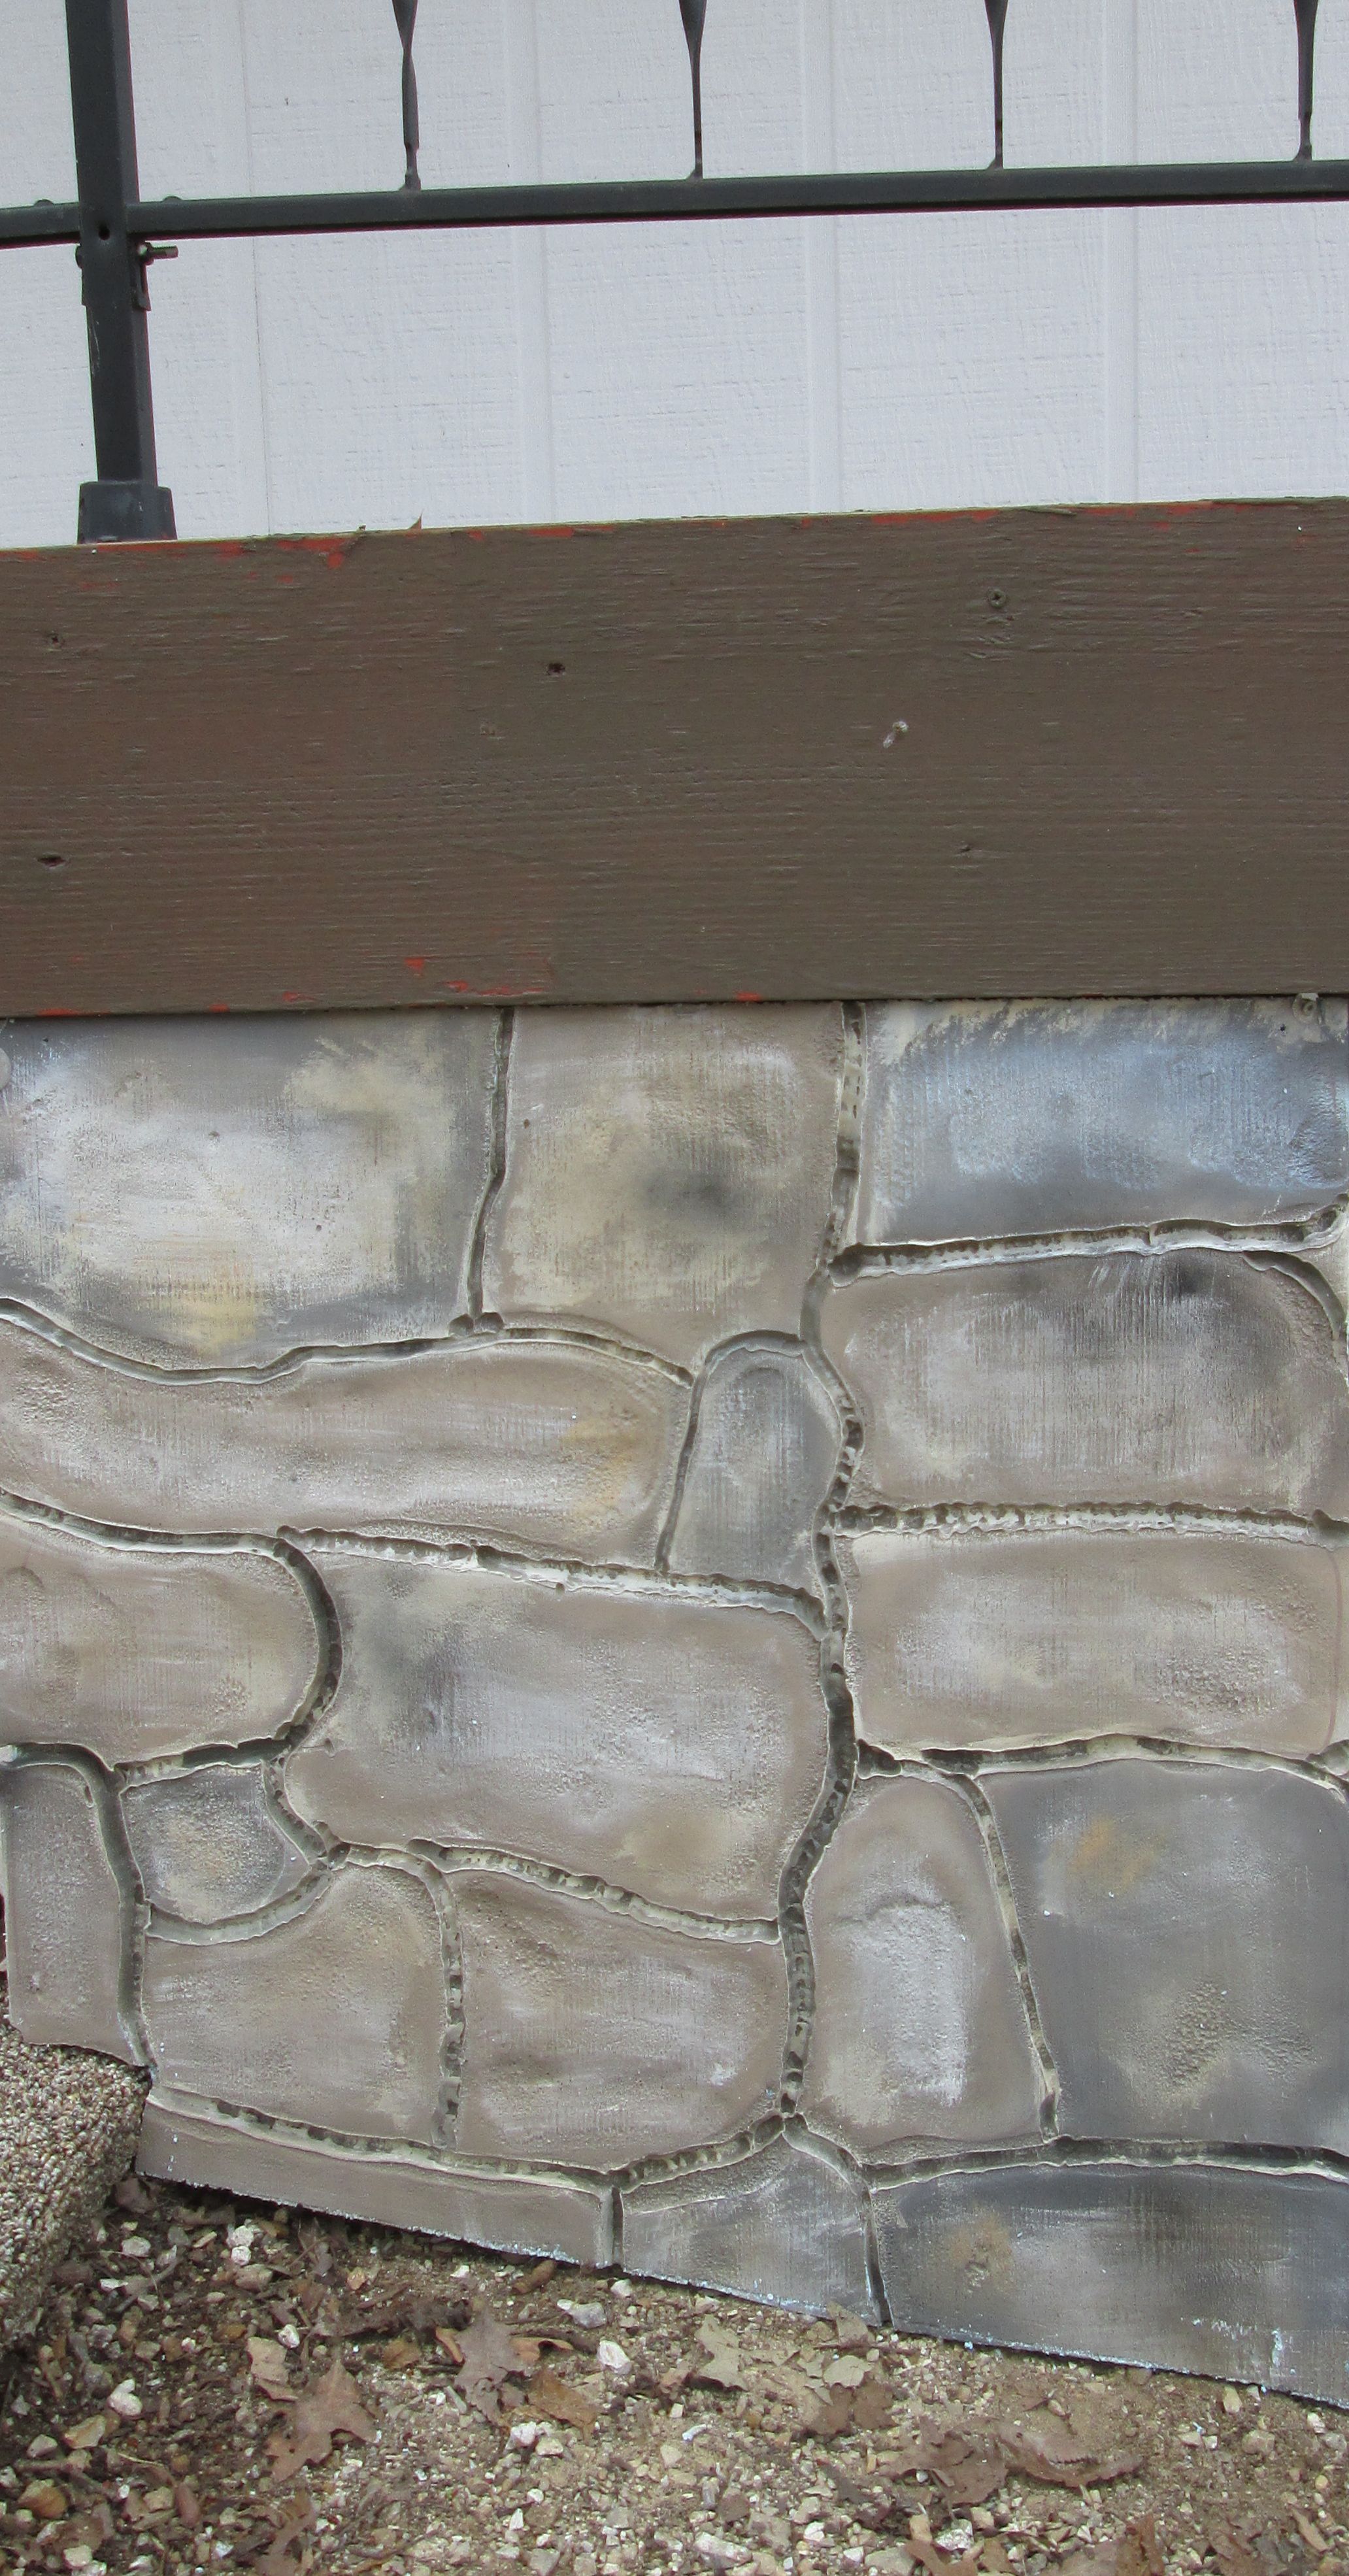
So, allll of this being said (whew, you actually made it to the end!), I installed one piece of it up at the lake. I’ll start putting the larger pieces up tomorrow. I’ll just attach the foam boards, after measuring and cutting them of course, and screw them using a screw and foam washer so the washer doesn’t go through the foam board. There’s no doubt, once you squirt the water and use the heat gun, it strengthens the foam a lot.
So here’s the one piece I was able to put up today. More pictures to come!
Awhile ago, during one of my bored days (I seem to have a LOT of those!), I thought hmmm….maybe I’ll paint something on the bottom of the white drapes up at the lake house.
I hope you all aren’t sick of hearing about “the lake house”. It needs so damned much, and has become my baby, of sorts. But there are days that I think “eh, I’m SICK of that POS Lake House!”.
Anyway, back to the point here.
These were boring:
What I needed for this quick and easy project was:
Tape. I like regular masking tape and I liked the thick width so I could actually use the tape as one of my “rows”.
Acrylic Paint. As many colors as stripes you’d like.
Fabric Medium. Mix this with each paint color so your fabric won’t be stiff.
I brought them home and lined them out. The biggest worry, of course, was making certain that the stripes would be even on each panel. I ended up not using a tape measure for fear that even a centimeter would easily show, so I used a box! Actually, a box of blank checks. The next I used the width of the tape.

After I taped off my stripes, the first coat of the first color:
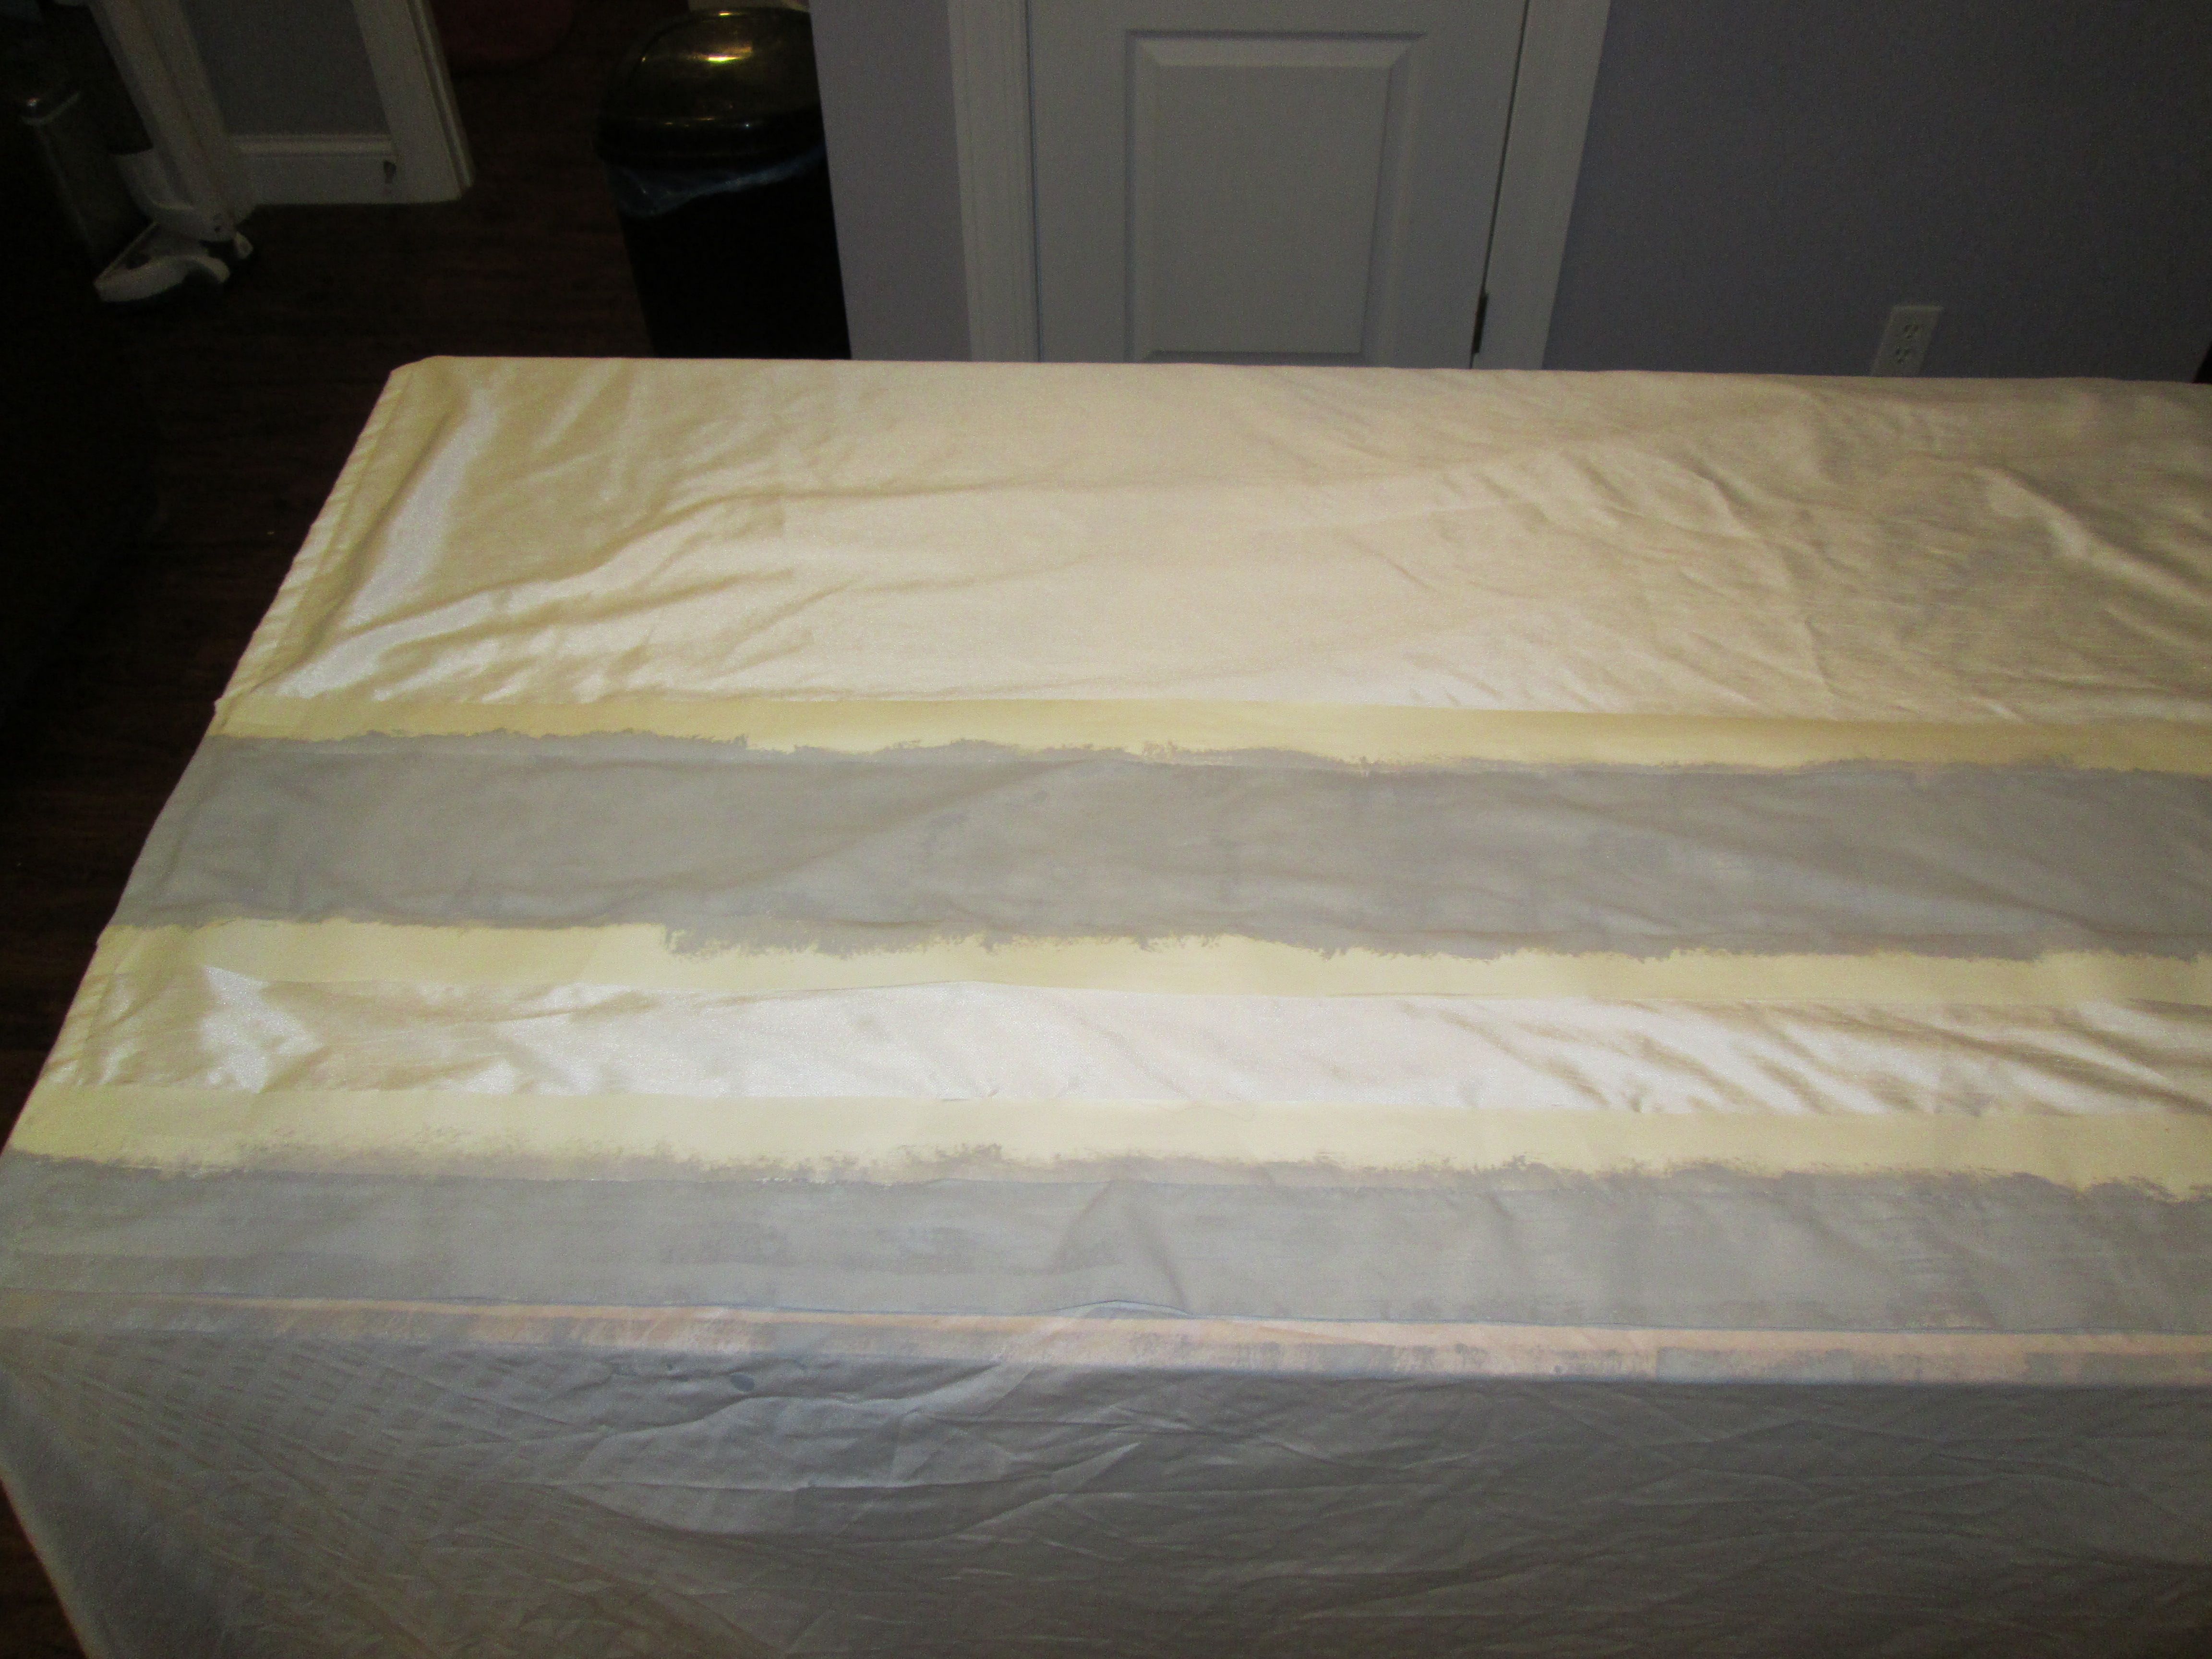
Then the last stripe
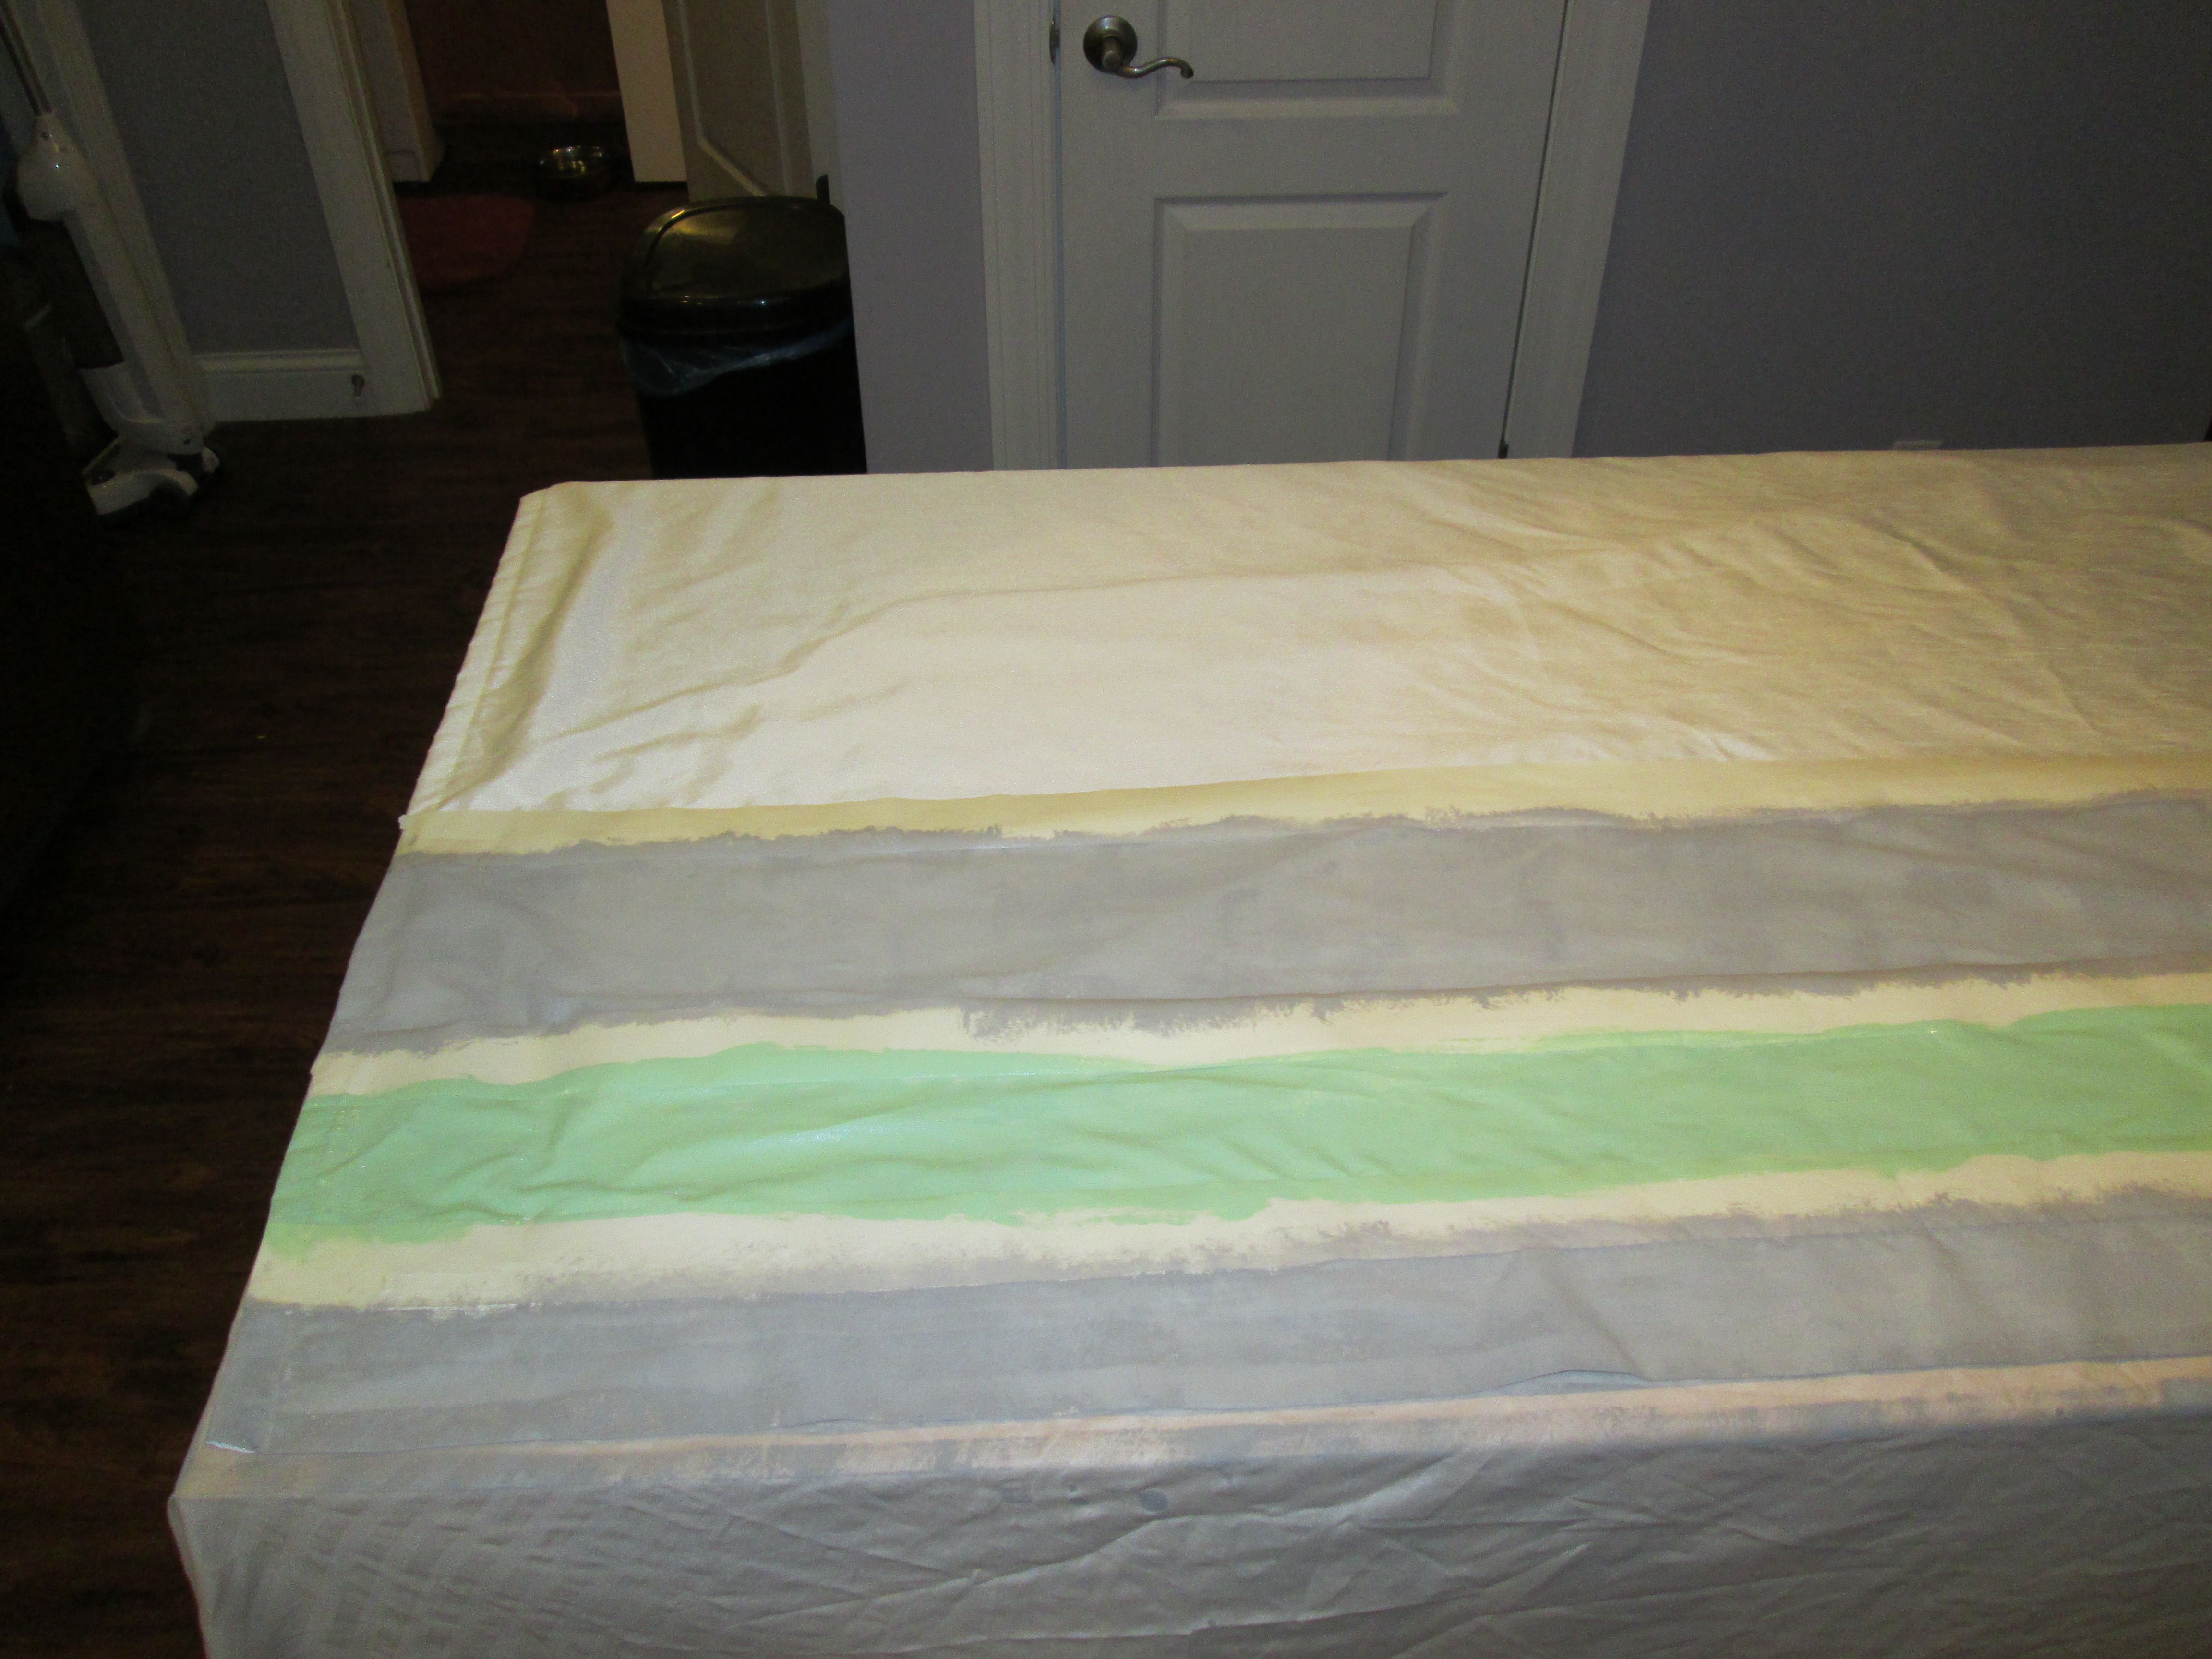
Pull off the tape and voila!
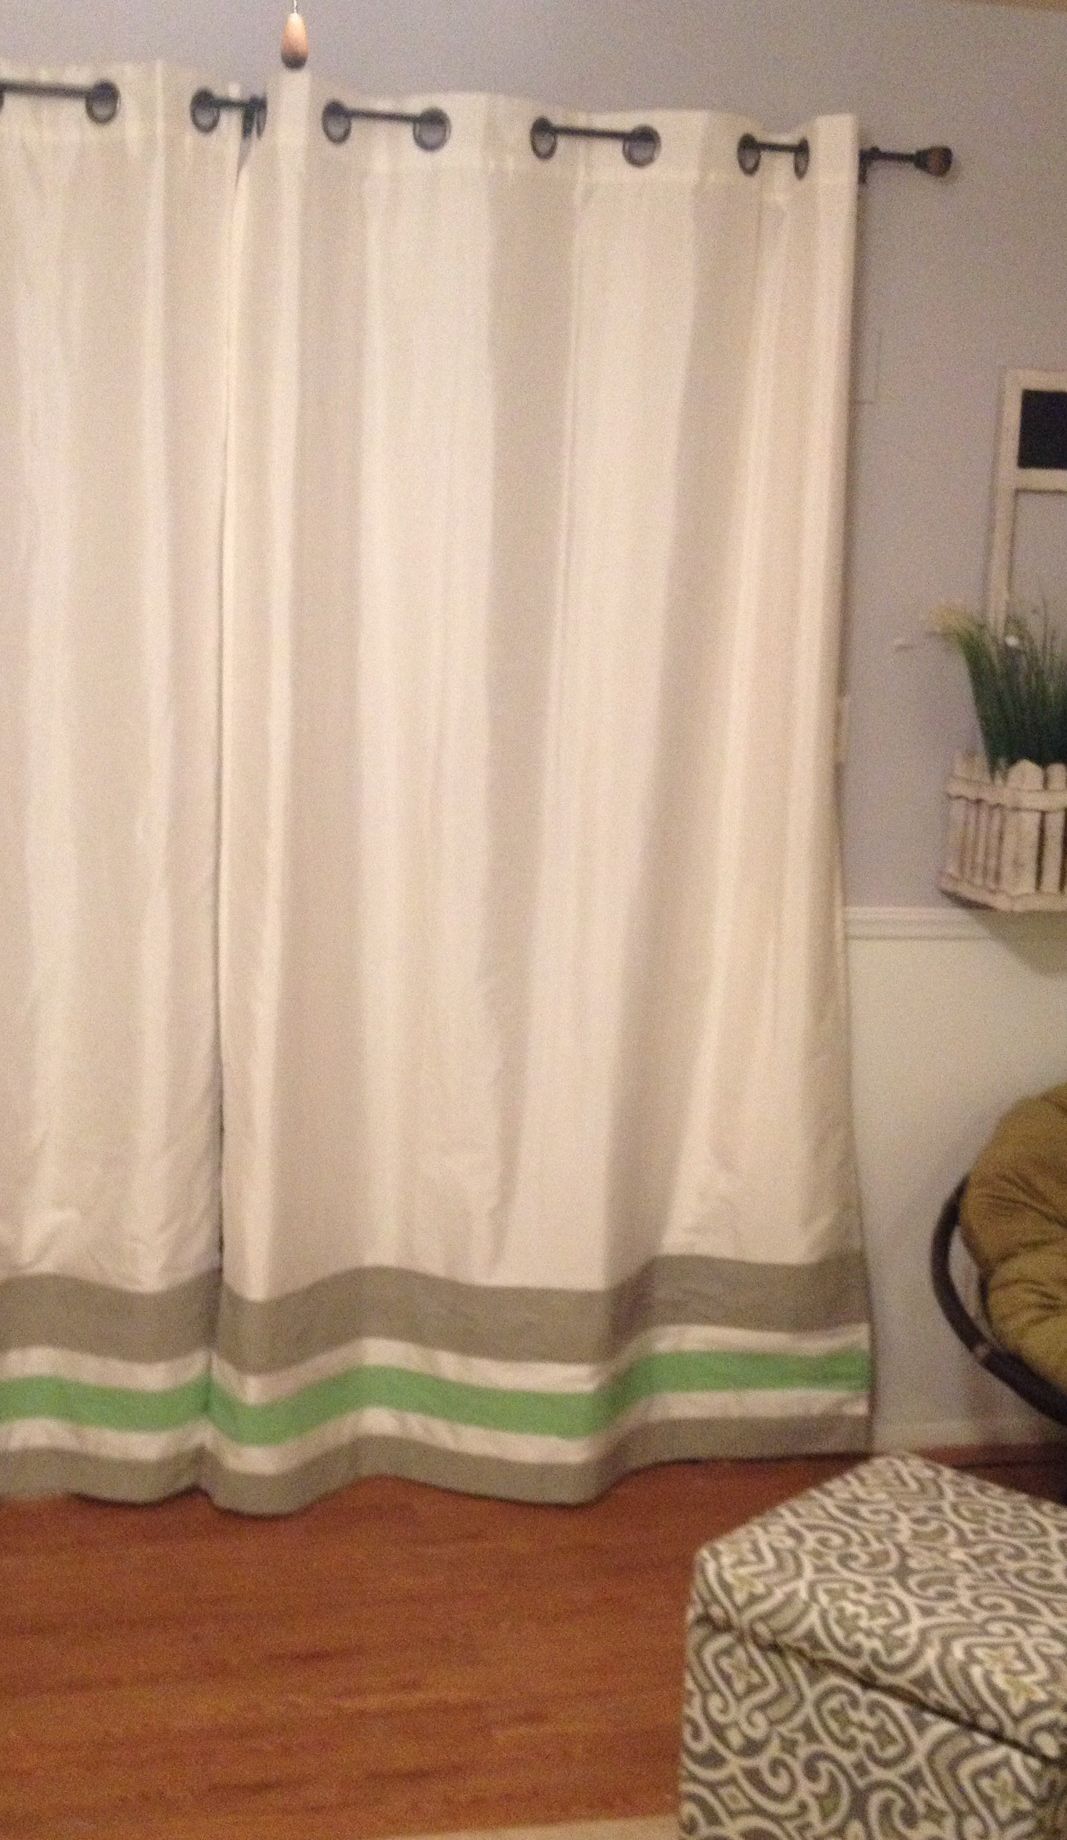
I apologize for the quality of the above photo, I took it with my iPad and also I had the drapes bunched up while we were working on the deck, so they’re wrinkled!
