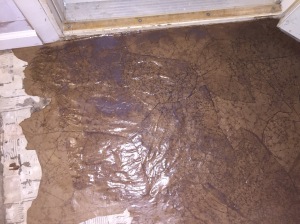
Yup, you read that right! Torn up paper bags, moistended with glue and water and voila, instant flooring that looks simply amazing.
After researching things quite a bit online and finding some great tips, I decided to give it a try on the cement floors of our lake house, aka The Guinia Pig Place, since whatever new i want to try, I try it there. So far, all of the projects have been total successes!
The paper bag flooring project was 1,000 sf. That’s quite a bit. What I did is tackle one room at a time each time we went up, so the project took me a lot longer than if I’d just stayed with it for a week or so. Regardless, it’s awesome!
As I tend to “talk too much”, let me just give the steps and then I’ll elaborate on them below:
- Brown paper purchased at Home Depot in very large rolls
- Vacuum well and clean your flooring
- Tear the paper in about 6-12″ pieces, using the straight edged pieces for the wall areas
- Squish the paper
- Get at least a gallon of Elmers Glue. Mix it 1:2 ratio; glue to water (those I watered down more sometimes)
- Dunk your pieces of wadded up paper in the glue mixture and wring out.
- Place on your floor and flatten out with your hand
- Let dry overnight
- Stain (I used Minwax Provencial, oil based)
Let dry and then come back with many coats of Polyeurathane. I used Minwax Polyacrylic water based
First, although you could use actual paper bags, it’s much easier to go buy a roll or two of brown paper at Home Depot ($11.99). I used three of those suckers in the house.
So tear the paper. And to be honest this was the part tht for me at least, was the most boring and after hours of tearing and wadding this stuff, my hands were tired! I’d start this part as we were watching tv.
Anyway, back to the point. Tear the paper any way you’d like. A lot of blogs suggested tearing them in stone like pieces, but although it was easy on some, most of the time i ended up with rectngles and squares. You don’t notice that at all! What i did was tear the sides of the paper, the straight sides, down the length of the paper so tht i could use the straight edges when applyig up against the walls. I wadded them up and put them in a separate trash bag. Then off to tearing and crinkling and tearing and wadding and…….til I thought I might lose my mind a few times. I put all those wadded up pieces in a diffferent trash bag.
I used Elmers Glue.. I wouldn’t use any other kind. I was able to find the gallon jugs of it for 14.99 at Ace. Home Depot was out of it every time I needed some, but definitely check since you’re goig to be buying your paper there. I used a 2:1 water to glue ratio, but after awhile, I stopped measuring, I just put a few “glugs” of the glue in and estimated the water I needed. I can say tht at the end, I was slpping tht damned paper down, not paying any attention to what I had done in the beginning and it looks exactly the same as the areas that I did all the right things!
I took my piece and dunked them in a bucket of the glue mixture and then rung them out by hand. You want it saturated, but not too dripping with glue. Overlap your pieces about an inch or so. Again, be random, it’s not going to show.
Let this dry overnight. Or as long as need be. You can tell when it’s dry. Many blogs only had instructions for putting this over a wood subfloor, so this was new territory. I did not seal our floors first, nothing. I vacuumed and mopped…..a little… This stuff went and stayed down PERFECTLY. No doubt, you will see that leather look and it is simply amazing.
Here it is after the paper dried, before the staining.

Next what I did was stain the paper flooring. You can leave it natural, but I wanted something a little darker. Not to mention that when you put the stain on, it really brings out the wrinkles, which is what makes it look like leather. What I’d do, in order to give myself a walking path throughout the house, is glue one section, say a 10’x10′ section, let it dry, and then stain it and begin a new section. You can’t tell where I stopped and then started again at all. This proect is very, very forgiving. Ahh…my kinda project!
After the stained paper was dry, which took about 8 hours, longer than I had initially thought it would take, you can apply your polyurethane. Now, I used an oil based stain and a water based poly. No problem at all and was suggested by others as well. I put 5-10 coats on. It dries so quickly tht it doesn’t take long. The less amount of coats was only due to needing to move on in the project. You can always go back and reapply more.
I got a little concerned when, after applying the poly, it started to wrinkel. Rest assured, it’ll dry smooth again.
So when it’s all said and done, this is what you are going to get.


